Your browser does not seem to support JavaScript. As a result, your viewing experience will be diminished, and you have been placed in read-only mode.
Please download a browser that supports JavaScript, or enable it if it's disabled (i.e. NoScript).
rigger
Hi,in another post I found a way to achieve my goal of converting the coordinate position to camera space and then scaling it to a small size so that he appears first.
this is new code:
def Draw(self,op, drawpass, bd, bh):


    if not op[c4d.S_MOTIONTRAIL_GTWO_DRAWENABLE]:
        return c4d.DRAWRESULT_OK
    #bd.SetMatrix_Matrix(None, c4d.Matrix())
    pmg = ~bd.GetMg()
    bd.SetMatrix_Camera()

    all_pos = self.parameters['all_pos']
    color_lis = self.parameters['color_lis']
    point_size = op[c4d.S_MOTIONTRAIL_GTWO_POINTSIZE]
    bd.SetPointSize(point_size)
    for per_pos,color in zip(all_pos,color_lis):
        bd.SetPen(color)
        cnt = len(per_pos)
        temp_lis = []
        for i in xrange(cnt-1):
            c = (pmg * per_pos[i]).GetNormalized() * 20
            f = (pmg * per_pos[i+1]).GetNormalized() * 20
            bd.DrawLine(c,f,c4d.NOCLIP_D)
            temp_lis.append(c)
        temp_lis.append(f)
        bd.DrawPoints(temp_lis)


    return c4d.DRAWRESULT_OK
why * 20 will work, * 1or 2 not work (c = (pmg * per_pos[i]).GetNormalized() * 20)?
I found a solution in other posts, and this is an video example:
example code: import c4d from c4d import bitmaps,gui class DraggingArea(c4d.gui.GeUserArea): def __init__(self): self.startx = 0 self.starty = 0 def DrawMsg(self, x1, y1, x2, y2, msg): # Initializes draw region self.OffScreenOn() self.SetClippingRegion(x1, y1, x2, y2) icon_bmp = bitmaps.InitResourceBitmap(5159) icon_clip = bitmaps.GeClipMap() icon_clip.InitWithBitmap(icon_bmp,icon_bmp.GetInternalChannel()) clip = bitmaps.GeClipMap() w,h = self.GetWidth(),self.GetHeight() clip.Init(w,h) clip.BeginDraw() clip.SetColor(0,0,180) clip.FillRect(0,0,w,int(h*0.4)) clip.SetColor(180,0,0) clip.FillRect(0,int(h*0.4),w,h) clip.SetDrawMode(c4d.GE_CM_DRAWMODE_BLEND,255) clip.Blit(self.startx,self.starty,icon_clip,0,0,icon_clip.GetBw(),icon_clip.GetBh(),c4d.GE_CM_BLIT_COL) clip.EndDraw() # Get default Background color bmp = clip.GetBitmap() self.DrawBitmap(bmp,0,0,w,h,0,0,w,h,c4d.BMP_NORMAL) def InputEvent(self, msg): """ Called by Cinema 4D, when there is a user interaction (click) on the GeUserArea. This is the place to catch and handle drag interaction. :param msg: The event container. :type msg: c4d.BaseContainer :return: True if the event was handled, otherwise False. :rtype: bool """ # Do nothing if its not a left mouse click event if msg[c4d.BFM_INPUT_DEVICE] != c4d.BFM_INPUT_MOUSE and msg[c4d.BFM_INPUT_CHANNEL] != c4d.BFM_INPUT_MOUSELEFT: return True # Retrieves the initial position of the click mouseX = msg[c4d.BFM_INPUT_X] mouseY = msg[c4d.BFM_INPUT_Y] mouse_pos_dict = self.Global2Local() x, y = mouse_pos_dict['x'] + msg.GetInt32(c4d.BFM_INPUT_X), mouse_pos_dict['y'] + msg.GetInt32( c4d.BFM_INPUT_Y) self.startx = x self.starty = y # Initializes the start of the dragging process (needs to be initialized with the original mouseX, mouseY). self.MouseDragStart(c4d.KEY_MLEFT, mouseX, mouseY, c4d.MOUSEDRAGFLAGS_DONTHIDEMOUSE | c4d.MOUSEDRAGFLAGS_NOMOVE) isFirstTick = True # MouseDrag needs to be called all time to update information about the current drag process. # This allow to catch when the mouse is released and leave the infinite loop. while True: # Updates the current mouse information result, deltaX, deltaY, channels = self.MouseDrag() if result != c4d.MOUSEDRAGRESULT_CONTINUE: break # The first tick is ignored as deltaX/Y include the mouse clicking behavior with a deltaX/Y always equal to 4.0. # However it can be useful to do some initialization or even trigger single click event if isFirstTick: isFirstTick = False continue # If the mouse didn't move, don't need to do anything if deltaX == 0.0 and deltaY == 0.0: continue # Updates mouse position with the updated delta mouseX -= deltaX mouseY -= deltaY x -= deltaX y -= deltaY self.startx = int(x) self.starty = int(y) # Redraw the GeUserArea (it will call DrawMsg) self.Redraw() # Asks why we leave the while loop endState = self.MouseDragEnd() return True class MyDialog(c4d.gui.GeDialog): """ Creates a Dialog with only a GeUserArea within. """ def __init__(self): # It's important to stores our Python implementation instance of the GeUserArea in class variable, # This way we are sure the GeUserArea instance live as long as the GeDialog. self.area = DraggingArea() def CreateLayout(self): """ This method is called automatically when Cinema 4D Create the Layout (display) of the Dialog. """ self.AddUserArea(1000, c4d.BFH_SCALEFIT | c4d.BFV_SCALEFIT) self.AttachUserArea(self.area, 1000) return True def main(): # Creates a new dialog dialog = MyDialog() # Opens it dialog.Open(dlgtype=c4d.DLG_TYPE_MODAL_RESIZEABLE, defaultw=500, defaulth=500) if __name__ == '__main__': main()
example code:
import c4d

from c4d import bitmaps,gui


class DraggingArea(c4d.gui.GeUserArea):
    def __init__(self):
        self.startx = 0
        self.starty = 0

    def DrawMsg(self, x1, y1, x2, y2, msg):


        # Initializes draw region
        self.OffScreenOn()
        self.SetClippingRegion(x1, y1, x2, y2)
        icon_bmp = bitmaps.InitResourceBitmap(5159)
        icon_clip = bitmaps.GeClipMap()
        icon_clip.InitWithBitmap(icon_bmp,icon_bmp.GetInternalChannel())

        clip = bitmaps.GeClipMap()
        w,h = self.GetWidth(),self.GetHeight()
        clip.Init(w,h)
        clip.BeginDraw()
        clip.SetColor(0,0,180)
        clip.FillRect(0,0,w,int(h*0.4))
        clip.SetColor(180,0,0)
        clip.FillRect(0,int(h*0.4),w,h)

        clip.SetDrawMode(c4d.GE_CM_DRAWMODE_BLEND,255)
        clip.Blit(self.startx,self.starty,icon_clip,0,0,icon_clip.GetBw(),icon_clip.GetBh(),c4d.GE_CM_BLIT_COL)


        clip.EndDraw()
        # Get default Background color
        bmp = clip.GetBitmap()
        self.DrawBitmap(bmp,0,0,w,h,0,0,w,h,c4d.BMP_NORMAL)


    def InputEvent(self, msg):
        """
        Called by Cinema 4D, when there is a user interaction (click) on the GeUserArea.
        This is the place to catch and handle drag interaction.

        :param msg: The event container.
        :type msg: c4d.BaseContainer
        :return: True if the event was handled, otherwise False.
        :rtype: bool
        """
        # Do nothing if its not a left mouse click event
        if msg[c4d.BFM_INPUT_DEVICE] != c4d.BFM_INPUT_MOUSE and msg[c4d.BFM_INPUT_CHANNEL] != c4d.BFM_INPUT_MOUSELEFT:
            return True

        # Retrieves the initial position of the click
        mouseX = msg[c4d.BFM_INPUT_X]
        mouseY = msg[c4d.BFM_INPUT_Y]
        mouse_pos_dict = self.Global2Local()
        x, y = mouse_pos_dict['x'] + msg.GetInt32(c4d.BFM_INPUT_X), mouse_pos_dict['y'] + msg.GetInt32(
            c4d.BFM_INPUT_Y)
        self.startx = x
        self.starty = y

        # Initializes the start of the dragging process (needs to be initialized with the original mouseX, mouseY).
        self.MouseDragStart(c4d.KEY_MLEFT, mouseX, mouseY, c4d.MOUSEDRAGFLAGS_DONTHIDEMOUSE | c4d.MOUSEDRAGFLAGS_NOMOVE)
        isFirstTick = True

        # MouseDrag needs to be called all time to update information about the current drag process.
        # This allow to catch when the mouse is released and leave the infinite loop.
        while True:

            # Updates the current mouse information
            result, deltaX, deltaY, channels = self.MouseDrag()
            if result != c4d.MOUSEDRAGRESULT_CONTINUE:
                break

            # The first tick is ignored as deltaX/Y include the mouse clicking behavior with a deltaX/Y always equal to 4.0.
            # However it can be useful to do some initialization or even trigger single click event
            if isFirstTick:
                isFirstTick = False
                continue

            # If the mouse didn't move, don't need to do anything
            if deltaX == 0.0 and deltaY == 0.0:
                continue

            # Updates mouse position with the updated delta
            mouseX -= deltaX
            mouseY -= deltaY
            x -= deltaX
            y -= deltaY
            self.startx = int(x)
            self.starty = int(y)


            # Redraw the GeUserArea (it will call DrawMsg)
            self.Redraw()

        # Asks why we leave the while loop
        endState = self.MouseDragEnd()


        return True


class MyDialog(c4d.gui.GeDialog):
    """
    Creates a Dialog with only a GeUserArea within.
    """

    def __init__(self):
        # It's important to stores our Python implementation instance of the GeUserArea in class variable,
        # This way we are sure the GeUserArea instance live as long as the GeDialog.
        self.area = DraggingArea()

    def CreateLayout(self):
        """
        This method is called automatically when Cinema 4D Create the Layout (display) of the Dialog.
        """
        self.AddUserArea(1000, c4d.BFH_SCALEFIT | c4d.BFV_SCALEFIT)
        self.AttachUserArea(self.area, 1000)
        return True


def main():
    # Creates a new dialog
    dialog = MyDialog()

    # Opens it
    dialog.Open(dlgtype=c4d.DLG_TYPE_MODAL_RESIZEABLE, defaultw=500, defaulth=500)


if __name__ == '__main__':
    main()
@gheyret Thanks for your help! i use "c4d.CallCommand(12147) # Redraw" to replace c4d.EventAdd() or c4d.Redraw(), it also work!
change code:
        if id == 1001:
            for obj in doc.GetObjects():
                obj.ChangeNBit(c4d.NBIT_EHIDE,c4d.NBITCONTROL_CLEAR)
            c4d.CallCommand(12147) # Redraw
            return True
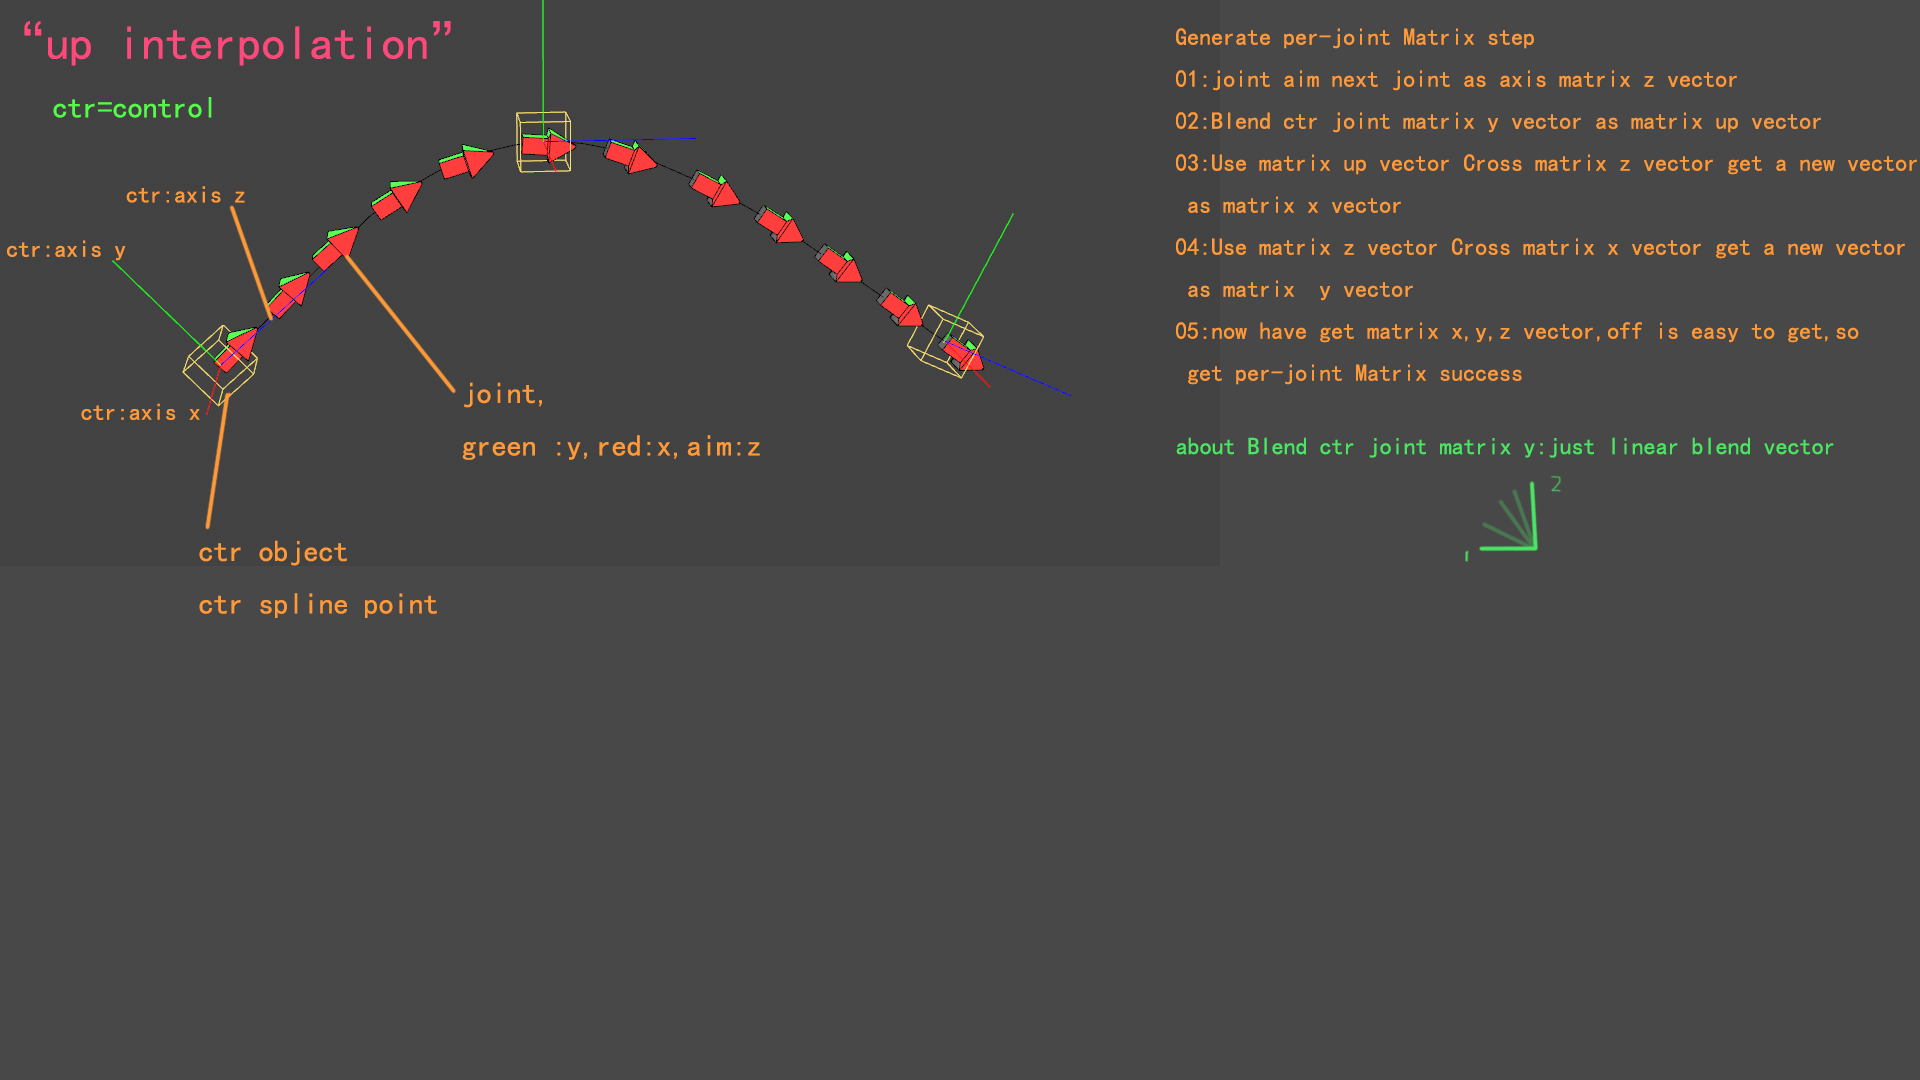
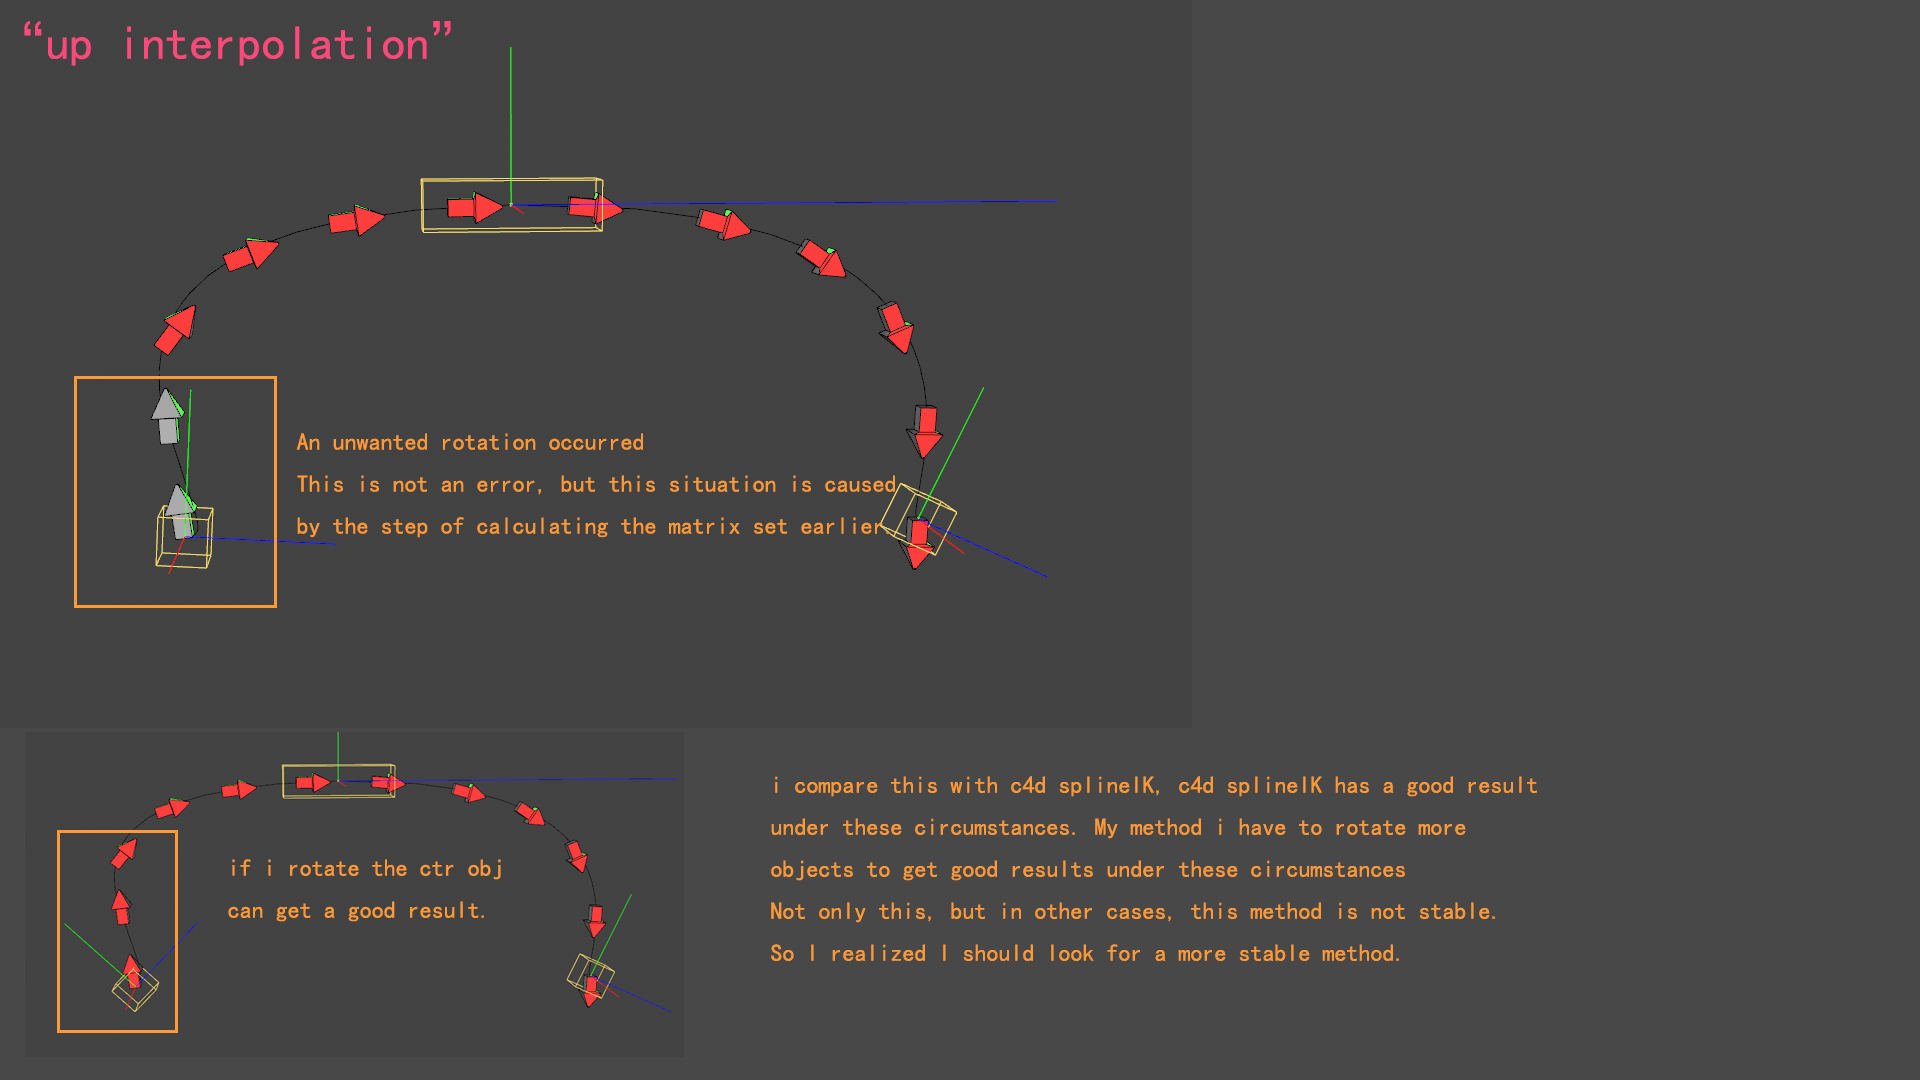
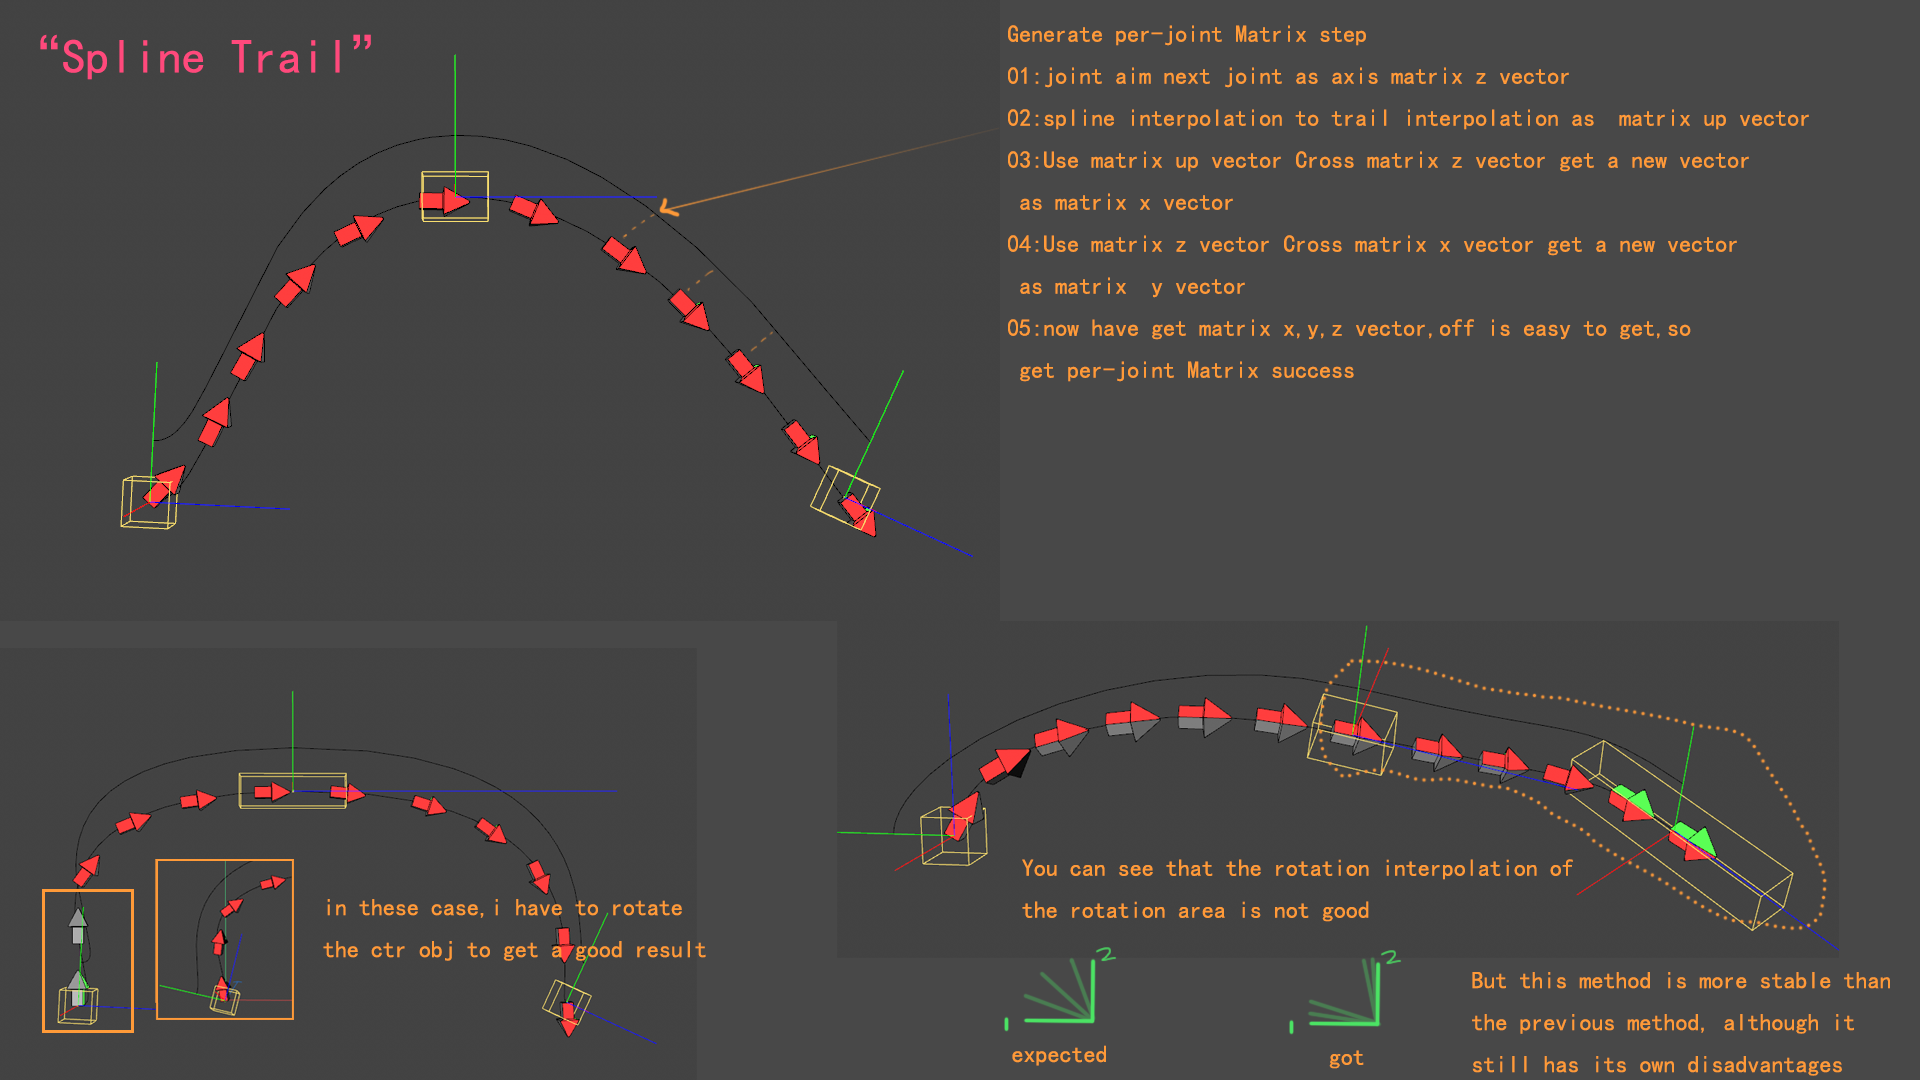
@r_gigante @zipit The detailed explanation is shown below “up interpolattion” Try use "spline trail"
I read some papers, but always been very slow, just only expanded know, such as Frenet–Serret formulas etc. But I did not directly find a better way to replace my current method, and I have been looking for it.
Computation of Rotation Minimizing Frames This seems to be a good paper, I will read it carefully.
@m_adam Thank you for your team's reply. I will share my exploration in this post in the future.
The problem has been resolved, reinstall the graphics driver and perform a custom clean installation!
try use GetDirty(DIRTYFLAGS_CACHE),compare last dirty and current dirty
@i_mazlov Thank you for your detailed reply, it was really helpful! The following video shows the results, which work well. The blue polygon uses GetPolyPointST()
Hi, you can read this thread
Hi @i_mazlov Through exploring these two pages,page1,page2, I have converted them into Python code Inverse_Bilinear_Interpolation(), which can replace GetPolyPointST(). I am not sure why GetPolyPointST() may obtain incorrect values in certain situations, but Inverse_Bilinear_Interpolation() does not go wrong in complex situations.
video use Inverse_Bilinear_Interpolation() code: import math # algorithm_InverseBilinearInterpolation 逆双线性插值 的算法 def Wedge2D(v:c4d.Vector,w:c4d.Vector): return v[0] * w[1] - v[1] * w[0] def Inverse_Bilinear_Interpolation(p:c4d.Vector,p0:c4d.Vector,p1:c4d.Vector,p3:c4d.Vector,p2:c4d.Vector): """ 注意对点顺序的定义 Attention : points Order p2 --- p3 | | | | p0 --- p1 """ q = p - p0 b1 = p1 - p0 b2 = p2 - p0 b3 = p0 - p1 - p2 + p3 A = Wedge2D(b2,b3) B = Wedge2D(b3,q) - Wedge2D(b1,b2) C = Wedge2D(b1,q) # 求V - solve v if abs(A) < 0.00000001: v = -C / B else: discrim = B * B - 4.0 * A * C v = 0.5 * (-B - math.sqrt(discrim)) / A # CCW #v = 0.5 * (-B + math.sqrt(discrim)) / A # CW # 求 u - solve u denom = b1 + v * b3 if abs(denom[0]) > abs(denom[1]): u = (q[0] - b2[0] * v) / denom[0] else: u = (q[1] - b2[1] * v) / denom[1] return u,v # example use CPolygon point position a,b,c,d, and point p in quard(CPolygon) # u,v = Inverse_Bilinear_Interpolation(p,a,b,c,d) sample file: custom-quadrilateral.c4d But for the code part, there are still some doubts about the difference between CCW and CW. When I understand what's going on, I will come back and reply. If any friend can explain, that's the best!
code:
import math


# algorithm_InverseBilinearInterpolation 逆双线性插值 的算法

def Wedge2D(v:c4d.Vector,w:c4d.Vector):
    return v[0] * w[1] - v[1] * w[0]

def Inverse_Bilinear_Interpolation(p:c4d.Vector,p0:c4d.Vector,p1:c4d.Vector,p3:c4d.Vector,p2:c4d.Vector):

    """
    注意对点顺序的定义
    Attention :  points Order

    p2 --- p3
    |      |
    |      |
    p0 --- p1

    """

    q = p - p0
    b1 = p1 - p0
    b2 = p2 - p0
    b3 = p0 - p1 - p2 + p3

    A = Wedge2D(b2,b3)
    B = Wedge2D(b3,q) - Wedge2D(b1,b2)
    C = Wedge2D(b1,q)
    # 求V - solve v
    if abs(A) < 0.00000001:
        v = -C / B
    else:
        discrim = B * B - 4.0 * A * C
        v = 0.5 * (-B - math.sqrt(discrim)) / A  # CCW
        #v = 0.5 * (-B + math.sqrt(discrim)) / A  # CW

    # 求 u - solve u
    denom = b1 + v * b3

    if abs(denom[0]) > abs(denom[1]):
        u = (q[0] - b2[0] * v) / denom[0]
    else:
        u = (q[1] - b2[1] * v) / denom[1]

    return u,v
# example use CPolygon point position a,b,c,d, and point p in quard(CPolygon)
# u,v = Inverse_Bilinear_Interpolation(p,a,b,c,d)
sample file: custom-quadrilateral.c4d
But for the code part, there are still some doubts about the difference between CCW and CW. When I understand what's going on, I will come back and reply. If any friend can explain, that's the best!
@ferdinand Thanks for help
Hi in Dope Sheet -F-Curve mode,i change CTrack NBit(c4d.NBIT_TL1_SELECT2) ,(selection State),the window will not refresh immediately.
After selection state change, how can I make the window refresh in real time
import c4d

def main() -> None:

    for track in op.GetCTracks():
        track.ChangeNBit(c4d.NBIT_TL1_SELECT2,c4d.NBITCONTROL_SET)

    c4d.EventAdd()


if __name__ == '__main__':
    main()
Thanks for any help!
@ferdinand Thank you. hope this can be updated in the document
Hi @ferdinand , in .res file, how to set InExcludeData IN_EXCLUDE_FLAG_SEND_SELCHANGE_MSG is True? in c++ API doc,there no this flags for IN_EXCLUDE_FLAG_SEND_SELCHANGE_MSG
Supplement an example of generating UserData using code:
import c4d


def main() -> None:


    bc = c4d.GetCustomDataTypeDefault(c4d.CUSTOMDATATYPE_INEXCLUDE_LIST)
    bc[c4d.DESC_NAME] = "Test"
    bc[c4d.IN_EXCLUDE_FLAG_SEND_SELCHANGE_MSG] = True
    did = op.AddUserData(bc)
    c4d.EventAdd()

if __name__ == '__main__':
    main()
@ferdinand Thanks,it works!
Hi, i use this script code to detect obj selected in InExcludeData(),always return "None"
import c4d

doc: c4d.documents.BaseDocument  # The currently active document.
op: c4d.BaseObject | None  # The primary selected object in `doc`. Can be `None`.

def main() -> None:
    ie = op[c4d.ID_USERDATA,1]
    for i in range(ie.GetObjectCount()):
        print(ie.GetData(i)[c4d.IN_EXCLUDE_DATA_SELECTION])

if __name__ == '__main__':
    main()
i found a example code in this post,but it also not work.
@ferdinand Thanks for reply Other channels(BOX,X-Ray....) also seem to be unfeasible, and currently it seems only can accept this limitation (affected by depth of field) Due to the current not to transfer to C++, some plugin ideas are indeed somewhat unusual only using some simple C4D drawings to generate Bitmaps, so I did not pay attention to the handling of Ocio. I will carefully read the manual on this aspect in the document.
@ferdinand Thanks, DRAWPASS::HANDLES There is a limitation that only displays when I select the object, and my goal is to keep it displayed (select or not select) code:
    def Draw(self,op, drawpass, bd, bh):


        if drawpass == c4d.DRAWPASS_OBJECT:
            #draw
            bd.SetMatrix_Screen()

            window_dict = bd.GetSafeFrame()

            bd.SetLightList(c4d.BDRAW_SETLIGHTLIST_NOLIGHTS)
            # set uv ... info
            uvadr = [c4d.Vector(), c4d.Vector(), c4d.Vector(), c4d.Vector()]
            uvadr[1] = c4d.Vector(1, 0, 0)
            uvadr[2] = c4d.Vector(1, 1, 0)
            uvadr[3] = c4d.Vector(0, 1, 0)
            padr = [c4d.Vector(), c4d.Vector(), c4d.Vector(), c4d.Vector()]
            padr[0] = c4d.Vector(window_dict['cl'], window_dict['ct'], 0)
            padr[1] = c4d.Vector(window_dict['cr'], window_dict['ct'], 0)
            padr[2] = c4d.Vector(window_dict['cr'], window_dict['cb'], 0)
            padr[3] = c4d.Vector(window_dict['cl'], window_dict['cb'], 0)
            map = xx  # this can be any images
            cadr = [c4d.Vector(1), c4d.Vector(1), c4d.Vector(1), c4d.Vector(1)]
            nadr = [c4d.Vector(1), c4d.Vector(1), c4d.Vector(1), c4d.Vector(1)]
            if map:
                bd.DrawTexture(map, padr, cadr, nadr, uvadr, 4, c4d.DRAW_ALPHA_NORMAL, c4d.DRAW_TEXTUREFLAGS_TEMPORARY)

        return c4d.DRAWRESULT_OK
hi, I have a OBJECT_GENERATOR plugin and I encountered some problems while drawing it. I am drawing something in screen space use BaseDraw.DrawTexture(), and when I turn on depth of field of viewport, the drawn content is also affected. How to make the drawn content not affected by depth of field. Thanks for any help!