Maxon Developers Maxon Developers
    • Documentation
      • Cinema 4D Python API
      • Cinema 4D C++ API
      • Cineware API
      • ZBrush GoZ API
      • Code Examples on Github
    • Forum
    • Downloads
    • Support
      • Support Procedures
      • Registered Developer Program
      • Plugin IDs
      • Contact Us
    • Unread
    • Recent
    • Tags
    • Users
    • Login
    1. Maxon Developers Forum
    2. zauhar
    Z
    • Profile
    • Following 0
    • Followers 0
    • Topics 4
    • Posts 16
    • Best 0
    • Controversial 0
    • Groups 0

    zauhar

    @zauhar

    0
    Reputation
    7
    Profile views
    16
    Posts
    0
    Followers
    0
    Following
    Joined Last Online

    zauhar Unfollow Follow

    Latest posts made by zauhar

    • RE: Apply material to individual faces of a polygon

      Ferdinand, I was indeed the one that asked, and I got a visualization like the one above working via that approach. My memory is that the surface coloring was only visible in the viewport, when I tried to render it did not show up.

      That was when you or someone else told me that I needed to write a custom shader, which honestly surprised me. Also, I was warned that a shader in python would be 'slow' . I tried to look for more documentation and/or examples, found little that helped me. So I put the problem on the shelf for a while.

      Is my understanding about needing a custom shader incorrect?

      Finally, while I have been only looking at the python SDK, I am perfectly comfortable in C/C++. Is that the better route for doing things like this?

      Thanks!

      Randy

      posted in Cinema 4D SDK
      Z
      zauhar
    • RE: Apply material to individual faces of a polygon

      Got it working !

      surface.png

      This relies on a lot of custom stuff, but I am pasting the code if anyone wants to follow the same idea. importOBJ takes a path to a file in wavefront format with RGB values appended to the vertex positions and returns lists of numpy objects (the names are obvious).

      Thanks !

      Randy

      NUM_RGB = 100
      
      class c4dSURFACE_test(object) :
      	def __init__(self, surfpath, transparency=0. ) :
      		vertices,elems,normals,centers,centernorms,areas,rgb = importOBJ(surfpath)
      		self.mesh = c4d.PolygonObject(len(vertices),len(elems))
      		c4dverts = [ c4d.Vector(v[0],v[1],-v[2]) for v in vertices ]
      		# need to flip face orientations
      		elems = [ list(e) for e in elems ]
      		for elem in elems :
      			t = elem[1]
      			elem[1] = elem[2]
      			elem[2] = t 
      		#
      		self.mesh.SetAllPoints(c4dverts)
      		self.polys = [ c4d.CPolygon(elem[0],elem[1],elem[2]) for elem in elems ]
      		# 
      		for idx,poly in enumerate(self.polys) :
      			self.mesh.SetPolygon(idx,poly)
      		#
      		doc.InsertObject(self.mesh)
      		self.materials = []
      		self.ttags = [] 
      		if None not in rgb :
      			# make a range of NUM_RGB colors
      			# use kmeans to make clusters based on rgb, take average color in each cluster
      			# NOTE that my export currently assigns colors to vertices, need tp compute face color
      			rgb = numpy.array(rgb)
      			faceRGB = []
      			for eidx in range(len(elems)) :
      				s = sorted(elems[eidx])
      				faceRGB.append(numpy.mean(rgb[s],axis=0))
      			faceRGB = numpy.array(faceRGB)
      			means = numpy.mean(faceRGB,axis=0)
      			stds = numpy.std(faceRGB,axis=0)
      			diff = faceRGB - means[numpy.newaxis,:]
      			rgbZ = diff * numpy.reciprocal(stds)[numpy.newaxis,:]
      			kmeans = KMeans(n_clusters=NUM_RGB).fit(rgbZ)
      			labels = kmeans.labels_
      			labelToElems = {}
      			#
      			for eidx,label in enumerate(labels) :
      				if label not in labelToElems :
      					labelToElems[label] = [] 
      				labelToElems[label].append(eidx)
      			labelToMeanRGB = {}
      			for label in labelToElems :
      				color = numpy.mean(faceRGB[labelToElems[label]],axis=0)
      				labelToMeanRGB[label] = color
      			#
      			# Get a selection of all faces
      			kwargs = {"command": c4d.MCOMMAND_SELECTALL,"list": [self.mesh],"mode": c4d.MODELINGCOMMANDMODE_POLYGONSELECTION,"bc": c4d.BaseContainer(),"doc": self.mesh.GetDocument()}
      			c4d.utils.SendModelingCommand(**kwargs)
      			polySelection = self.mesh.GetPolygonS()
      			#
      			for lidx in range(NUM_RGB) :
      				polySelection.DeselectAll() 
      				for eidx in labelToElems[lidx] :
      					polySelection.Select(eidx)
      				c4d.utils.SendModelingCommand(c4d.MCOMMAND_GENERATESELECTION, \
      					[self.mesh], c4d.MODELINGCOMMANDMODE_POLYGONSELECTION, c4d.BaseContainer(), self.mesh.GetDocument(), c4d.MODELINGCOMMANDFLAGS_NONE)
      				selectionTagCollection: list[c4d.BaseTag] = [t for t in self.mesh.GetTags() if t.CheckType(c4d.Tpolygonselection)]
      				selectionTag: c4d.BaseTag = selectionTagCollection[-1]
      				#
      				material: c4d.Material = c4d.BaseMaterial(c4d.Mmaterial)
      				textureTag: c4d.BaseTag = self.mesh.MakeTag(c4d.Ttexture)
      				self.mesh.GetDocument().InsertMaterial(material)
      				r,g,b = labelToMeanRGB[lidx]
      				material[c4d.MATERIAL_COLOR_COLOR] = c4d.Vector(r, g, b)
      				material.SetName('COLOR_' + str(label))
      				material[c4d.MATERIAL_USE_TRANSPARENCY] = 1
      				material[c4d.MATERIAL_TRANSPARENCY_BRIGHTNESS] = transparency
      				textureTag[c4d.TEXTURETAG_MATERIAL] = material
      				textureTag[c4d.TEXTURETAG_RESTRICTION] = selectionTag.GetName()
      				self.materials.append(material)
      				self.ttags.append(textureTag)
      		else :
      			mat = c4d.BaseMaterial(c4d.Mmaterial)
      			mat.SetName('surface')
      			mat[c4d.MATERIAL_USE_TRANSPARENCY] = 1 
      			mat[c4d.MATERIAL_TRANSPARENCY_BRIGHTNESS] = transparency
      			mat[c4d.MATERIAL_COLOR_COLOR] = c4d.Vector(1., 1., 1.)
      			self.mesh.GetDocument().InsertMaterial(mat)
      			self.materials.append(mat)
      			ttag = c4d.TextureTag()
      			ttag.SetMaterial(mat)
      			self.ttags.append(ttag)
      			self.mesh.InsertTag(ttag)
      		#
      		#
      		self.mesh.SetBit(c4d.BIT_ACTIVE)
      		c4d.EventAdd()
      		return
      
      posted in Cinema 4D SDK
      Z
      zauhar
    • RE: Apply material to individual faces of a polygon

      @zauhar

      I think I found the stupid issue.

      When I imported the mesh, it included a default material. That tag was 'in front' of the ones I added. All I have to do is import with no material (or delete the default material from the tag list) and I see my changes.

      Thanks, I will close this once I have my intended code working.

      Randy

      posted in Cinema 4D SDK
      Z
      zauhar
    • RE: Apply material to individual faces of a polygon

      Ferdinand, thanks for the reply.

      In my case I need to programmatically select particular polygons to apply different materials to, I cannot rely on an interactive selection.

      So as to not involve my custom code, which relies on numpy, etc, the example code below tries to set the material for the one half of the polygons in a mesh that is brought in as 'Default' object using File->Merge Project.

      I drag the object from the Objects panel into the python console, and assign it to the variable 'op' to match your examples.

      The code where I select the first 50% polygons clearly works, I see one half of the mesh selected if I view in 'select polygon' mode. (The code for programmatic selection was suggested by this thread : https://developers.maxon.net/forum/topic/13194/polygon-islands-convenience-method)

      The final result - apparently nothing happens. If I leave my programmatic selection active, right-click on the material I inserted, and choose to 'Apply', the action takes place and half of the mesh has the new color.

      What am I still missing?

      Thanks, Randy

      # Ferdinand, the following line is created by dragging the imported object into the python session so I get a reference to
      # it; I assign it to the variable 'op' to match your code
      
      op = Default
      
      kwargs = {"command": c4d.MCOMMAND_SELECTALL,"list": [op],"mode": c4d.MODELINGCOMMANDMODE_POLYGONSELECTION,"bc": c4d.BaseContainer(),"doc": doc}
      
      c4d.utils.SendModelingCommand(**kwargs)
      
      polySelection = op.GetPolygonS() 
      
      polySelection.DeselectAll() 
      
      count = op.GetPolygonCount()  
          
      for i in range(count) :
      	if i < count/2 :  
      		polySelection.Select(i)
      
      ## the above 'works' in the sense that I see half of the polygons selected if I'm in face selection mode
      
      if not c4d.utils.SendModelingCommand(c4d.MCOMMAND_GENERATESELECTION, [op], c4d.MODELINGCOMMANDMODE_POLYGONSELECTION, c4d.BaseContainer(), op.GetDocument(), c4d.MODELINGCOMMANDFLAGS_NONE):
              raise RuntimeError("Could not create polygon selection.")
      
      selectionTagCollection: list[c4d.BaseTag] = [t for t in op.GetTags() if t.CheckType(c4d.Tpolygonselection)]
      selectionTag: c4d.BaseTag = selectionTagCollection[-1]
      
      bs = selectionTag.GetBaseSelect()
      
      print('# selected = %d of %d' % (bs.GetCount(),count))
      # selected = 24998 of 49996
      
      material: c4d.Material = c4d.BaseMaterial(c4d.Mmaterial)
      textureTag: c4d.BaseTag = op.MakeTag(c4d.Ttexture)
          
      # Insert the material into the document of #op, set its color to a random color, and reference
      # both the material and the selection in the texture tags. Selections references in texture tags
      # are a bit weird as in that they work over strings and not BaseLinks. So we pass the name of
      # our selection tag.
      op.GetDocument().InsertMaterial(material)
      # try to make half the mesh blue
      material[c4d.MATERIAL_COLOR_COLOR] = c4d.Vector(0., 0., 1.)
      textureTag[c4d.TEXTURETAG_MATERIAL] = material
      textureTag[c4d.TEXTURETAG_RESTRICTION] = selectionTag.GetName()
      
      c4d.EventAdd()
      
      # nothing happens
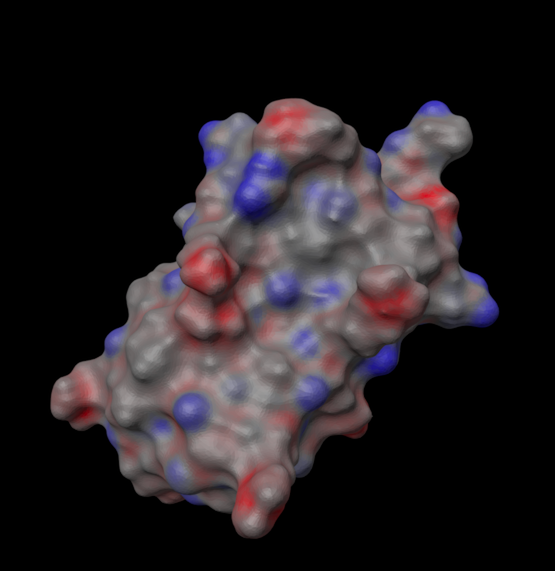
      
      posted in Cinema 4D SDK
      Z
      zauhar
    • Apply material to individual faces of a polygon

      Hi,

      In Python I have code to build a PolygonObject from an imported mesh file. I want to color code the faces according to a surface distribution that is already computed (i.e. every face has an imported RGB assignment).

      I had tried to do this with vertex shading, and found out how that you literally need to write a custom shader !

      Instead, my work-around is to cluster the RGB values and generate a collection of materials (say 100) that cover the range of shades. I want to assign each polygon face an appropriate material to achieve an approximate color mapping.

      I can generate the materials, and in fact I can apply them interactively by selecting polygon faces, right-clicking on a material and choosing to Apply it. The result is visible not only in the viewport but also when I render.

      HOWEVER, I cannot find a way to do this programmatically. The faces in my PolygonObject are CPolygon objects, which do not support inserting a texture tag.

      What is the missing link to make this work in Python?

      Thanks in advance.

      Randy

      posted in Cinema 4D SDK python sdk
      Z
      zauhar
    • Trying to programmatically create vertex color tag

      Hi,
      I am making a python script to import a mesh in OBJ format, and want to programmatically set the colors on a per-vertex basis.

      I am currently playing around, have imported the mesh using File->Merge Project, set a single material for all objects (there is only one object), and got a reference to the polygons by dragging into the python command line (op = Default below).

      I followed examples I found (code below) to make a vertex color tag, and just to experiment set the vertices to red. The issues :

      1. I have to select the vertex color tag in the Objects panel for the coloring to show up, otherwise the color is just default white

      2. When the tag is selected there is no shading, color is 'flat'

      3. Rendering just shows the white underlying material coloring

      Code is below, what am I missing?

      Thanks,

      Randy

      op = Default 
      red = c4d.Vector4d(1.0, 0.0, 0.0, 1.0)
      
      pointCount = op.GetPointCount()
      tag = c4d.VertexColorTag(pointCount)
      
      tag.SetPerPointMode(True)
      
      dataW = tag.GetDataAddressW()
      
      for idx in range(pointCount) :
      	c4d.VertexColorTag.SetPoint(dataW, None, None, idx, red)
      
      op.InsertTag(tag)
      tag.SetBit(c4d.BIT_ACTIVE)
      
      c4d.EventAdd()
      
      
      posted in Cinema 4D SDK
      Z
      zauhar
    • RE: Look At Camera Tag and text orientation

      @ferdinand

      Thanks, that is exactly correct - in fact I did not need to make the orthonormal vector, all one needs do is set the objects Y-axis equal to the camera, and get the x-axis by cross product .

      I think I correctly handle the pathological situation after looking at the limiting cases.

      The modified function is below.

      Randy

      EPSILON = 1E-5 # The floating point precision we are going to assume, i.e., 0.00001
      
      # This is based on the python Look at Camera example
      # https://github.com/PluginCafe/cinema4d_py_sdk_extended/tree/master/plugins/py-look_at_camera_r13
      
      def GetLookAtTransform(host: c4d.Matrix, target: c4d.Matrix, reverseZ=True) -> c4d.Matrix:
          """Returns a transform which orients its z/k/v3 component from #host to #target.
          """
          # Get the position of both transforms.
          p: c4d.Vector = host.off
          q: c4d.Vector = target.off
      
          # The normalized offset vector between 'host' (object to be reoriented) and 'target' (the camera)
          # will become the z-axis of the modified frame for the object .
          #
          # If reverseZ = True, the new z-axis is points from camera toward object, if False the reverse
          # I turn reverseZ on by default, as my initial application is to text splines, which are meant to be
          # viewed looking down the object z-axis.
          # In the original implementation
          # (https://github.com/PluginCafe/cinema4d_py_sdk_extended/tree/master/plugins/py-look_at_camera_r13 )
          # the modified y-axisis computed using the global y-axis, and this does not consistently
          # keep the text upright in the view of the camera. Instead, simply take the object y-axis same as camera y.
          #
          # In the pathological case of new object z-axis parallel to camera y :
          # If reverseZ :  set object z = camera y , object y = -camera Z
          # else : set object z = -camera y, object y = -camera z
          #
          if reverseZ :
               z: c4d.Vector = ~(p - q)
               if 1. - abs(z * target.v2) > EPSILON :
                   y = target.v2
               else :
                   z = target.v2
                   y = -target.v3
          else :
               z: c4d.Vector = ~(q - p)
               if 1. - abs(z * target.v2) > EPSILON :
                   y = target.v2
               else :
                   z = -target.v2
                   y = -target.v3
      
          # get x using cross product
          x: c4d.Vector = ~(y % z)
      
          # Return the frame (x, y, z) plus the offset of #host as the look-at transform.
          return c4d.Matrix(off=p, v1=x, v2=y, v3=z)
      
      
      posted in Cinema 4D SDK
      Z
      zauhar
    • RE: Look At Camera Tag and text orientation

      @ferdinand

      I have to add an update to this. While I marked this as 'solved', in fact initially I was not looking carefully at behavior in the view.

      While the text stayed 'more or less' vertical with respect to camera orientation sometimes it was far off, depending on the specific camera angle.

      I looked at the :Look At Camera python example, and the approach is to set Z as the normalized displacement from host to target, and set 'up' as the global Y axis , then generate normalized X and Y by taking cross products.

      I made a modified plugin, and changed the math as follows:

      def GetLookAtTransform(host: c4d.Matrix, target: c4d.Matrix) -> c4d.Matrix:
          """Returns a transform which orients its z/k/v3 component from #host to #target.
          """
          # Get the position of both transforms.
          p: c4d.Vector = host.off
          q: c4d.Vector = target.off
      
          # The normalized delta vector will become the z-axis of the frame.
          #z: c4d.Vector = ~(q - p)
          # I reversed this as my application is for a text spline, where you look down the negative z-axis of 
          # the object in default orientation
          z: c4d.Vector = ~(p - q)
      
          # We compute an up-vector which is not (anti)parallel to #z.
          #up: c4d.Vector = c4d.Vector(0, 1, 0) \
          #                 if 1. - abs(z * c4d.Vector(0, 1, 0)) > EPSILON else \
          #                 c4d.Vector(EPSILON, 1, 0)
          #
          # Instead, take camera Y and orthonormalize with respect to our Z
          y = ~(target.v2 - (target.v2 * z) * z)
          # 
          #x: c4d.Vector = ~(up % z)
          # get x using cross product 
          x: c4d.Vector = ~(y % z)
          #y: c4d.Vector = ~(z % x)
      
          # Return the frame (x, y, z) plus the offset of #host as the look-at transform.
          return c4d.Matrix(off=p, v1=x, v2=y, v3=z)


      This now keeps the text orientation nailed, aligned with the 'up' axis of the camera.

      I have not handled the pathological case of the initial Z being directly along the camera Y axis, I will take a look at that.

      Sorry if this is solved somewhere else and I did not see it. If not I will try to submit the plugin.

      Thanks,

      Randy

      posted in Cinema 4D SDK
      Z
      zauhar
    • RE: Look At Camera Tag and text orientation

      Ah Ok, thanks Ferdinand.

      At least I was partly on base.

      Randy

      posted in Cinema 4D SDK
      Z
      zauhar
    • RE: Look At Camera Tag and text orientation

      @cairyn

      Thanks very much, your solution and Ferdinand's below both work.

      Randy

      posted in Cinema 4D SDK
      Z
      zauhar