Multiple animation import
-
Hi,
We have made some progress to get our plugin working for C4D R20/R21, allowing import and export functionalities to Sketchfab (if you are curious, here is the latest version of the plugin, please note that you'll need an account on Sketchfab in order to download/upload files from/to the platform).
We are now working on implementing support for the import of animated skinned objects, and... well... problems arise

How the import works
Basically, we allow users to gain access to our library of downloadable models. The plugin allows to browse for models in a way similar to the website, and once authentificated, to import models through the GlTF format.
In the latest release, we manage to correctly import the majority of the available files, although some of the materials can look different (due to the PBR material system we use on Sketchfab, and that is well translated in GlTF but not natively supported in Cinema4D).
The problem
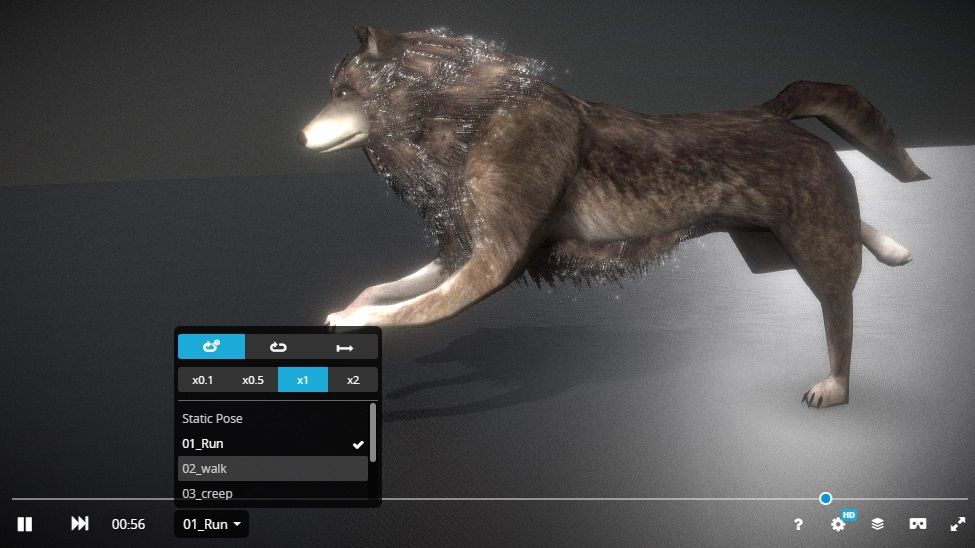
This model makes for a perfect typical example: Wolf with Animations by user 3DHaupt (available under CC Attribution-NonCommercial-ShareAlike).
As you can see on the 3D viewer or on the picture below, the wolf character has multiple animation "tracks" attached to it: Run, Walk, Idle...
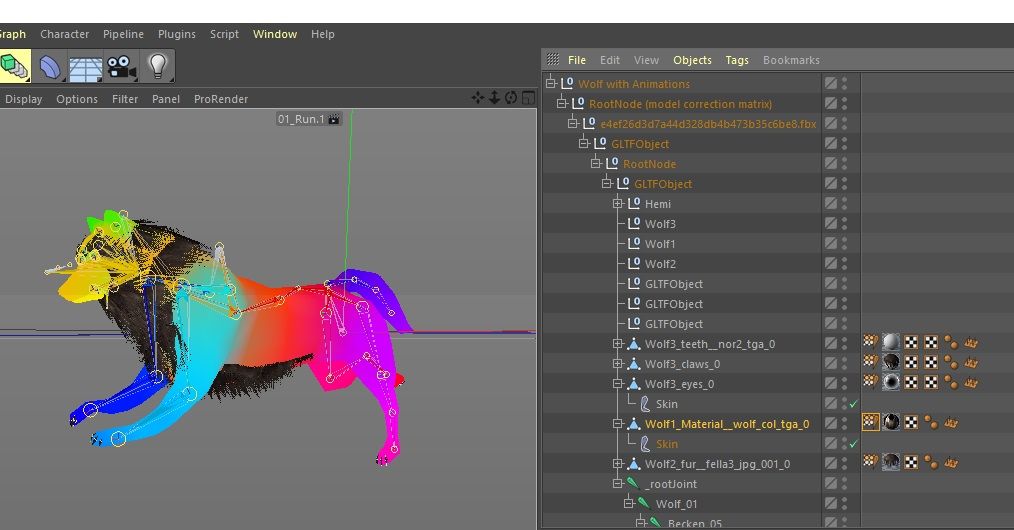
As you can see on the screenshot below, importing the model works fine: we managed to import the joints and create the skeleton hierarchy, as well as skin the mesh with c4d.modules.character.CAWeightTag and OSkin objects (created under each skinned mesh).
Importing only ONE animation from GlTF also works fine by parsing the keyframes and adding them to the F-curves of newly generated CTracks. So far, so good, we have a running wolf !

However, not being very familiar with Cinema4D ourselves (as users as well as using the API), we don't (yet) know how to import MORE THAN ONE animation in Python, in a way that makes sense to C4D users
 ...
...Things we tried / think about
- We've explored using the Take system (for each different animation, create one Take, add it under the Main take, set it as the current take, and then parse in the keyframes/curves).
But the final result seems to just be a mess of all the different keyframes combined, and except if we did something wrong, this system does not seem to be appropriate for what we are looking to achieve... - The motion clip system seems to be the standard and more appropriate for this "character" use case (generate one clip for each different animation, and let the user combine, separate or merge them as pleased), but we can't find any way to implement this through the Python API...
- Another idea is to emulate the tutorials we find about Mixamo import (for instance here), and basically import the same geometry multiple times, but the workflow does not seem intuitive and feels like overkill given that we already have all the animation data in one file. Plus the motion clip system is still a mystery.
- Finally, a last thing that people seem to do is to import each animation in a different C4D document, but once again, this seems far from the ideal workflow.
Help ?
Keeping in mind that we are far from being C4D experts, we are looking for any hint to implement the correct workflow to import multiple animations.
Should we use the Take System, Motion Clips, CMotion ?
And if so, how can we use them in Python ?Any help, code example, documentation, advice, or even further question concerning the issues we face would be, of course, warmly welcomed. Thanks in advance !

Cheers,
Loïc from Sketchfab. - We've explored using the Take system (for each different animation, create one Take, add it under the Main take, set it as the current take, and then parse in the keyframes/curves).
-
Sounds great what you have got already!
You can't access Motion Clips from C++ or Python. At least you can't create them or add keyframe data to them.
You could put the animations back to back in the timeline so all the data is at least in one file. Then create timeline markers to indicate where in the timeline the individual animations are located. A user would then be able to use the Motion Clip system to select part of the animation and turn them into Motion Clip sources themselves, and then mix and match them in the scene from then on. Not the most streamlined solution but it at least gets the data in and usable.
Keen to hear if the support team have any other suggestions here.
-
@kbar Hi Kent, and thanks for your comment and constructive feedback !
It's good to know that Motion Clips are hidden from the APIs, thanks for the confirmation on that subject.
Your back-to-back suggestion definitely makes sense.
Although it adds a little burden from the user perspective, it might still be the best approach to keep things "understandable", and has the advantage of not being too complex to implement, hence reducing the possible mistakes on our end
I'd definitely be curious about other suggestions/ideas too !
Thanks again,
Loïc. -
Hi @sketchfab.
Thanks for reaching us.
First of all, it must be said, but Cinema 4D is not really designed to support this kind of behavior with multiple animations at the same time range.So here some solutions:
- Don't create keyframes on the import but creates a Python Tag on the root object and this Python Tag will offer a combo list with all the animations. Then from there two solutions
- Clear and create keyframes for all the hierarchy when the combo is defined (be sure to be in the main thread but since it come from a GUI interaction it's ok).
- Don't create keyframes but according to the animation defined in the combo and the time directly defines matrix for each object.
- Use the motion system. It can be a bit cobblestone to set up since there is no direct API for doing it and some area/ID is not documented at all and you can screw up things if something is not set up correctly (but it's possible, look at https://developers.maxon.net/forum/topic/11021/placing-motion-sources-at-timeline-markers-with-python-r19/5) moreover from user POV once a motion source is defined, he don't have any more control over it and can't edit keyframe.
- Use the take system, can be cobblestone to set up and a bit tricky for the user to use since it defines a different state for the scene, meaning the user will probably have to enable a take, copy and paste each animation track manually (since user can't copy/paste multiple tracks at once).
Hope it helps you to see possible solutions.
If you have more questions don't hesitate to ask.Cheers,
Maxime. - Don't create keyframes on the import but creates a Python Tag on the root object and this Python Tag will offer a combo list with all the animations. Then from there two solutions
-
@m_adam Hi, and thanks for your feedback and suggestions.
The Take System sounds like requiring too much user interaction after the import, and I think we won't therefore consider it/
The motion system and "global" Python Tag seem like coherent alternatives to loading every animation one after the other.Now, the last step is to choose one of those systems...
I think we'll first implement the back to back loading of animations as suggested by @kbar, as this seems like the most lightweight and straightforward solution for a quick iteration.Cheers,
Loïc. -
Hi Lads !
FYI, the solution of playing each animation one after the other gave satisfying results

A tricky part though was to take into account joints animated in one animation, but not in others, hence keeping keyframed values where unnecessary.
The naive but effective solution to this problem was to force joints to their rest position in the animations in which they are not keyframed.Another "trick" was to offset the animation tracks by a small margin. If an animation ends at 5000ms for instance, we make the other one start at 5001ms. This allows for the "forced" keyframes to interpolate correctly and not mess up the whole animation (strange things started happening when setting multiple keyframes at the exact same time frame, probably an undefined behavior...).
For the "reference wolf", here is what the result looks like with an exaggerated margin between the animations is set to 1s (in practice, turning this value to something very small makes the transition immediate):

Anyway, thanks @kbar and @m_adam for your suggestions, this case is solved !
Cheers,
Loïc. -
Looks great Loïc.
It would be great if you could also add in the Timeline Markers to indicate where each animation starts and finishes.
Here are a couple of posts that should help.
https://gist.github.com/gr4ph0s/0badf708657aaa117be0f84dd176e2b8
Cheers.
Kent -
And we also have these examples on our github repository.
Cheers,
Maxime. -
@kbar @m_adam Thanks for the help lads, the markers were already added thanks to Kent suggestion in his previous reply.
Now the only things left are a little "GlTF-fighting", and some more polishing, packaging and testing before updating the plugin with a - hopefully - nice animation support !
I'll let you know when that's done (probably not before 2020 though
 ).
).Cheers,
Loïc

