Color Profiles
Cinema 4D now supports color management and color profiles in all places of the application. The render engine natively supports linear workflow.
You mostly need to be aware of linear workflow and color conversion when you write shaders, materials or videopost effects.
Here’s a schematic of Cinema 4D’s colorspace transformation pipeline:
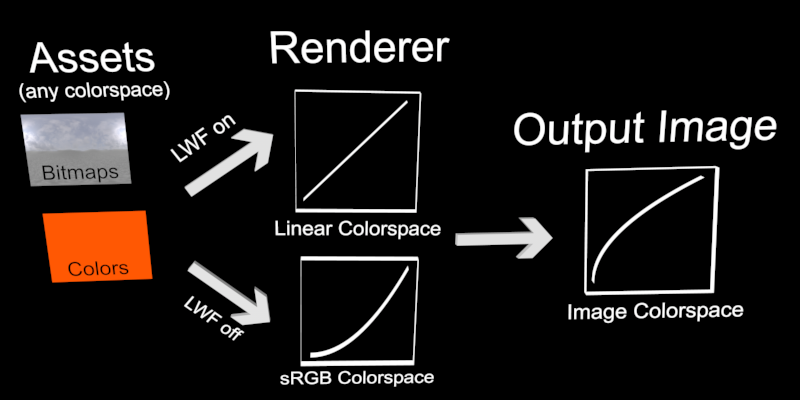
Before rendering all assets (bitmaps, colors or other external references) are transferred into the render engine’s colorspace. This can either be Linear Colorspace - if the user has “Linear Workflow” in Cinema 4D’s document settings enabled - or sRGB Colorspace.
The render engine now does all lighting calculations and creates an image - which is still in the colorspace that the renderer is operating in.
As a final step the render output is transformed into a user chosen output color space. Mostly this will be sRGB if the image has a bit depth of 8 or 16 and Linear for 32. But the use can choose any output colorspace in the render settings.
Please note that multi-pass images produced by the renderer always have render colorspace assigned - this is different from the regular image where you can set any arbitrary output colorspace. The reason for this is that a multi-pass image tries to recreate the render operations (adding multiple passes). If this didn’t happen in render colorspace the results would look completely wrong.
On a further note this is the reason for applications like Photoshop that cannot show multipasses correctly if bit depth is 32 and LWF is off - they have a hard-wired built-in logic that 32 bit images cannot have any color profile assigned and always use linear space.
Explanation of Color Management
Everyone has heard of it but only few understand what it really is, even though many books have been - and still are being - written about this topic. In the following you will find a brief introduction of the problematic of color fastness.
Surely you are familiar with the effect of an image looking perfect on your monitor (colors are exactly as you want them to be - brightness, contrast, etc. are immaculate) but when you view the same image on your colleague’s monitor or even printed out it looks completely different - mostly worse.
How does this happen?
Colleague A creates an image using an image editing program. He creates his image according to how it looks on his monitor. When finished, he saves the image - and this is where the problems start: Image editing programs have to save images with a reproducible color definition (i.e. the color profile, which is mostly RGB). Most often a color profile is selected that corresponds to the display device - for most (but not all!) monitors sRGB and for pring CMYK, etc.
This means that the red value on colleague A’s monitor has to correspond to the RGB value in the image file. Colleague A’s monitor must pass on the image’s colors exactly how the image processing program will display the RGB values. In order to do so, Colleague A’s monitor must be calibrated correctly. Over time, a monitor’s color display will change and should theoretically be calibrated every 4 weeks if being used for work with real color profiles. Regular calibration is also necessary for all input and output devices such as monitors, printers, scanners, etc.
If everything has been calculated correctly, the printed image from colleague A’s monitor should appear exactly the same on colleague C’s monitor after being scanned in. How probable this actually is can be attested to by anyone who has actually attempted such a feat (a 100% match is in fact not possible because not all devices can convert color profiles loss-free). But at least a nearly 100% match can be achieved on different monitors when calibrated correctly.
This was a simplified explanation of the issues involved with precise color management. What is basically required is a consistent, clearly-defined color profile within the creation process from image editing to the final output of the image.
And what does all this have to do with Cinema 4D?
First the good news: If you’ve never heard of color management and your renderings have always met or exceeded your requirements then you can simply ignore this parameter (and leave all Cinema 4D adjustable color profiles set to their default mode sRGB). To be honest, only very experienced artists will see the difference between images created using precise color management and those created by rule of thumb.
Note
Only change the color profile settings if you really know what you’re doing. Changing these values can otherwise lead to frustration and unwanted results. When in doubt, simply set everything back to sRGB. sRGB is the color profile that has been used for several years whenever no alternative color profile has specifically been defined. This is why about 99% of all images on the internet contain this default color profile. Even Cinema 4D versions prior to R12 saved images exclusively in the sRGB color profile.
Input Color Profile
Here you define 3 things:
Whether or not the embedded color profile of textures should be used
Which color profile should be used for textures with NO embedded color profile.
Which color profile should color selection fields, gradients, etc. within the application use
sRGB
Linear
If a texture has an embedded color profile, these options define how the color selection fields, gradients, etc. will be displayed in Cinema 4D. sRGB is the most commonly used display mode (when in doubt, use this mode). Linear is the mode that less common and more difficult to use.
Disabled
In this mode, embedded color profiles will not be taken into consideration. The sRGB color profile will be used instead. Simultaneously disabling the Linear Workflow option will reflect the mode prior to R12.