Table of Contents
Learn how to build, debug, and extend the C++ SDK on macOS.
Prerequisites
To follow this guide, you need the following:
- Cinema 4D C++ SDK: Download the extended SDK from the developers.maxon.net. The sdk.zip file shipped with Cinema 4D is insufficient for this guide.
- XCode: Install a version compatible with the SDK.
- Cinema 4D Installation: Download a trial version from the Maxon website.
- Build Requirements: See Technical Requirements for detailed build requirements.
On macOS, the Source Processor is not shipped with a builtin Python interpreter. You must install Python 3.8 yourself and set symlink to its executable under the name python. See Technical Requirements for more information.
- Note
- The code and
projectdefinitio.txtinstructions shown in this guide are identical for all platforms. The only difference between building the SDK on Windows, macOS, or Linux is the way the solution files are generated and how to interact with the IDEs such as Visual Studio, Xcode, or Eclipse. - This guide is accompanied by the YouTube playlist Getting Started with the Cinema 4D C++ SDK on macOS which contains videos that show the steps described in this guide.
Building the SDK
Generating a Build System
The Cinema 4D SDK is not shipped with a build system for either of the supported platforms. Instead, the project files must be generated with the build system generator CMake. Generating a build system with the CMake GUI splits into two phases, a configuration and a generation phase, each invoked by a button press in the middle of the CMake GUI. The video shown below will take you through all necessary steps on macOS.
- Configuration Phase
In this phase, basic inputs such as the path of a project, the path of its outputs, and the type of build system which should be generated are defined. The actual configuration, the configuration dialog, is mostly sidestepped in a Cinema 4D project since presets are provided which predefine these configuration settings. The following settings must be defined:
| Option | Description |
|---|---|
Where is the source code | Set this to the root folder of your project, not the modules/plugins folder in the project. |
Preset | Select here the build system to target, Xcode macOS Universal under macOS. |
Where to build the binaries | The path where CMake will generate the build system. When a preset is picked, this path will be auto-populated but it can be customized. |
Once all these settings are made, the Configure button will enable and can be clicked to configure the build system. A dialog will open, allowing us to set configuration details. But due to the selected preset, all configuration settings will already be set, and one can directly click Finish. CMake will now copy relevant data and print output to its console. There should be no errors in the console and when successful, the Generate button will be enabled.
- Warning
- We cannot offer any support or guarantee of functionality outside of the provided build system presets. Different versions of Visual Studio, build tools, or compilers might not work at all, or worse - might work only partially without you noticing first. When you must deviate from the recommended options, still choose a preset, but then modify the Configure popup dialog to your environment.
- Generation Phase
In the generation phase, settings specific to the Cinema 4D C++ SDK can be made and the final project files will be generated. The available options are:
| Option | Type | Description |
|---|---|---|
CMAKE_CXX_STANDARD | CMake | Defines the C++ standard which shall be used for the project. Defaults to 20 and should not be changed. See also C++ Standards. |
MAXON_C4D_EXECUTABLE | SDK | Defines the file path where a Cinema 4D executable can be found which shall be used as a debug application for debugging plugin binaries. Setting this option is not mandatory, one can also set the debug application manually in the IDE. Setting this option will not only set the debug application but also feed the project's binary output as additional module paths to that Cinema 4D instance. |
MAXON_FILTER_UNUSED_FRAMEWORKS | SDK | Setting this option to true will only include frameworks in the project which have been referenced in the project definitions of modules. This can cut down build times and minimally reduce file sizes of built binaries. |
MAXON_MODULES_DIR | SDK | Defines the location of the modules folder. Defaults to a plugins folder in the project. |
MAXON_SDK_CUSTOM_PATHS_FILE | SDK | Defines a file to take module paths and aliases from. See Custom Paths for details on how to use this feature. |
MAXON_SDK_EXTERNAL_LIBS_DIR | SDK | Defines the location of the external libs folder. Defaults to a libs folder in the project. |
CMAKE_OSX_ARCHITECTURES | CMake | Defines the architectures which shall be built. Defaults to arm64; x86_64. |
- Warning
- For Xcode, the automatic configuration of a debug application and its debug options is only semi-functional at the moment. Setting the option
MAXON_C4D_EXECUTABLEbefore the project has been built at least once will lead to a broken project. You must first compile your project at least once and then set the optionMAXON_C4D_EXECUTABLE. See Fig. I for a demonstration.
- Note
- The debug application can also be set manually in Xcode. Select a scheme and set the debug executable to a matching Cinema 4D executable. The debug arguments are set in the scheme settings. You must set
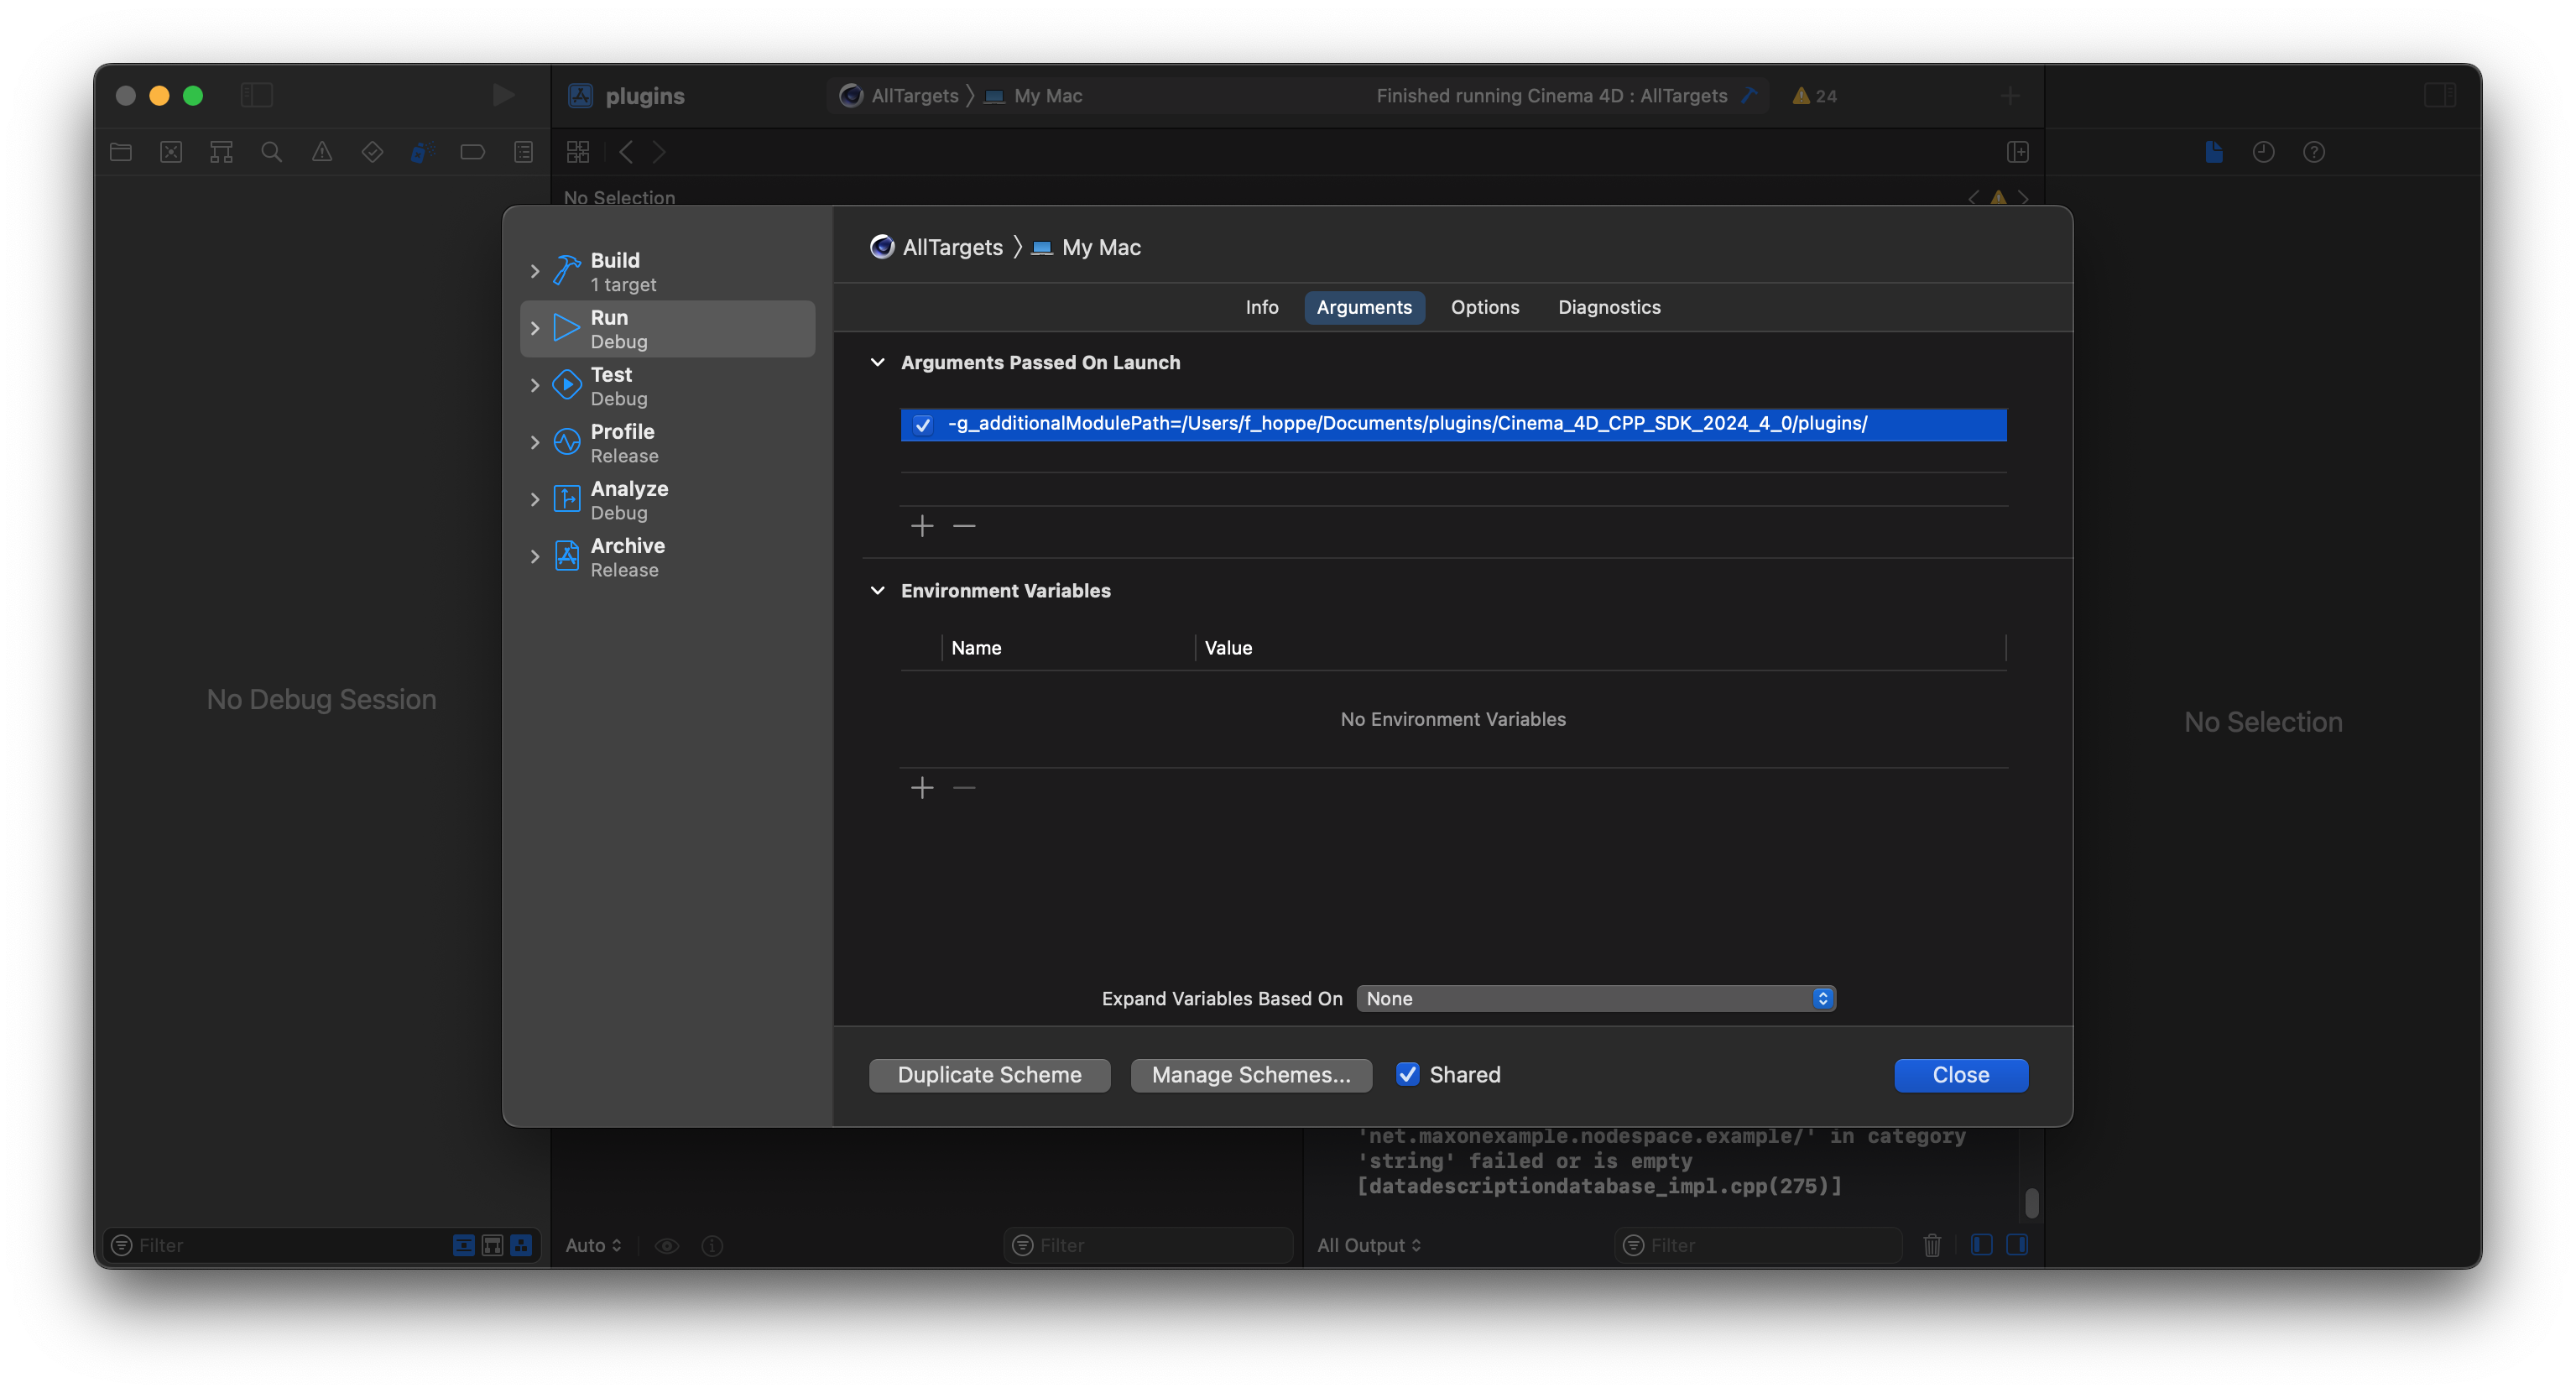
g_additionalModulePathsto the binary output of your project, e.g.,g_additionalModulePath=/Users/Documents/sdk/_build_xcode/bin/Debug/plugins/.
The only setting which must be regularly set is MAXON_C4D_EXECUTABLE (but even that is optional). Once all settings are made, the Generate button must be pressed. CMake will again print output to the console and there should be no errors. When the generation is successful, the Open Project button will be enabled and can be used to open the project.
Compiling a Build System
Once you have generated a solution with CMake, you can open it in Xcode by clicking the Open Project button in CMake. The Xcode project reflects the structure of the SDK and contains all the projects and files that are part of the SDK. The frameworks folder in the project contains the content of the frameworks folder of the SDK, here you can find the definition of the Cinema 4D API. A framework bundles a section of the Cinema 4D API that is thematically related, the asset.framework contains for example the API for the underlying data types of the Asset Browser. Frameworks are also used to include aspects of the Cinema 4D API with a project, so that the header files of that framework can be included in a source file of that project.
Now we must set the build scheme (Product > Scheme) to ALL_BUILD as Xcode will otherwise only build the selected project and its dependencies. While doing this, we can also edit the scheme (Product > Scheme > Edit Scheme) to set the build configuration. The Cinema 4D SDK is shipped with two build configurations, Debug and Release. The Debug configuration is used for debugging the SDK and the Release configuration is used for building the SDK for release. The Debug configuration is the default configuration and should be used for debugging the SDK. The Release configuration should be used when you want to ship your plugin.
the build target to AllTargets. The build target is the project that will be built when you press the build button in Xcode. The build target is usually set to the project that contains the code you are currently working on, but in this case, we want to build all projects in the SDK at once. You can also set the scheme to examples.main or any other project in the SDK. The scheme is a collection of settings that define how the project should be built. You can set the scheme to examples.main to build the main example project of the SDK. You can also set the scheme to examples.asset or any other project in the SDK. You can also set the scheme to AllTargets to build all projects in the SDK at once.
the project we want to build. The scheme is a collection of settings that define how the project should be built. You can set the scheme to examples.main to build the main example project of the SDK. You can also set the scheme to examples.asset or any other project in the SDK. You can also set the scheme to AllTargets to build all projects in the SDK at once.
the build target to AllTargets in the status bar at the top of Xcode. As the build destination you should choose My Mac for now. When you want to ship a plugin you can choose Any Mac to compile universal binaries that can run both on Intel and Apple Silicon hardware. These settings can also be found in the Product > Scheme (to select a target) and Product > Destination (to select a destination) menus.
You can now build the solution by pressing CMD+B or selecting Build from the Product menu. The SDK now starts building and you can switch to the Report Navigator by clicking the icon in the top left of the Xcode window (where the Project Navigator is located) to see the build progress. When the build has finished you can see the message 'Build succeeded' in the Xcode output window. There should not be any failed projects. If there are, the error messages can also be found in the output window. Feel free to ask for help on the Maxon Developer Forum if you encounter any issues.
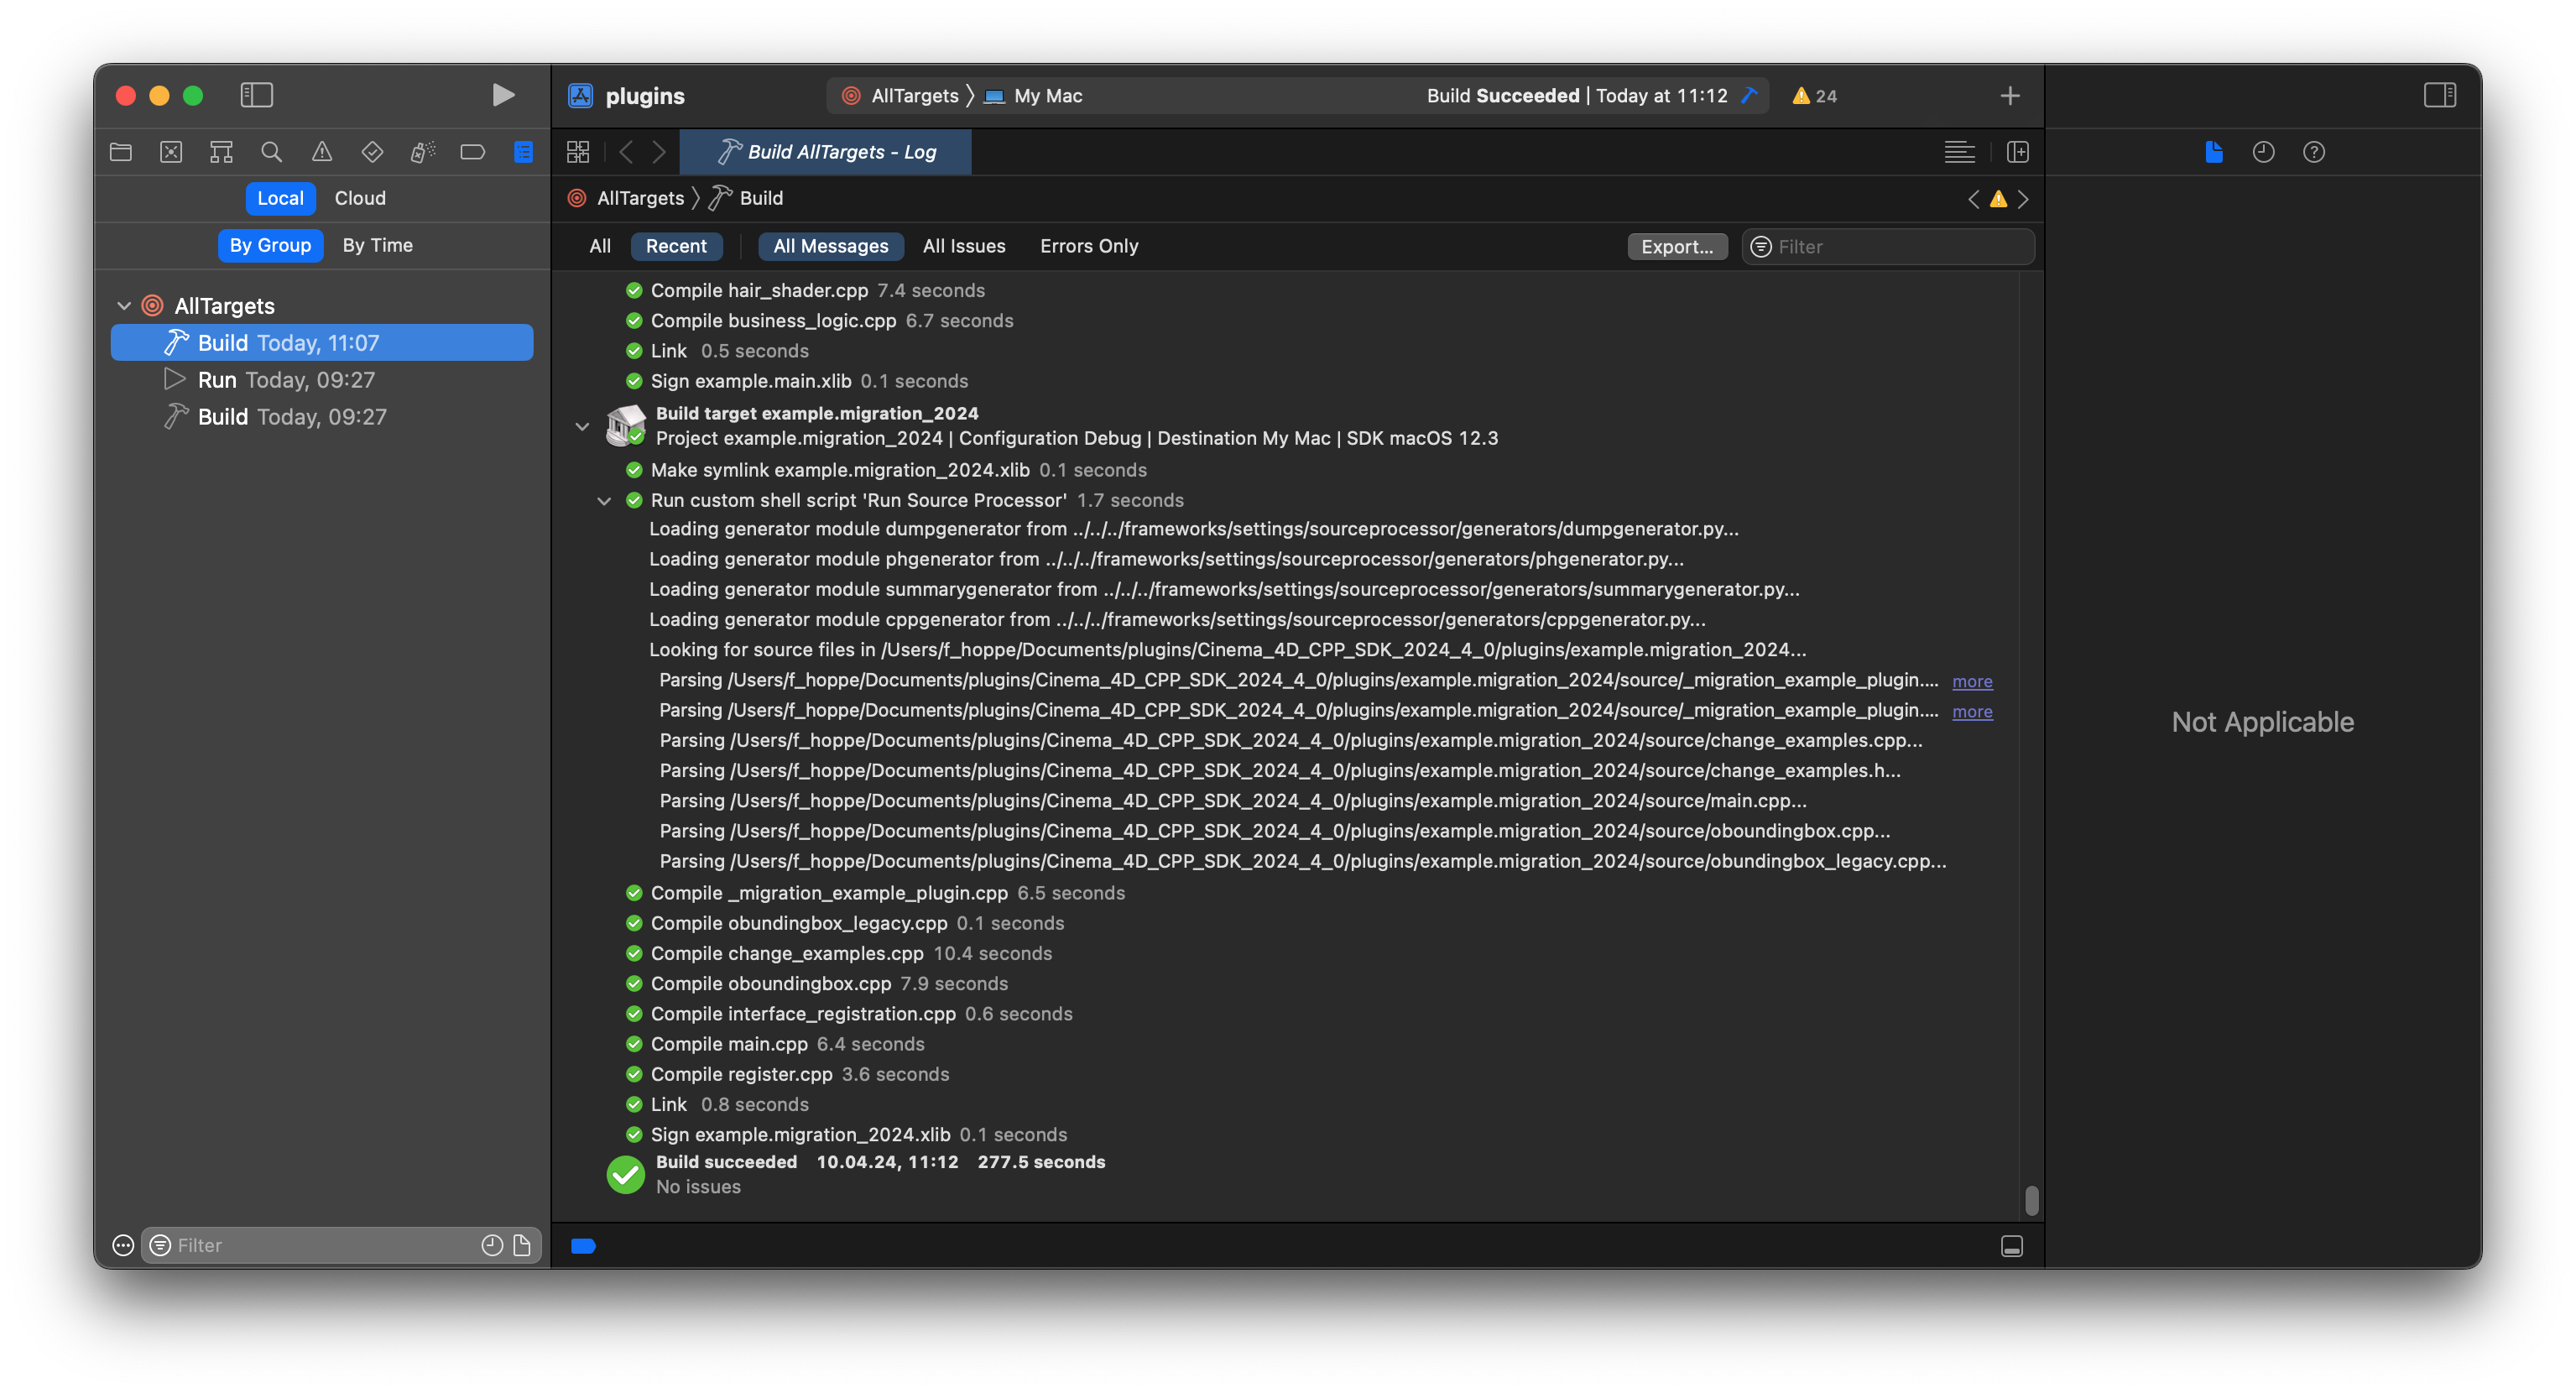
Once the build has finished, you can find the compiled plugins binaries in the bin folder of your build system. They will be placed in bin/Debug/plugins or bin/Release/plugins, depending on which build configuration you used. On Windows, the compiled plugins are .xdl64 files, on macOS .xlib files, and on Linux .xso64 files.
Debugging the SDK
Now that you have built the Cinema 4D C++ SDK, you can test its binaries by debugging them in Xcode. Running Cinema 4D with a debugger attached allows you to set breakpoints in the SDK code, inspect variables, and make use of debugging features of the Cinema 4D API.
Configuring the Debugger
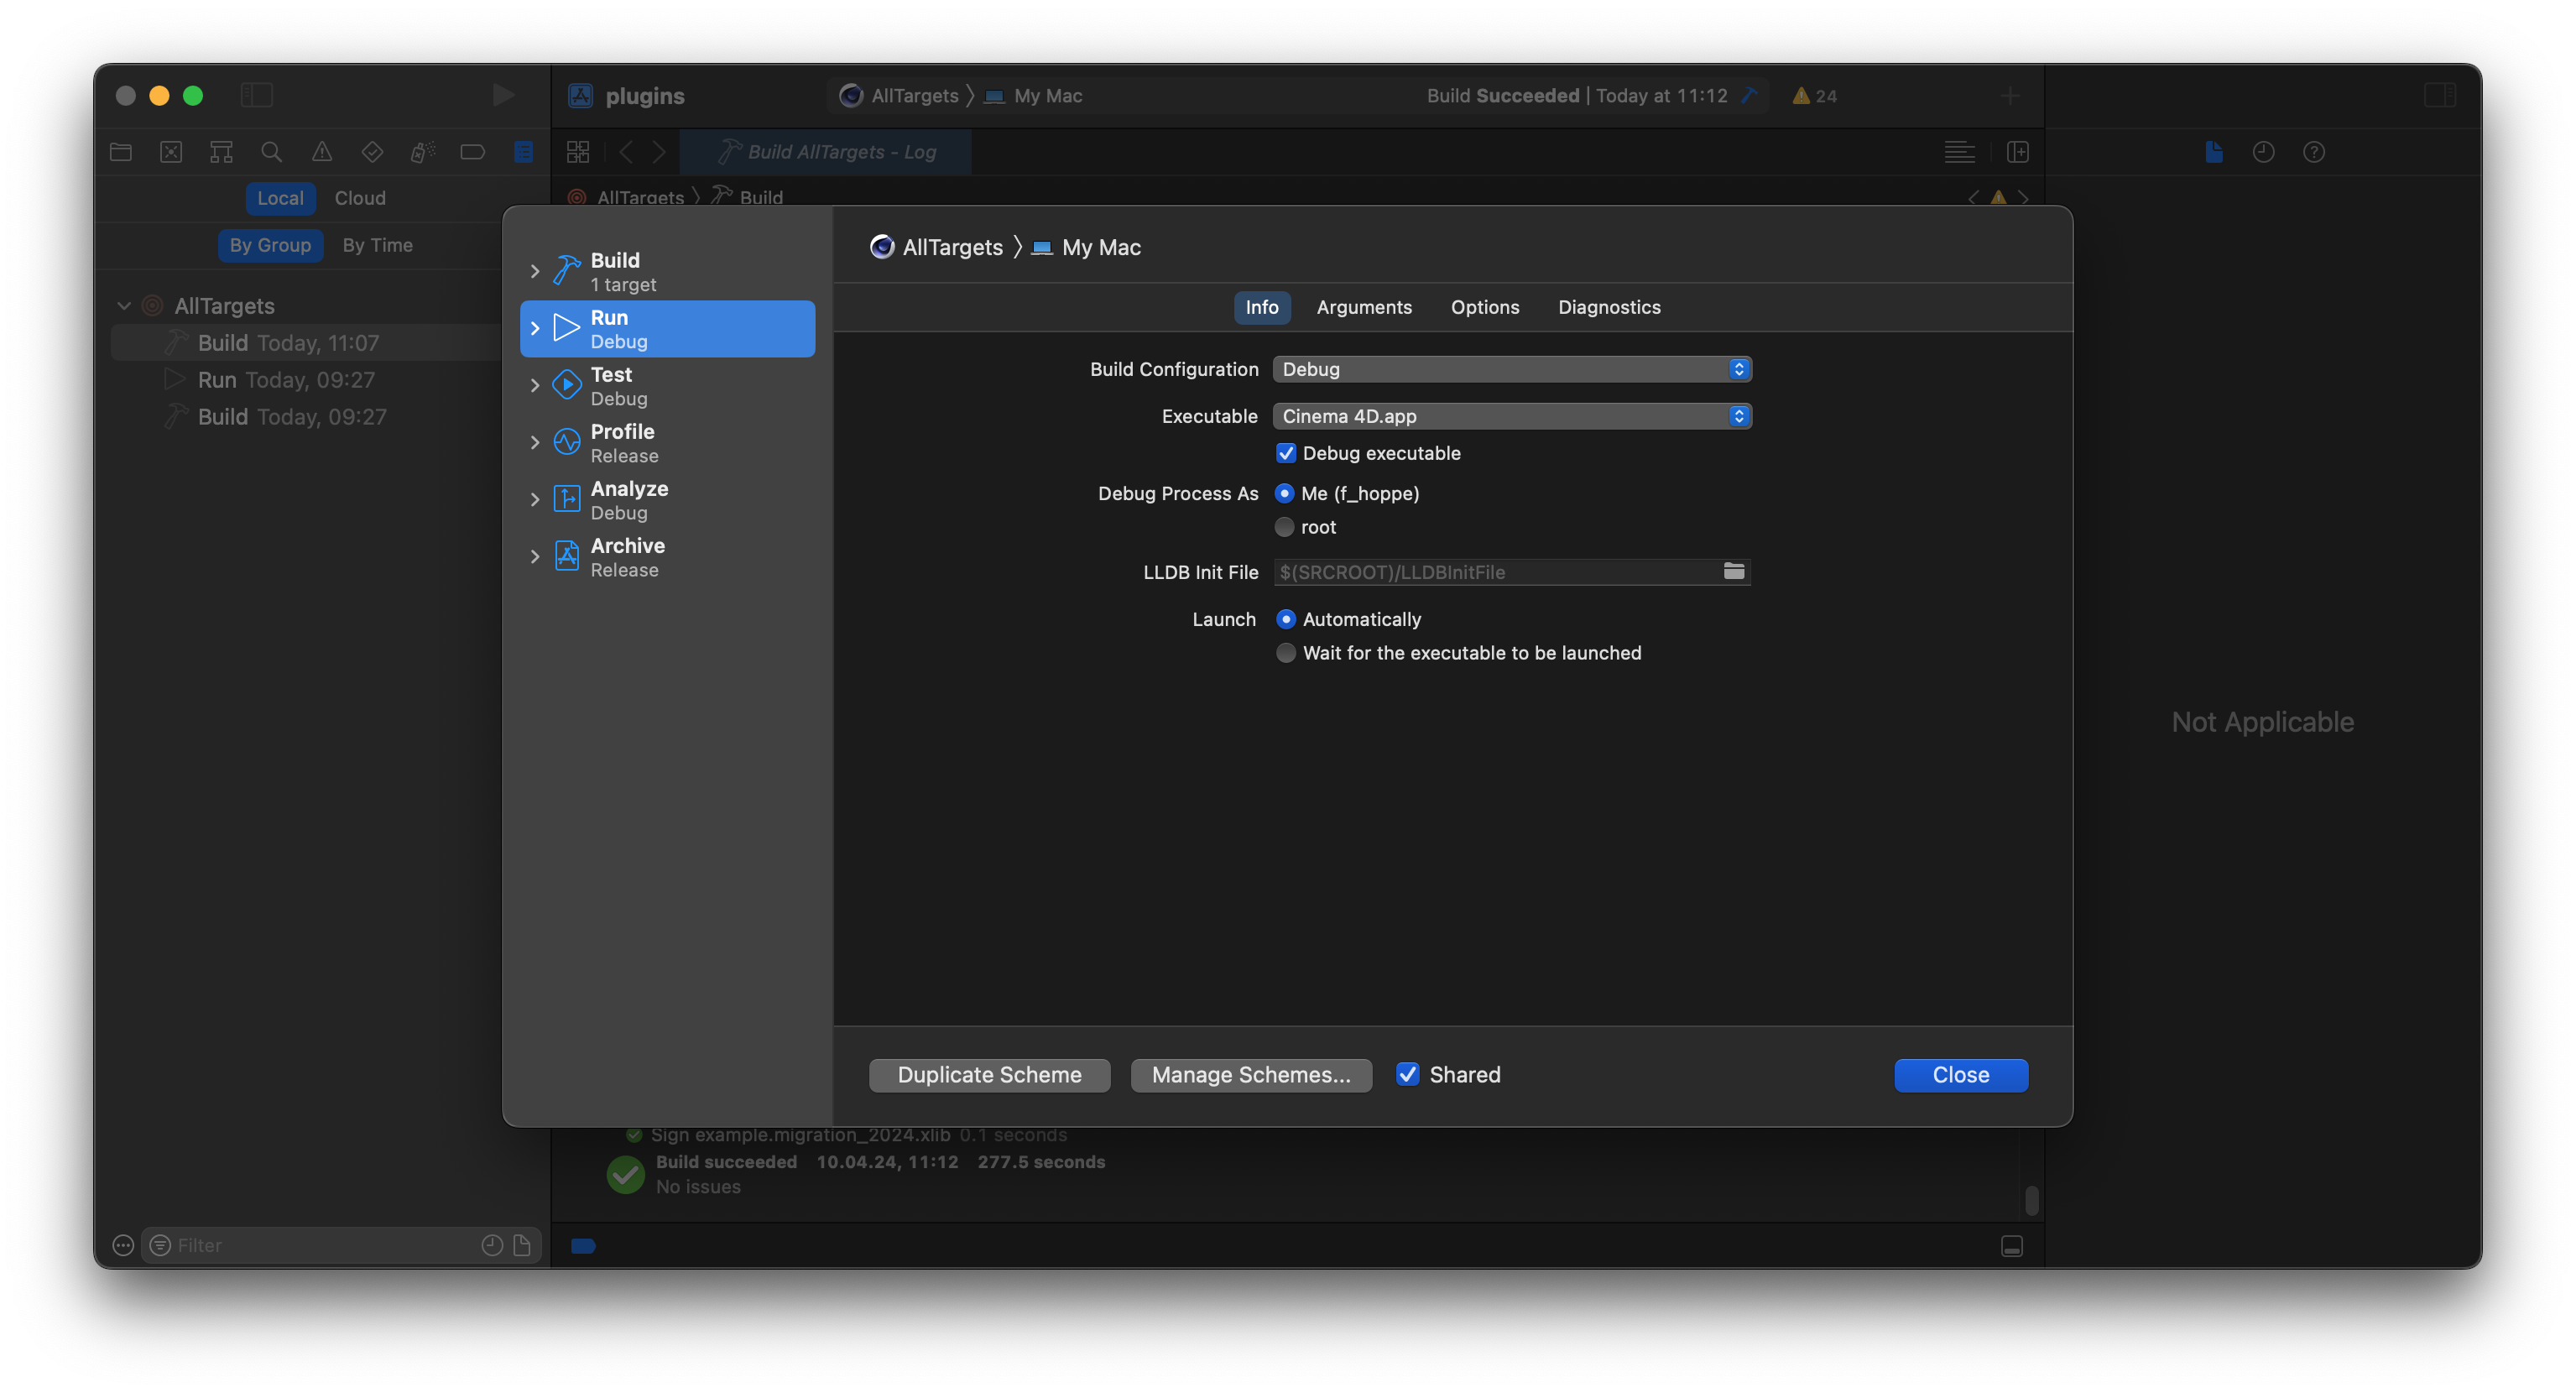
In Xcode we must always configure the debugger at this point. We can either do this manually or automatically using CMake. To use CMake, simply set the MAXON_C4D_EXECUTABLE option in CMake to the path of a Cinema 4D executable that matches the used SDK. Then reconfigure and regenrate the project. You do not have to recompile. See Fig. IV for a demonstration.
When you want to configure the debugger manually, you must select a scheme where you want to do this, this should be be either ALL_BUILD or your project. Then edit the scheme by selecting Product > Scheme > Edit Scheme. In the scheme editor, select the Run section and set the Executable to a Cinema 4D executable that matches the used SDK.
When you would now start debugging, Cinema 4D would start, but it would not load your plugin because it would not know that your plugin does exist. To fix this, set the Arguments Passed On Launch to the string shown below which will tell Cinema 4D to load all plugins in your build output folder.
- Note
- You can always debug a plugin binary with a Cinema 4D version that exactly matches the SDK version the plugin has been compiled. To learn more about the compatibility between compiled plugin binaries and different Cinema 4D versions, see the ABI Compatibility .
Attaching the Debugger
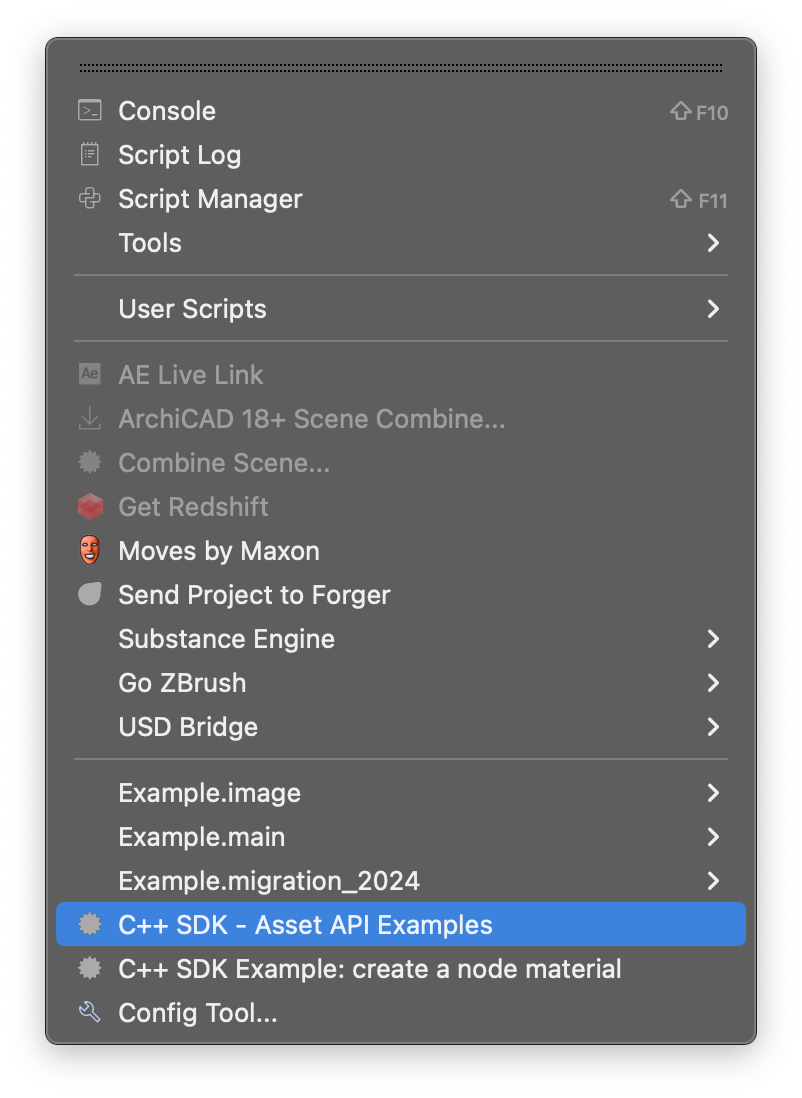
Now you can press CMD+R or the grey 'Play' button in the toolbar of Xcode to start the debugger. The debugger will boot Cinema 4D which will also load your plugin. Once Cinema 4D has started, you can check its Extensions menu to see if the C++ SDK has been loaded.
Without closing Cinema 4D and without stopping the debugger in Xcode, you now return to Xcode. There you navigate to the file modules/example.main/source/object/roundedtube.cpp in the Project Navigator and open it by double-clicking it. In the file, you open the search by pressing CMD+F and search for the definition of the method RoundedTubeData::GetVirtualObjects. Here you set a breakpoint by left-clicking the line number of one of the lines of the method. The breakpoint should lie within the scope, the curly braces, of the method. The line should now be marked by a blue arrow.
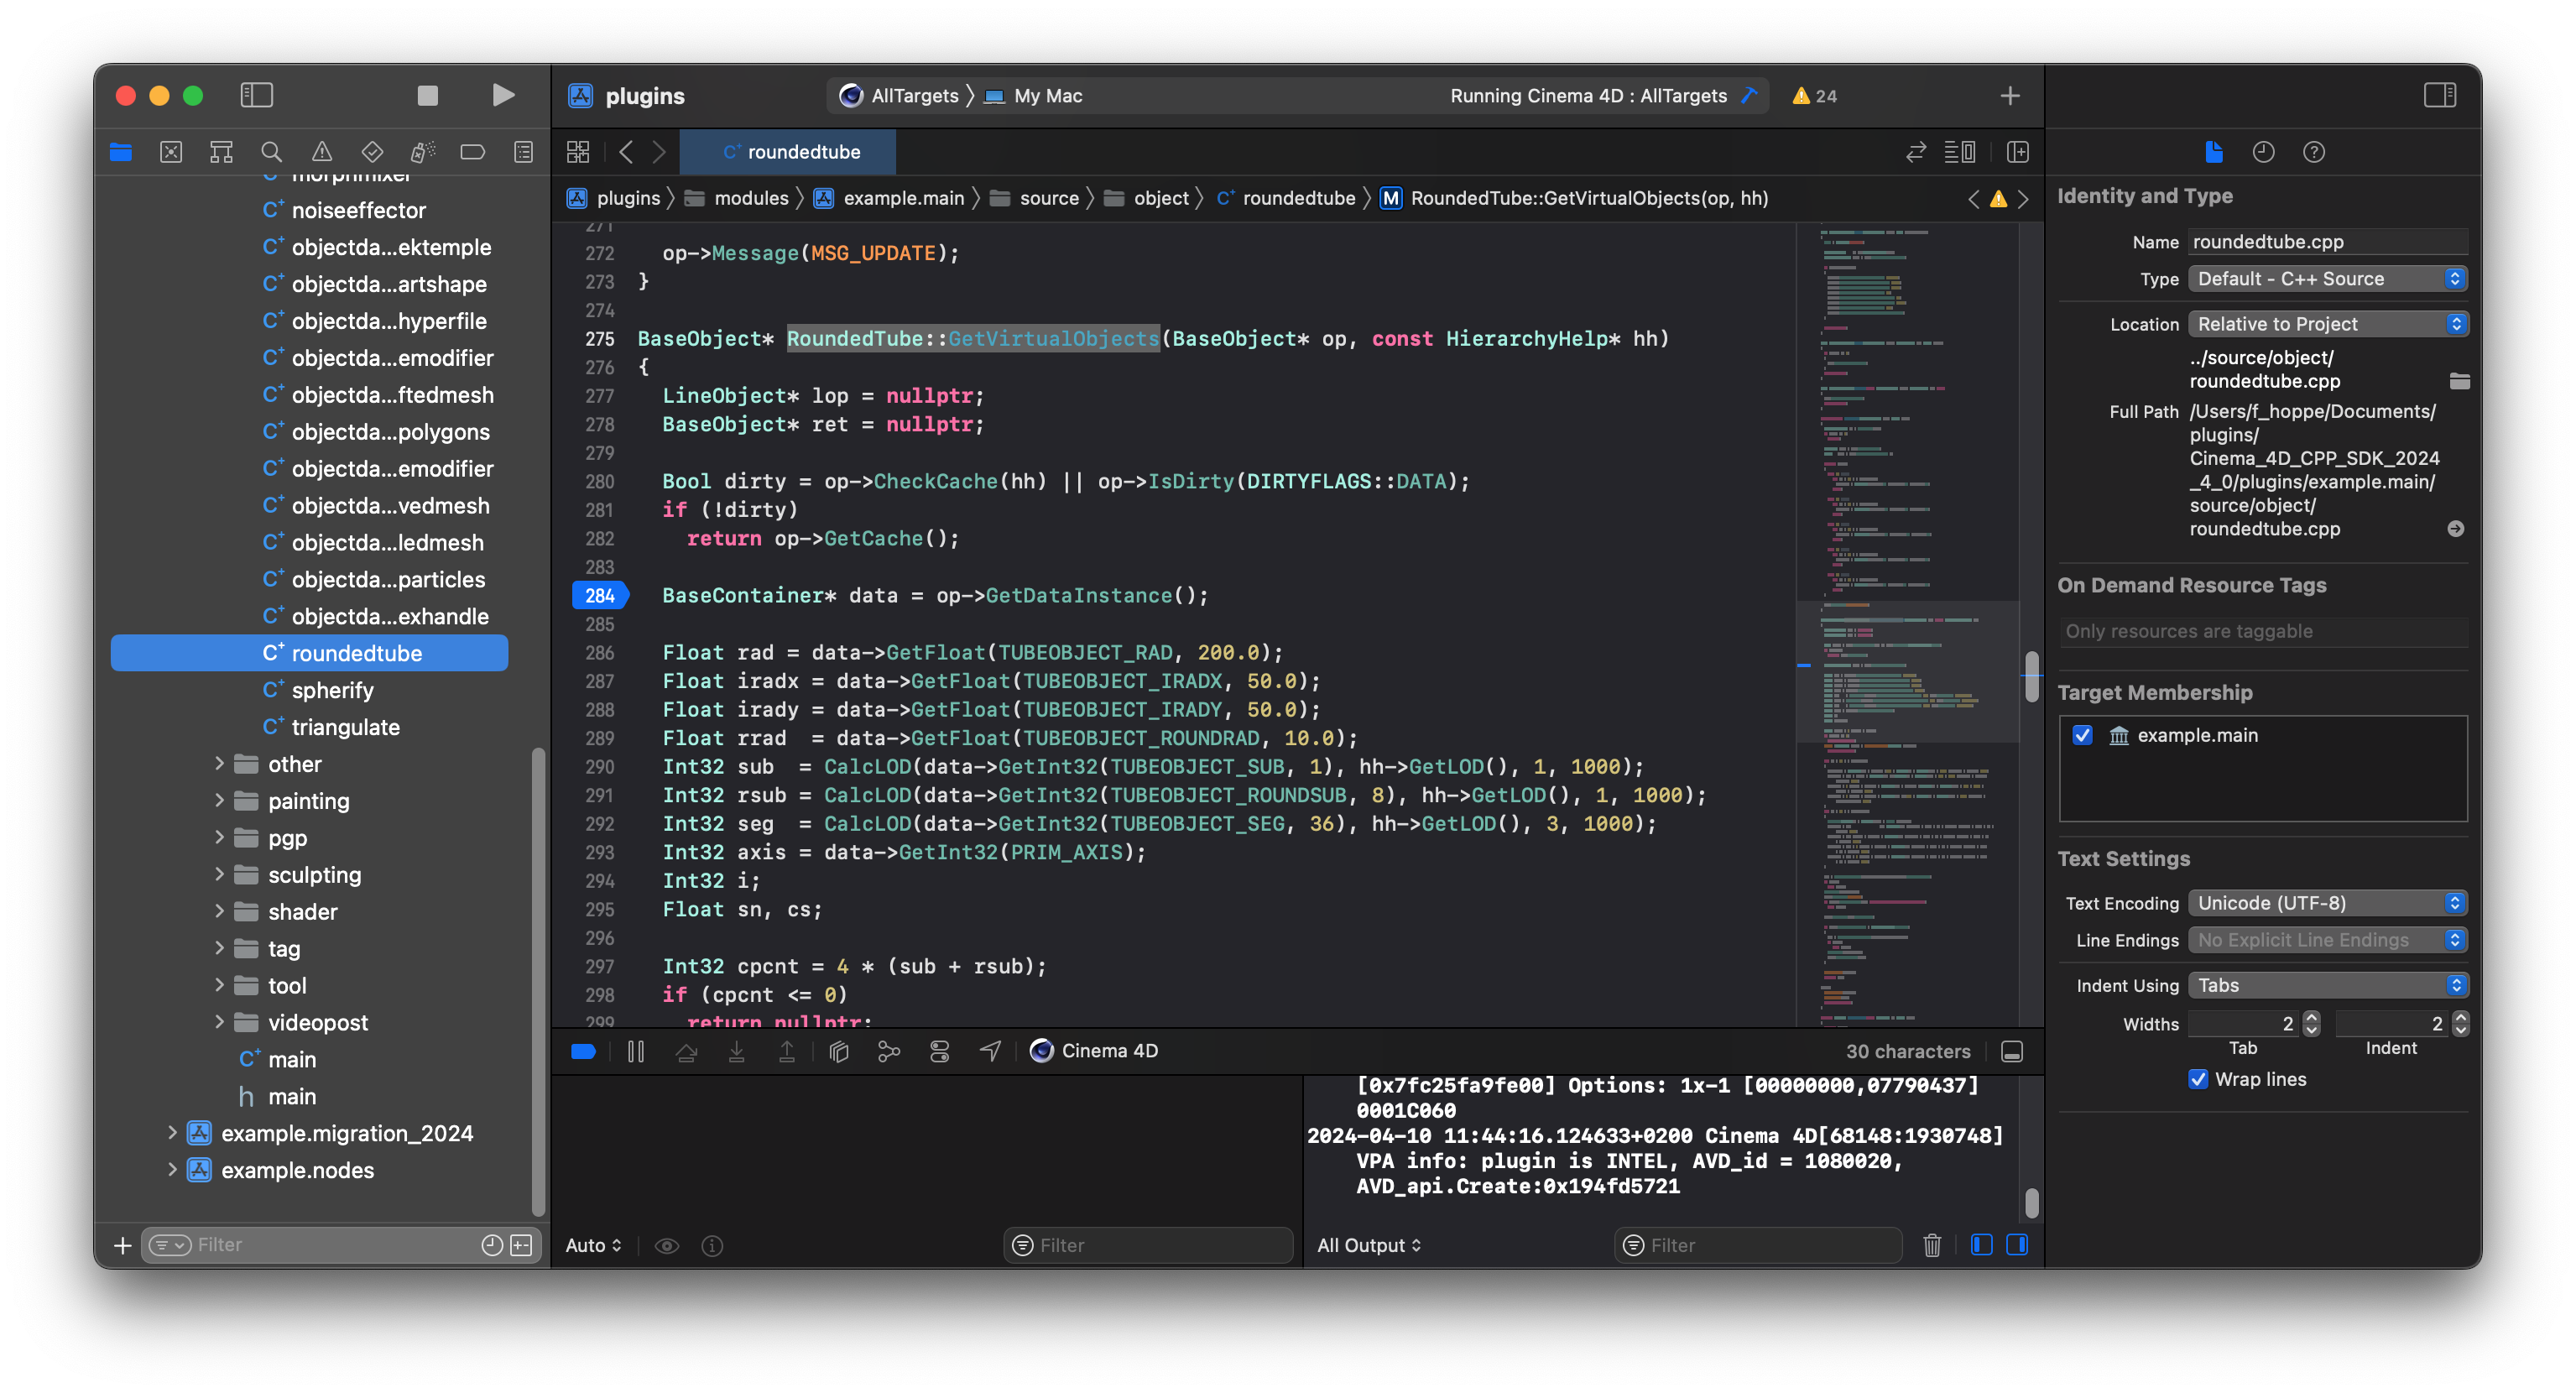
RoundedTubeData::GetVirtualObjects() method while the debugger is running. You can also set a breakpoint when the debugger is not running, we just do it here in one go so that you do not have to reboot Cinema 4D between debugging the SDK for the first time and setting your first breakpoint. Back in Cinema 4D, you can now invoke the Rounded Tube code example from the Commander by pressing SHIFT+C and typing Rounded Tube and then hitting Enter. Cinema 4D will now create an instance of the RoundedTubeData object which will try to build its geometry cache. The debugger will halt on your breakpoint because you have set it in RoundedTubeData::GetVirtualObjects(), the method which is responsible for building the geometry of that plugin.
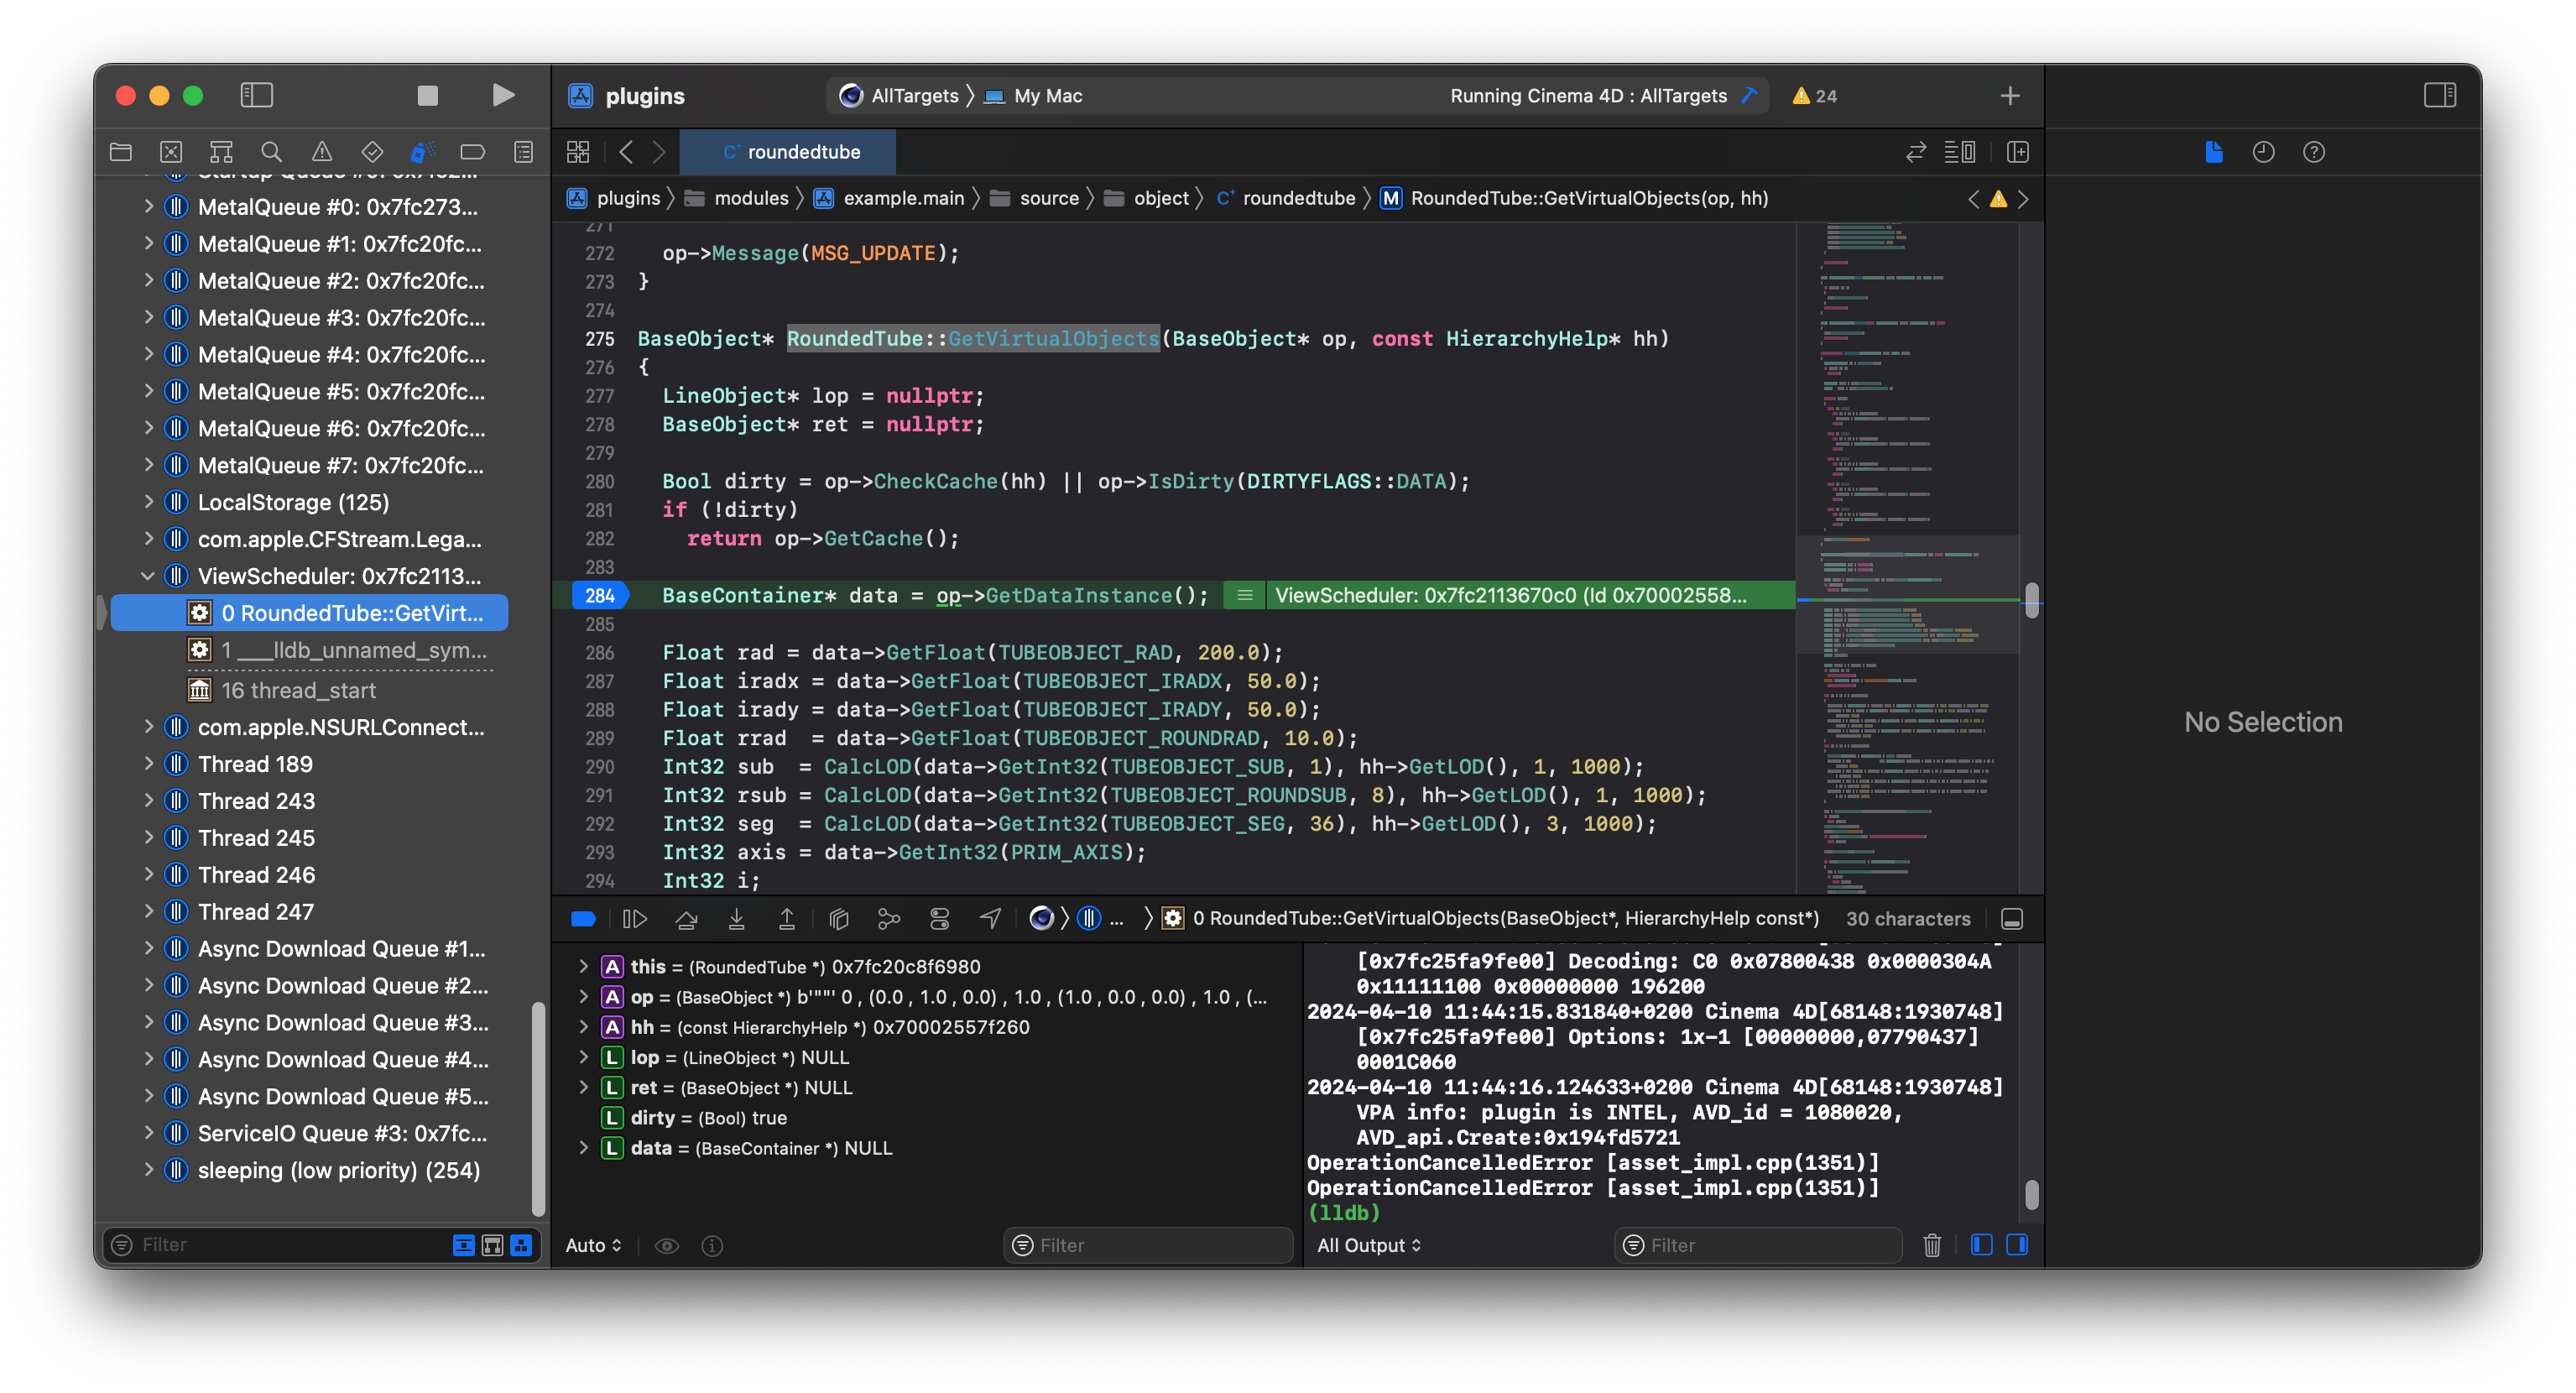
You can now step through the code by pressing F6 to step over the current line or F7 to step into the current line. You can also inspect variables by hovering over them with your mouse or by adding them to the watch window by right-clicking them and selecting Add Expression.
Advanced Techniques
You can now stop the debugger by pressing the stop button in the toolbar in the top left of Xcode. We will now learn how to print (debug) messages in the Cinema 4D API to its various consoles and how to invoke debug stops from code.
To do that, first disable your breakpoint by again clicking on the blue arrow in the the code editor of the modules/example.main/source/object/roundedtube.cpp file. Then insert the code shown below into the RoundedTubeData::GetVirtualObjects the file so that the snip marks line up with the existing code.
Now rebuild the solution by pressing CMD+B or selecting Build from the Product menu. When the build has finished, start the debugger by pressing CMD+R or the grey 'Play' button in the toolbar of Xcode. In Cinema 4D, create again an instance of the Rounded Tube object. The debugger will now halt on its own on the first manual halt in your code, the DebugStop, and then on the second manual halt, the CriticalStop. Press CTRL+CMD+Y to continue the execution of the program after each halt.
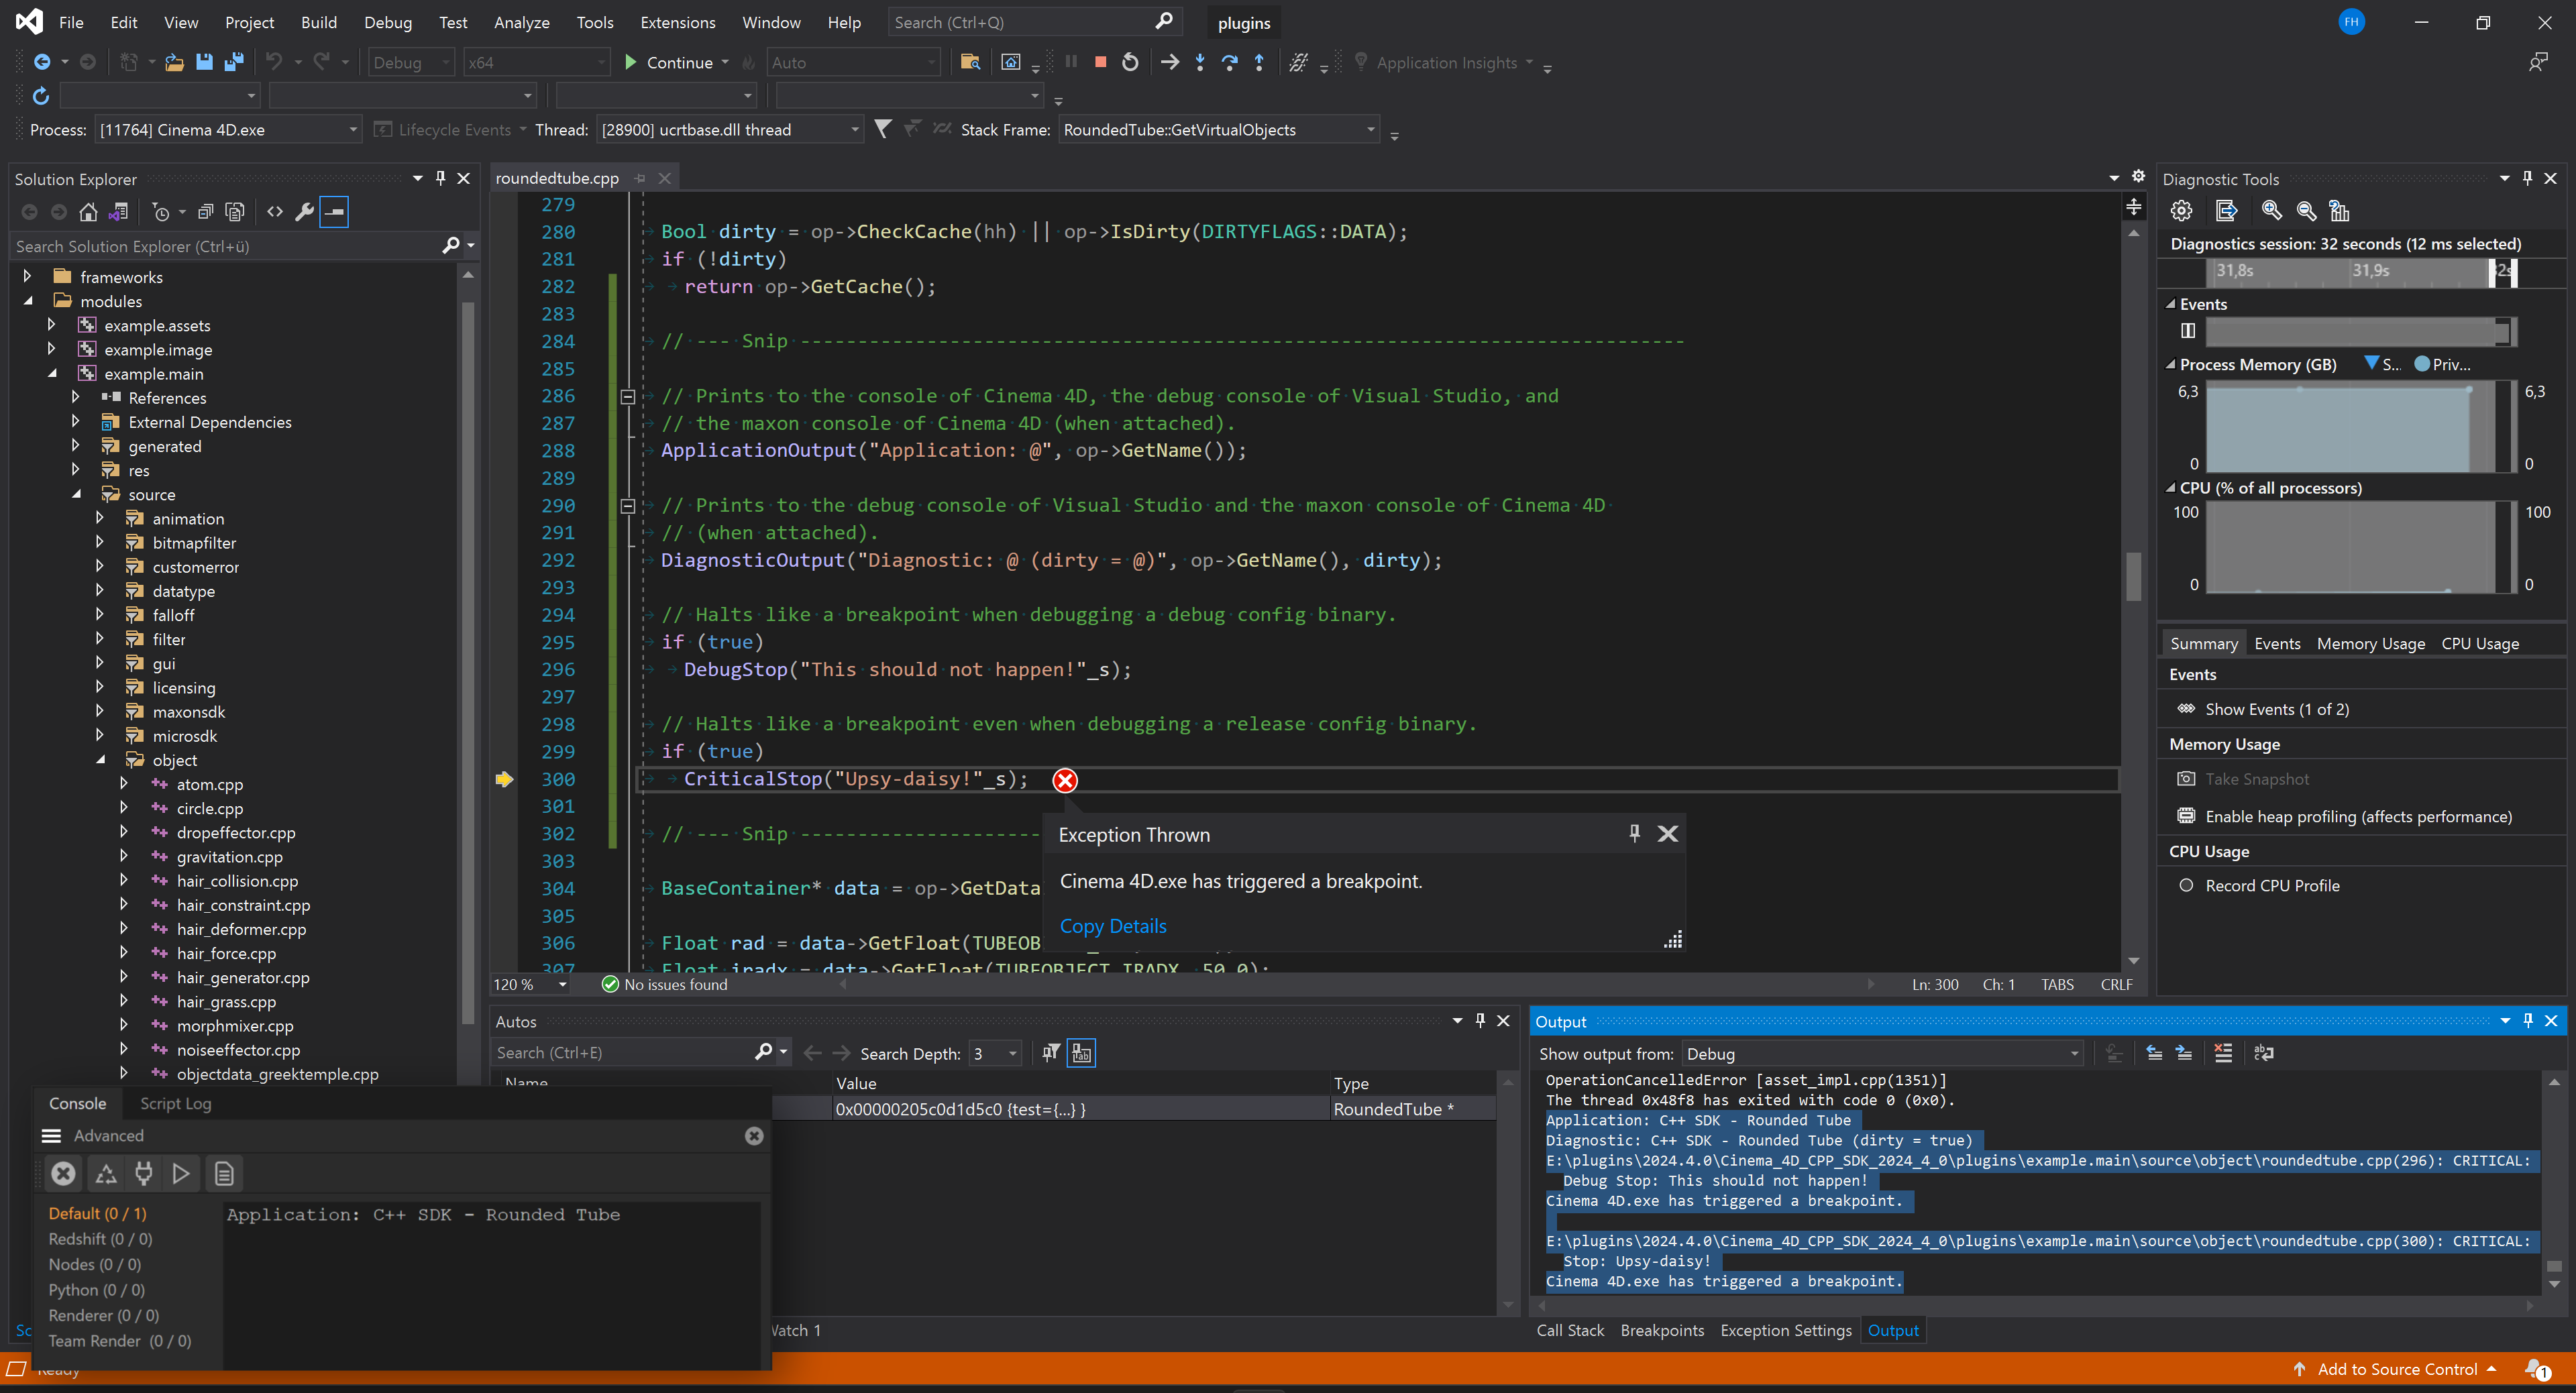
CriticalStop. In the lower right corner you see the Xcode output window which shows the output of the ApplicationOutput and DiagnosticOutput calls, as well as the messages of both DebugStop and CriticalStop. The ApplicationOutput call is also shown in the Cinema 4D console, superimposed in the bottom left corner. - Note
- To see the output of the
ApplicationOutputcalls in the Cinema 4D console, you must have the Cinema 4D console open. You can open the Cinema 4D console by selecting Extensions > Console from the Cinema 4D menu. To see output in the maxon console, you must run Cinema 4D with the command line argumentg_console=trueorg_consoleDebugger=true. The former will only show the Cinema 4D console when no debugger is attached, the latter will always show the Cinema 4D console.
ApplicationOutput is a relatively expensive call and you should avoid it in production code for everything but critical messages which are meant to be seen by the end-user. When you spam the Cinema 4D console with messages, you not only render it unusable for others but also eat up considerable system resources as rendering the console takes time. DiagnosticOutput is a less expensive call than ApplicationOutput and should be used for messages that are meant for developers and not for end-users.
There are more output functions available in the Cinema 4D API, see the Console Output for more information. The Output functions all support the maxon string output syntax which is described in the Output Syntax page. The general idea is that the \@ character is used to insert variables into the string and you can pass as many variables as you want to these functions as they are all variadic functions.
DebugStop and CriticalStop are used to halt the execution of the program just like a breakpoint would. DebugStop will only halt the program when it is being debugged in a debug configuration, CriticalStop will halt the program in all configurations. These functions can be useful to bake breakpoints into your code to halt a debugger when something truly critical happens that you did not expect to happen. For end-users these functions will not do anything, they are only active when the program is being debugged.
But you might also run into these two functions without using them yourself as they are often used in the Cinema 4D frameworks to halt the program when something unexpected happens. When you hit a DebugStop or worse, a CriticalStop, in the frameworks while debugging your plugin, it usually means that you either do something truly wrong or have found a bug in Cinema 4D. Most of our debug stops unfortunately are not very informative and do not have an error message attached. But you can look at the framework code to get a sense of what is going wrong. When you hit a wall in such cases, do not hesitate to ask for help on the Maxon Developer Forum.
Extending the SDK
Now that you have built and debugged the Cinema 4D C++ SDK, it is time to add your first own plugin.
- Note
- This section focuses on all the boilerplate code and steps necessary to get a new plugin up and running. It is not about how to write a specific plugin type but will contain code for your first minimal plugin. Please refer to the code examples for instructions on how to implement specific plugin types.
To add a new plugin to the SDK, you must either create a new module in the SDK solution or create a new solution with a new module. You technically could setup shop in one of the existing SDK projects, e.g., the examples.asset project, but this would mean you would have to ship your plugin with the binary of the examples.asset project. You therefore need at least one custom project to ship your plugin(s). Within such project you can have multiple plugins, so that you can ship multiple plugins with one binary.
Adding a Project
First you must create a new module folder in the plugins folder of your solution. The name of the new folder will determine of the plugin binary into which your module will be compiled. In this folder, you must create a project folder and in that folder a projectdefinition.txt file. You also need a source folder in the project folder and in that folder a main.cpp file.
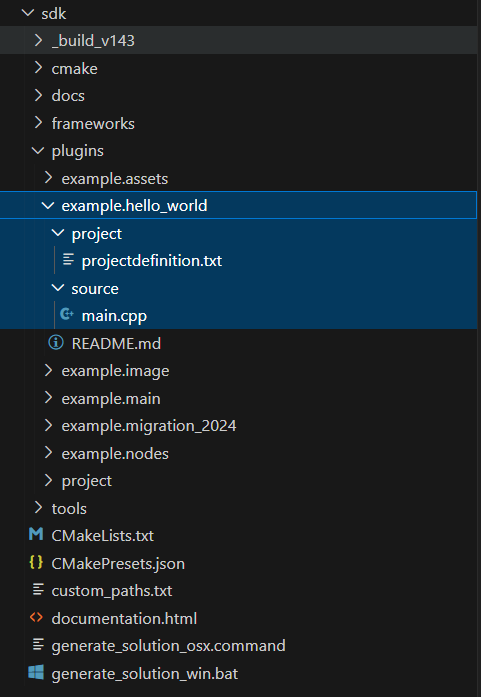
example.hello_world project provides an example for the minimal setup of a new Cinema 4D module. The projectdefinition.txt file contains the instructions for CMake to generate the project files for the module. The main.cpp file contains the code of the module, in this case a simple command plugin which opens a message dialog with the text "Hello World!" when invoked. Setting up a Project
NNow you must fill the projectdefinition.txt file of your new project with instructions for the CMake.
CMake will generate the solution files for the project based on the information in the projectdefinition.txt files it finds in each module. The projectdefinition.txt file must contain at least the following information:
- The platforms the project is targeting, e.g.,
Platform=Win64;OSX;Linux. - The type of the project, usually
Type=DLL. - The frameworks the project uses, e.g.,
APIS=cinema.framework;cinema_hybrid.framework;core.framework. - The module identifier of the project, e.g.,
ModuleId=net.maxonexample.hello_world.
To learn more about projectdefinition.txt files, see the Configuring Build Systems.
- Warning
- You cannot use module identifiers in the domain
"net.maxon."as they are reserved for Maxon Computer. Plugins using such identifiers will not be loaded by Cinema 4D.
The APIS argument determines which frameworks are included in your project and therefore which header files of the Cinema 4D API you can use in your project. As a third party developer, you can include all frameworks - or at least a broad selection as shown in the examples.main project - with little to no downsides for your project.
But as a beginner you will usually only need the cinema.framework, cinema_hybrid.framework, and core.framework frameworks. The cinema.framework contains most parts of the Cinema API of Cinema 4D, the cinema_hybrid.framework contains parts of the Cinema API and the Maxon API, and the core.framework contains important foundational aspects of the Maxon API. The cinema.framework is the most important framework for you as a beginner as it contains most of the Cinema API of Cinema 4D and with it all the plugin interfaces that are interesting for beginners. The Maxon API will only play a minor role in your first steps without you missing out on anything. See Plugin Types for an overview of the different plugins types.
- Note
- You will encounter the terms Cinema API and Maxon API often in the Cinema 4D SDK. The Cinema API is the API that has been around since the inception of Cinema 4D and is the API that is used by most plugins. The Maxon API is a new API that is being introduced with Cinema 4D R20. Both APIs coexist and while there is some overlap between them, they mostly follow different paradigms and are used for different purposes. The Cinema API is written in mainly very accessible old-school C++ - pointers everywhere, strong focus on messages, no smart pointers, no templates, no lambdas, almost no automated memory handling. The Maxon API is written in modern C++ and uses features such as templates, smart pointers, and lambdas. The Maxon API has also a custom error handling system replacing C++ exceptions and an automated memory management system.
Writing the Plugin
Now it is time to finally fill your main.cpp file with the code of your plugin. This section is mostly about the boilerplate code you need to get a plugin up and running and uses the minimal code necessary to implement a plugin. The plugin will be a simple command that opens a message dialog with the text "Hello World!" when invoked.
- Note
- This section demonstrates how to implement Cinema API plugins which make up the vast majority of plugin types such as commands, tools, messages handlers, scene hooks, objects, tags, (Cinema API legacy) materials, (Cinema API legacy) shaders and more. Plugins in the Maxon API are implemented entirely differently and are not covered in this section. The Maxon API primarily covers plugins that implement custom assets for the Asset API and plugins that implement custom node spaces, node systems, and node templates for the Node API. See Plugin Types for an overview of the different plugins types.
Most plugins also split up their code into multiple files, the main.cpp file and one or multiple files that implement the actual plugin. The main.cpp is usually only used to handle plugin messages sent to the module the main.cpp is the entry point of, while the actual plugin code is implemented in other files. This example condenses all the code into the main.cpp file for simplicity.
The content of the main.cpp file in the plugins/myplugin/project/source folder should look like as shown below:
The important aspects of getting a module and plugin up an running are:
- The cinema::PluginStart function is the entry point for registering all Cinema API plugins and called when your module is being loaded. A plugin that does not register itself or whose registration fails will not be accessible to users as it will not be loaded. This function must be implemented in the
main.cppfile of a project. - The cinema::PluginEnd function is called by Cinema 4D when a module is about to be unloaded. Most plugins use the empty implementation shown here as they do not have to do any manual cleanup. This function is usually implemented in the
main.cppfile of a project. - The PluginMessage function is called by Cinema 4D when a plugin message is sent to the module. There are several messages but all plugins must implement at least
C4DPL_INIT_SYSas shown here. Otherwise, the module and its plugins will not work. See Plugin Messages for more information on the plugin message system. - All plugins must register themselves with Cinema 4D by using the specific registration functions intended for their plugin type. In this case, the RegisterCommandPlugin function is used to register a command plugin. One or multiple of these registration function calls are then usually bundled up in a
RegisterMyPlugin()function that is called fromPluginStart()in the module. TheRegisterMyPlugin()function is often implemented in one of the plugin files, e.g.,myplugin.cppand is then 'included' in themain.cppfile as a forward declaration.
The arguments passed to plugin registration functions such as RegisterCommandPlugin differs from plugin type to plugin type but there are some commonalties:
- The first argument is the identifier of the plugin. This identifier must be unique and new identifiers must be obtained from developers.maxon.net.
- Passed are so usually also a plugin label, a tooltip, and some form of icon (there some plugin types which do not have an icon or tooltip).
- And finally either an instance of the plugin class or a function that returns an instance of the plugin class. The plugin class must inherit from a specific plugin hook of the Cinema 4D API, e.g.,
CommandDatafor a command plugin.
- Warning
- You can 'invent' plugin identifiers for a plugins you use only for testing purposes. But when you want to ship a plugin or plan to uses it for a prolonged time, you must obtain a plugin identifier from developers.maxon.net. Otherwise you risk identifier conflicts with other plugins which will lead to one of the plugins not being loaded.
To run your plugin, you must now rebuild the solution by pressing CMD+B or selecting Build from the Product menu. When the build has finished, you can start the debugger by pressing CMD+R or the grey 'Play' button in the toolbar of Xcode. In Cinema 4D, you can now find your plugin in the Extensions menu. You can also invoke it from the Commander by pressing SHIFT+C and typing Hello World Command (my_project) and then hitting Enter. When you do this, a message dialog with the text "Hello World!" will open.
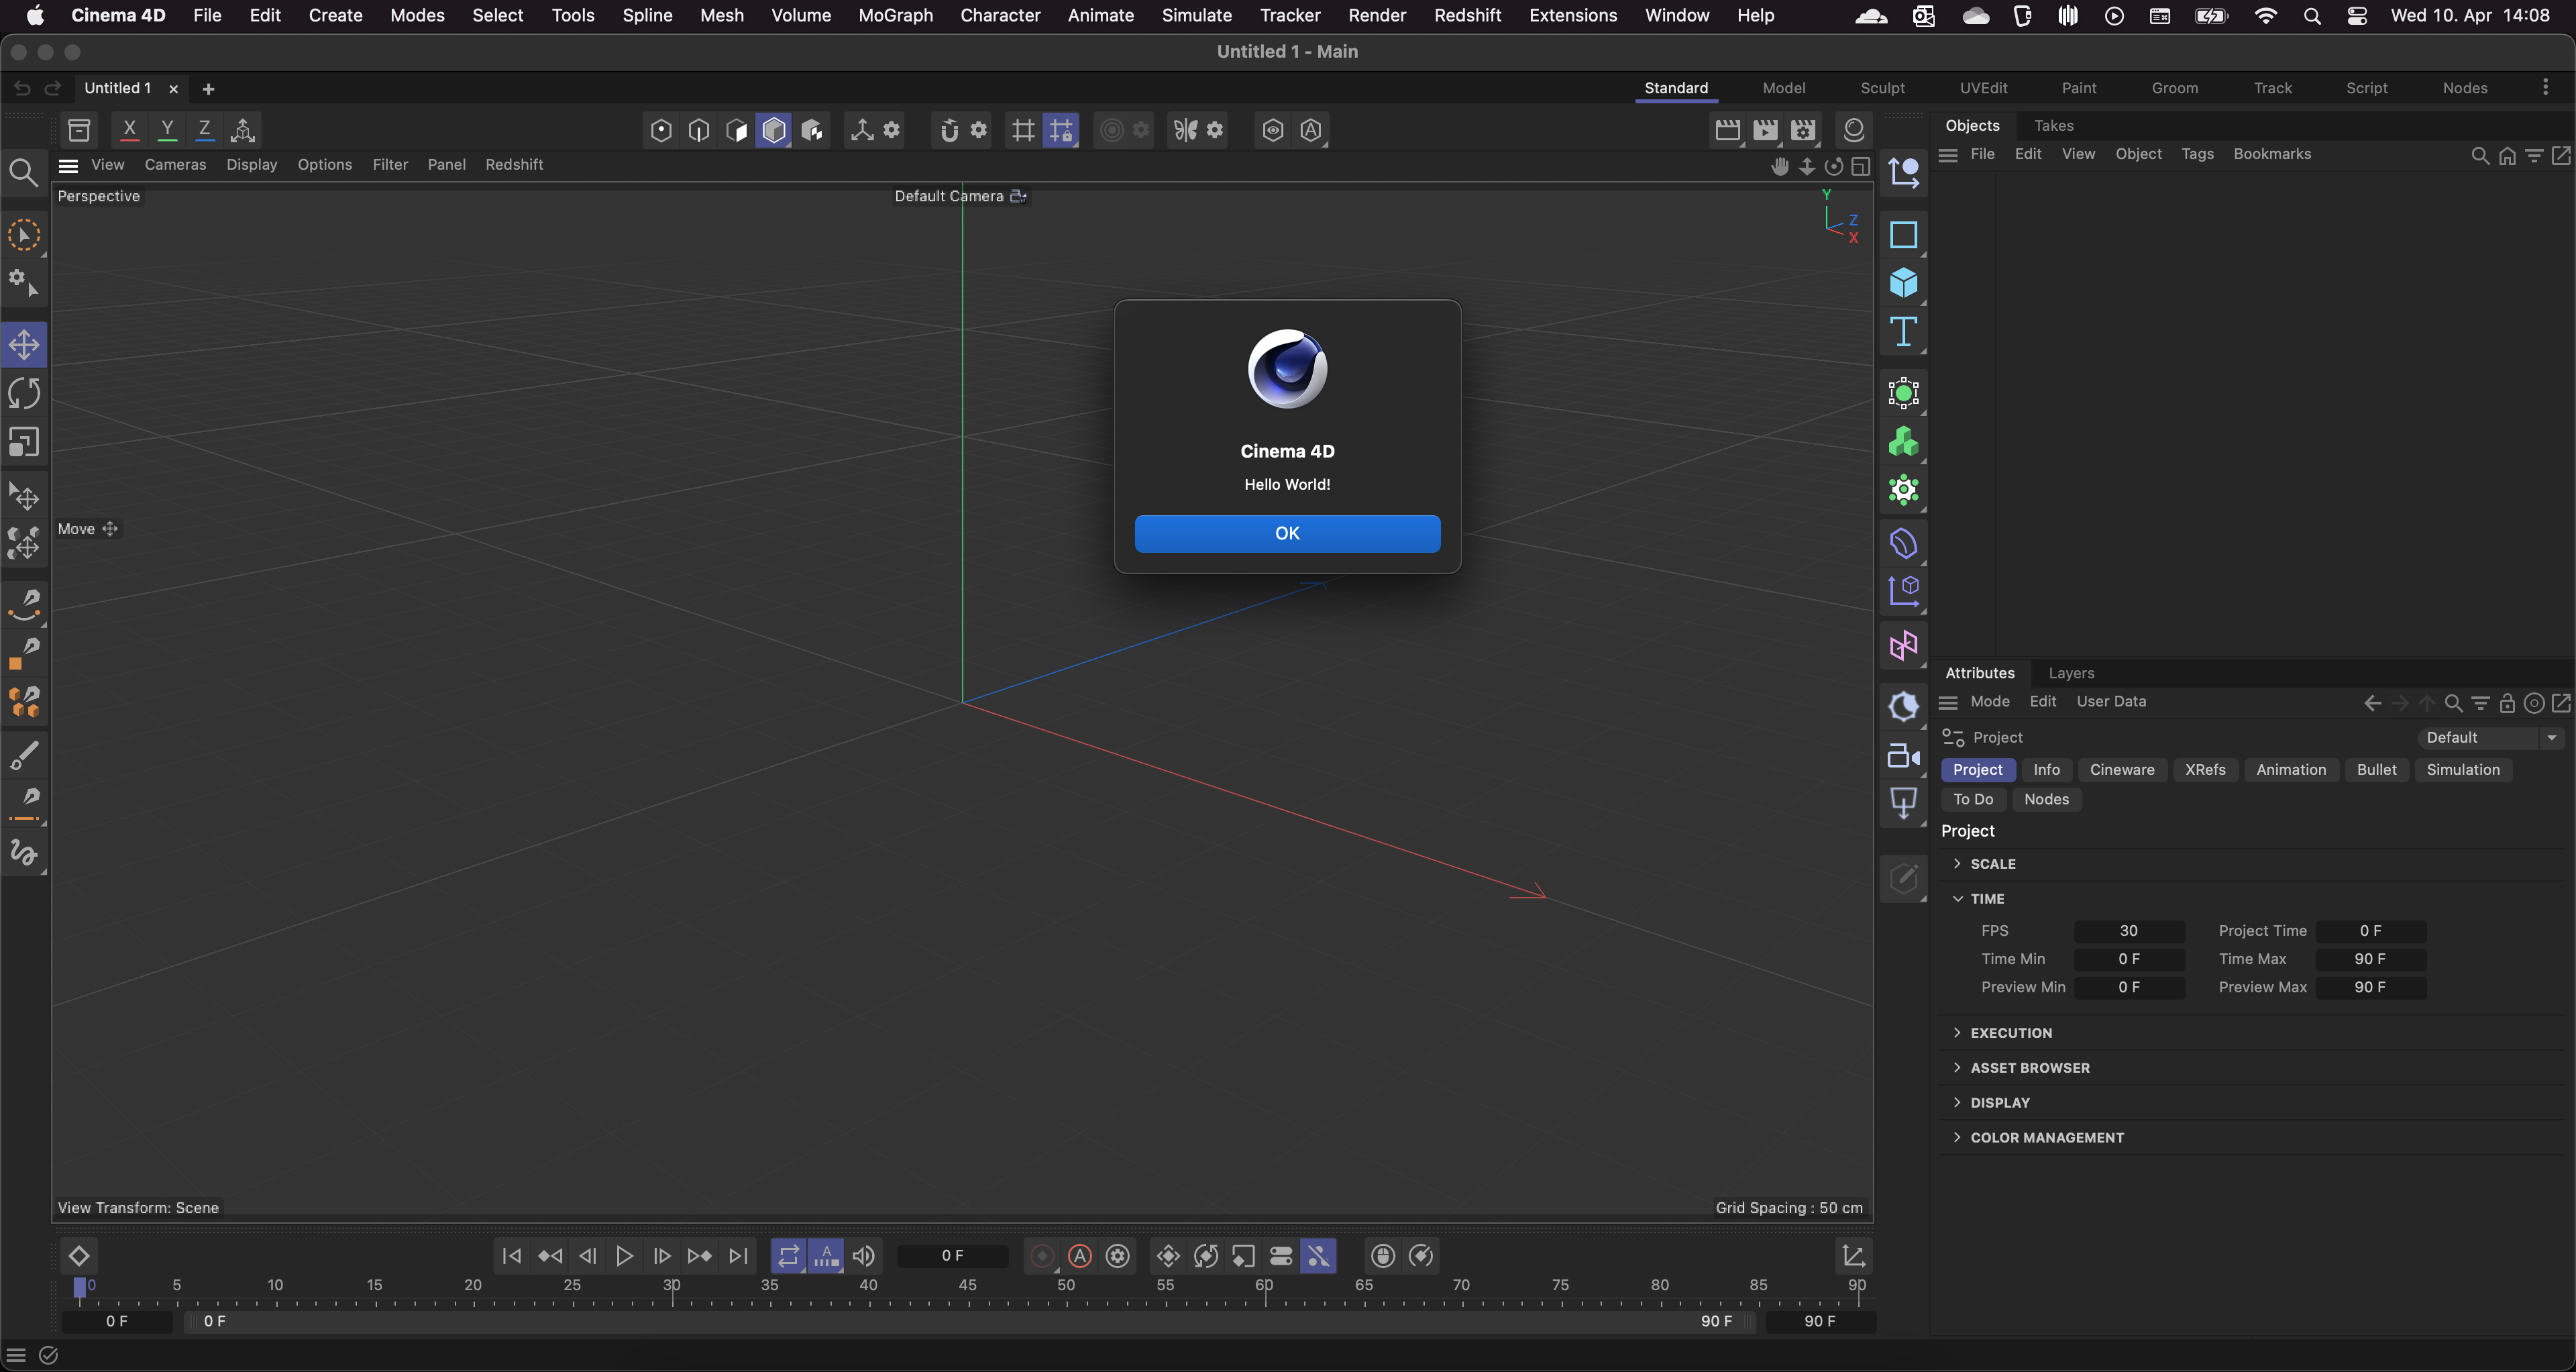
Extensions menu. Further Reading
- API Overview : Provides an overview of the Cinema 4D C++ SDK.
- Build Systems : Describes the project generation for Cinema 4D C++ API projects in more detail.