Table of Contents
Development Environment
Xcode is the only supported IDE and compiler for producing Cinema 4D plugins for macOS. Xcode 14 is not supported. See Development Environments for an overview of supported Xcode versions for different versions of Cinema 4D. When building the SDK for macOS, one must use the sdk.zip file provided by a macOS installation of Cinema 4D to avoid file permission problems.
Prerequisites
Cinema 4D projects for macOS have currently two prerequisites:
- A Python interpreter to execute Python scripts in the build process.
- The availability of the legacy build system which is being phased out by Apple.
Python
Other than older versions of macOS, macOS Monterey does not provide a Python installation. One must provide therefore such interpreter and symbolic links to it, preferably the Python 3 interpreter shipped with the Xcode Command Line Tools. Follow these steps to install the tools and create a symbolic link for the contained Python interpreter:
- Remove existing Xcode Command Line Tools: When the Command Line Tools are already installed on a system, one should ensure that they match the currently used Xcode version and reinstall them. To uninstall the tools, simply delete the directory
/Library/Developer/CommandLineTools/as recommend by Apple. - Open a terminal: Press
CMD + Spaceand type"Terminal"and pressEnter. - Create the directory: mkdir /usr/local/bin
- Install the tools: xcode-select --install
- Remove old symbolic link: sudo rm /usr/local/bin/python
- Add new symbolic link: sudo ln -s /Library/Developer/CommandLineTools/Library/Frameworks/Python3.framework/Versions/3.8/bin/python3.8 /usr/local/bin/python
Legacy Build System
Once the Project Tool has ran on a directory of source files and generated the project solution, one must take two steps to successfully compile such solution.
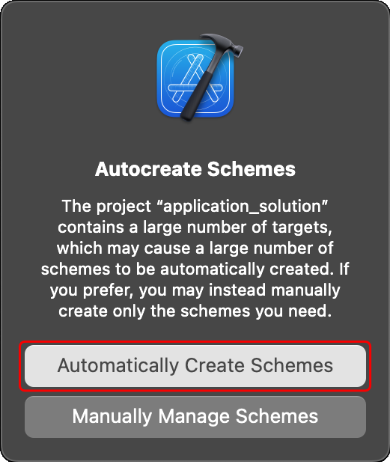
- Generate Project Schemes: When opening the solution, accept the offer of Xcode to automatically generate schemes for the projects in the solution (Fig. I).
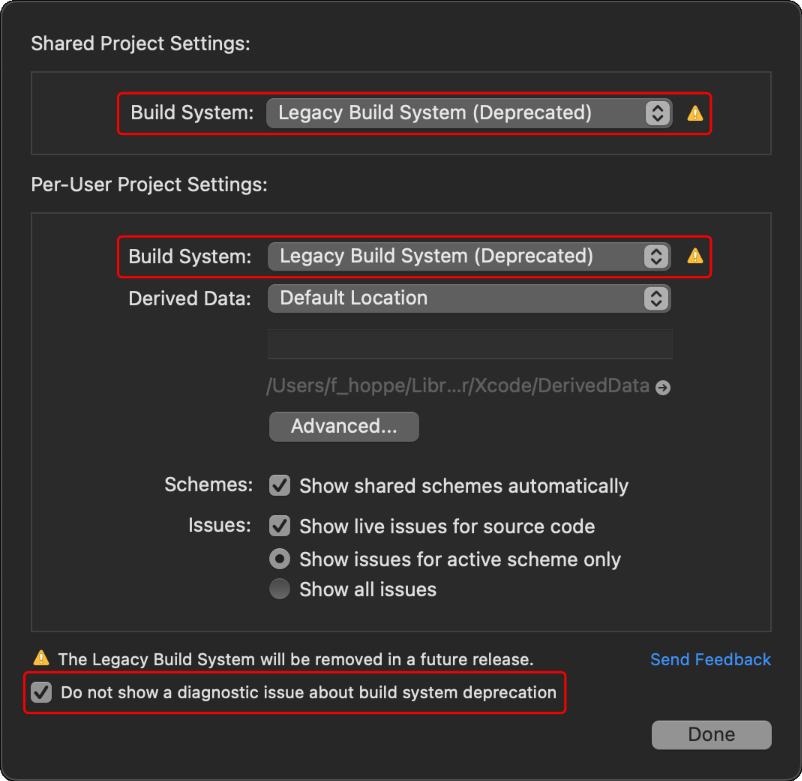
- Enable Legacy Build System: To successfully build the solution, one must enable the Legacy Build Settings and supress the deprecation warnings. Go to
File > Project Settingsand configure it as shown in Fig. II.
Best Practice
macOS Specific Code
macOS specific code can be guarded with the macro MAXON_TARGET_MACOS:
Universal Binaries
Since Cinema 4D R23 Service Pack 1, it's possible to build plugins as Universal Binaries to run them both on Intel-based and ARM-based hardware.
To build Universal Binaries the following development environment is required:
- macOS Catalina 10.15.6+ or macOS Big Sur 11.x
- Xcode 12.2+
Aside from regenerating the project using the Project Tool, if the plugin's code is fully relying on Cinema 4D APIs, no changes are needed and rebuilding the project will suffice to generate universal binaries running on both platforms.
In case one of the two architectures is not required you can deactivate it by:
- commenting out the architecture not desired in <R23 SP1 SDK>/frameworks/settings/compiler.xcconfig and rebuild, or
- for each framework/module enter (1) the Build Settings, set (2) the Architecture to the proper desired one (x86_64 or arm64) and deactivate (3) Build Active Architecture Only.

3rd-party Libraries Support
If your plugin makes use of 3rd-party libraries, it's recommended to port the library on Apple Silicon - as recommended here - before attempting to build the whole Cinema 4D plugin to streamline the porting process.
Running Plugins
It is possible to start Cinema 4D from Xcode to run and debug a plugin:
- In the plugin project scheme set "Run"->"Run" "Info"->"Executable" to the location of a Cinema 4D executable.
- Under "Arguments" add and set the command line argument g_additionalModulePath to make sure that this Cinema 4D executable will find and load the plugin.
Debugging
The Console displays messages printed with DiagnosticOutput(). See Debug and Output Functions.
For general information on debugging see Debugging.
Automating Processes
The execution of the Project Tool can easily be automated using bash scripts.
This bash script executes the Project Tool on the given location of the SDK and starts Xcode to open the solution file:
This bash script starts Cinema 4D with the location of the plugins:
Additionally one can set the command line argument g_runUnitTests to automatically execute custom unit tests.
Cinema 4D can be informed on the type of license model to use - which can be helpful in certain automated tasks - by using:
- g_licenseServerRLM="[servername]:[port]" to specify the RLM license server, or
- g_licenseServerURL="[http(s)://[ip address]:[port]" to specify the Maxon license server, or
- g_licenseUsername and g_licensePassword to specify the authentication credentials on https://id.maxon.net.
DYLIBs
DYLIBs needed by a plugin can be placed in myplugin\res\libs\osx.
Deployment
The final plugin build for deployment should be created using the "Release" build target.
Notarization
Since macOS Catalina 10.15, all Mac software distributed outside the Mac App Store must be notarized by Apple in order to run by default.
The notarization process beside involving Mac applications, also applies to plugins that are supposed to run in notarized applications.
The notarization process is different depending on the type of file to be notarized (an app or a plugin) or on the final archiving strategy used to deploy the plugin. The notary service accepts disk images (UDIF format), signed flat installer packages, and ZIP archives.
Requirements:
- Apple Developer ID
- XCode 10.1+
- Internet connection
- specific password for the notary tool
Preliminary steps
Notarization requires Xcode 10 or later. Building a new app for notarization requires macOS 10.13.6 or later.
Apple's notary service requires you to adopt the following protections:
- enable code-signing for all of the executables you distribute;
- enable the Hardened Runtime capability for your app and command line targets, as described in Enable hardened runtime;
- use a Developer ID application, kernel extension, or installer certificate for your code-signing signature;
- include a secure timestamp with your code-signing signature (optional if you have enabled Hardened Runtime);
- don’t include the com.apple.security.get-task-allow entitlement with the value set to any variation of true - if your software hosts third-party plug-ins and needs this entitlement to debug the plug-in in the context of a host executable, see Avoid the Get-Task-Allow Entitlement - ;
- link against the macOS 10.9 or later SDK.
Apple Developer Program
Before the Apple notary service process a binary, it's mandatory to have the binary signed with a valid Apple Developer ID certificate. In case of signing applications or plugins signing the binary requires a Developer ID Application certificate. Such a certificate can be obtained once enrolled to the Apple Developer Program either as individual or as an organization.
The Apple Developer Program is not free and an yearly fee is due to get full membership and generate the Developer ID signing certificates. See Apple Developer Program for further details.
- Note
- It's important that the Apple ID used to sign-in in the Apple Developer Program has the two-factor authentication turned on. This authentication mechanism can allow the user to create application password which are used to invoke the command line executable responsible to execute the notarization procedure. This application password is later on referred as YourAppPassword.
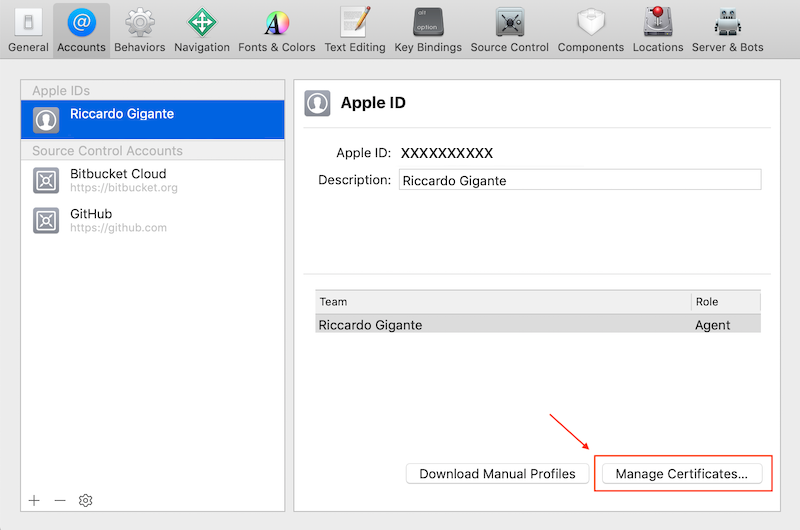
- At least one Apple ID registered to the Apple Developer Program should be used in Xcode and listed among the available Accounts
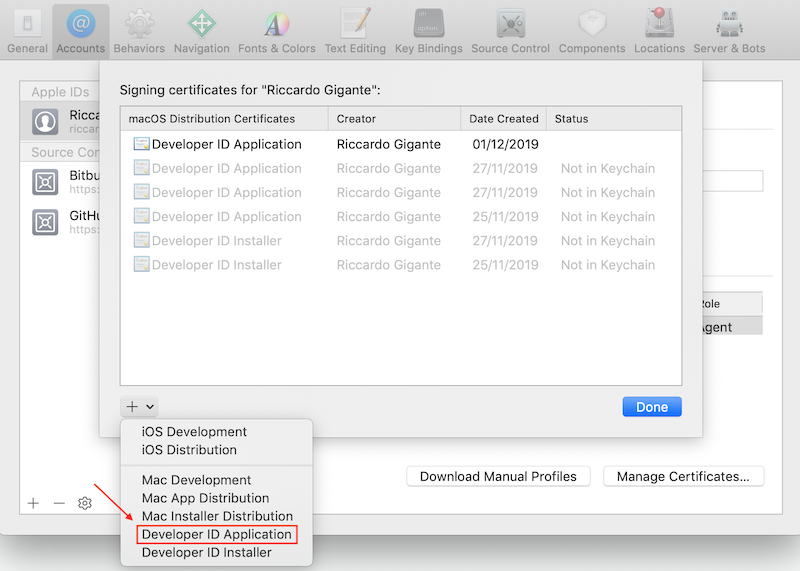
Upon adding an Apple ID owning developer credentials you can add a certificate by clicking on Manage Certificates
the clicking on +
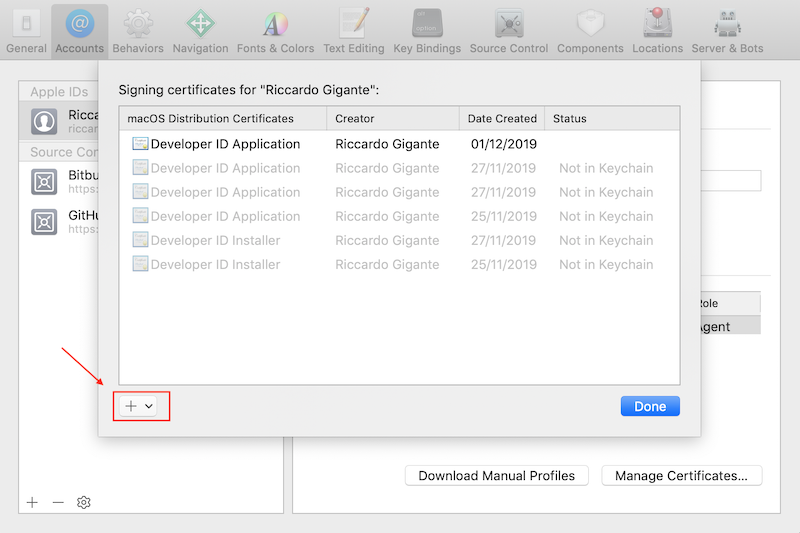
and finally selecting Developer ID Application
Code signing in Xcode
Signing a binary in Xcode is required to successfully complete the notarization process as described in Preliminary steps.
To prepare a project to undergo the notarization process the signing options needs to be specified for the project responsible to generate the binary to be notarized.
Given such a project, select the Targets settings and filter for the string "Signing"

change the values for the following parameters:
- Code Signing Identity
- Development Team
- Enable Hardened Runtime
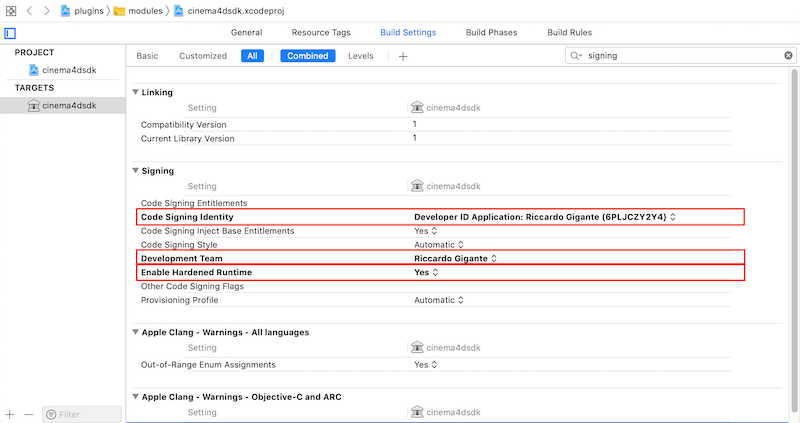
Upon settings up the signing parameters a Release binary of the plugin must be generated by clicking on Product -> Build For -> Profiling .
ZIP-contained plugin notarization
After the creation of the release binary, a ZIP archive should be created containing the plugin and all the other needed files. Considering the case of the cinema4dsdk plugin, upon moving the cinema4dsdk.xlib and the res folder in a proper folder, to create a zip archive of the files, from a Terminal window, execute:
Later on in the process it's requested to provide the value for the ASC-provider:to retrieve the list of allowed providers, from a Terminal window, execute:
and, if successfully executed, the tool should return
To submit the zip-archive to Apple to complete the notarization process, from a Terminal window, execute:
and, if successfully executed, the tool should return
- Note
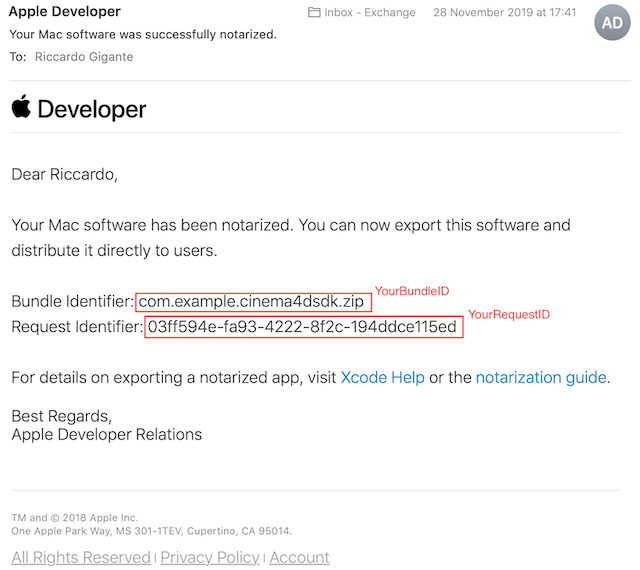
- The RequestUUID represents the notarization request unique identifier and must be used when further details are queried from Apple about the state of the process.
Within a certain amount of time, Apple Notary Service notifies the user about the notarization process being finished by sending an email to the address bound to the registered Apple ID.
Finally it's possible at anytime to check the notarization queue executing
and, if successfully executed, the tool should return something like
- Note
- Upon the package is approved, it can be safely deployed to customers, since, from that moment on, macOS can be acknowledged by Apple to be allowed to run the binary(-ies).
- Warning
- The notarization process must be repeated everytime the binaries in the archive are changed.