c4dpy Manual
Describes how use the standalone Python interpreter shipped with Cinema 4D.
c4dpy is a standalone Python interpreter that is shipped with Cinema 4D and works similarly to the python app shipped with a standard CPython. But unlike the standard Python interpreter, c4dpy is also a headless Cinema 4D instance, i.e., a Cinema 4D instance without its GUI. Apart from the normal functionalities of a Python interpreter, such as running scripts, and running in interactive mode, c4dpy can do most things a normal Cinema 4D instance can do: It can load files, construct scenes, save files, start renderings, or run plugins; do everything as long as the functionality does involve any GUI. It is therefore for example not possible in c4dpy to get the content of a viewport in a document or to run a dialog as both would involve GUI interactions.
Table of Contents
Running c4dpy
c4dpy is available on Windows and macOS, and is located in the Cinema 4D installation directory. On Windows, c4dpy can be run with the executable c4dpy.exe. On macOS, these steps must be followed to run c4dpy:
Right-click on c4dpy.app and select Show Package Contents.
Navigate to the Contents/MacOS directory.
Drag the c4dpy file into a terminal window and press return.
Note that starting the c4dpy executable will take considerably longer than a standard CPython interpreter, as it is setting up the Python environment and the headless Cinema 4D instance. When running c4dpy for the first time, the user will be prompted with a login menu a shown below:
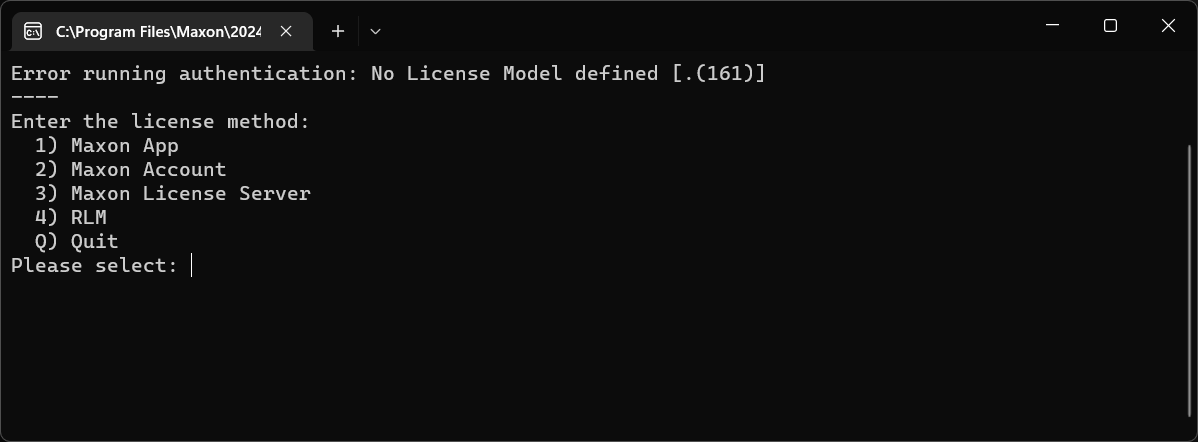
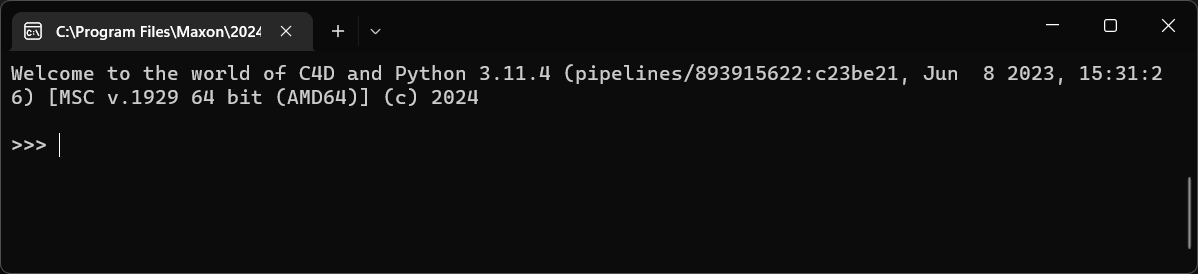
The recommended login method is Maxon App. Apart from a license sever environment, you can also login with Maxon Account, i.e., just as you would with id.maxon.net, using your account credentials. An account login only does work for non-federated accounts, i.e., accounts where you login is not redirected to Apple, Google, or Facebook. Once you have have verified your license, the Python REPL interactive interpreter console will start:

On all subsequent runs, the login menu will not appear, and the Python REPL interactive interpreter console will start immediately.
Command-line Arguments
c4dpy supports a subset of the Cinema 4D and CPython command-line arguments. The following table lists the supported arguments:
Argument |
Example |
Description |
|---|---|---|
|
|
Encrypts the given pyp file just as the command in the Cinema 4D menu |
|
|
Sets the license model, possible values are |
|
|
Sets the user handle when using the |
|
|
Sets the user password when using the |
|
The first unnamed argument to the c4dpy is a Python script to run. Note that this is a Python script, not a Cinema 4D Script Manager script, global variables like |
|
|
|
Executes the passed Python code in command. |
|
|
Searches |
|
|
Prints the version number of the Python VM used by c4dpy, e.g., |
|
|
Issues a warning when comparing |
|
|
If given, Python won’t try to write |
|
|
Ignore all PYTHON environment variables, e.g. |
|
|
When a script is passed as first argument or the -c option is used, enter interactive mode after executing the script or the command. |
|
|
Removes the user |
|
|
Disable the import of the module |
Editor Integration
Since c4dpy is just a Python interpreter like any other, it can be integrated with the developing environment of your choice. Make sure to have run the c4dpy executable at least once before trying to integrate it with an editor, so that the licensing method hast been set.
Warning
For c4dpy R21 to S24, the VS code Python extension can load indefinitely upon auto-discovering interpreters. Please turn off interpreter auto-discovery in such case. See also c4dpy.exe and VS Code.
Sublime Text
This guide has been written for SublimeText 3.2.2, some of the described steps might be slightly different for future or past versions of the application.
Run
Tools > Build Systems > New Build Systemfrom the main menu to create a new build system.
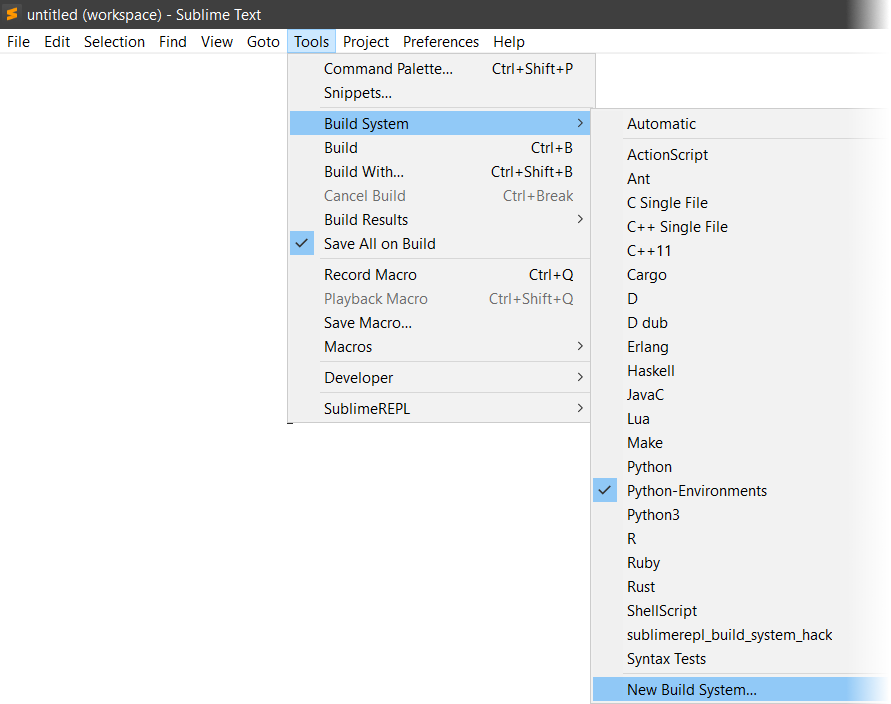
SublimeText will open a file for you, replace its content with the following:
1 2 3 4 5 6 7 8 9 10 11 12 13 14 15 16 | { "selector": "source.python", "cancel": {"kill": true}, "variants": [ { "name": "c4dpy", "cmd": ["c4dpy", "-u", "$file"], "file_regex": "^[ ]*File \"(...*?)\", line ([0-9]*)", }, { "name": "CPython", "cmd": ["py", "$file"], "file_regex": "^\\s*File \"(...*?)\", line ([0-9]*)" } ] } |
This example assumes a separate standalone CPython installation to be on the machine which we want to run alongside with c4dpy in this Python build environment. If this is not the case, one can delete the lines ten to fourteen in the file listing above. This example also assumes the user to having set up environment variables for both the CPython and c4dpy interpreter;
c4dpyfor c4dpy andpyfor CPython. Alternatively the firstcmdargument can also be an absolute path, e.g.:
1 2 3 4 5 6 7 | "cmd": ["c4dpy", "-u", "$file"], // Should become something like this, modify to your Cinema 4D directory. "cmd": ["C:\Program Files\Maxon\S24\c4dpy.exe", "-u", "$file"], "cmd": ["py", "$file"], // Should become something like this, modify to your CPython directory. "cmd": ["C:\compilers\python3.9\python.exe", "$file"], |
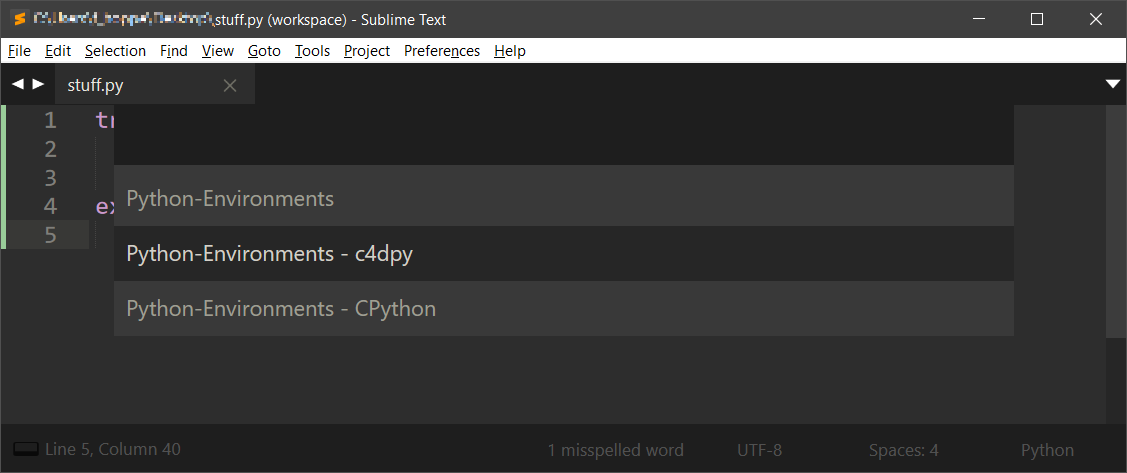
Save the file with
CTRL + S, SublimeText will open a file dialog already set to the user packages path. Save the build environment settings under the name it should appear in menus, e.g., Python-Environments.sublime-build.The build environment will now appear in the build menu to be selected as the active build environment as shown in the screen under point one.
A Python file like shown below can now be run with either of the defined Python interpreters.

Pressing
CTRL + SHIFT + Bor runningTools > Build Withwill cause SublimeText to prompt a popup asking for the interpreter to run the file with.
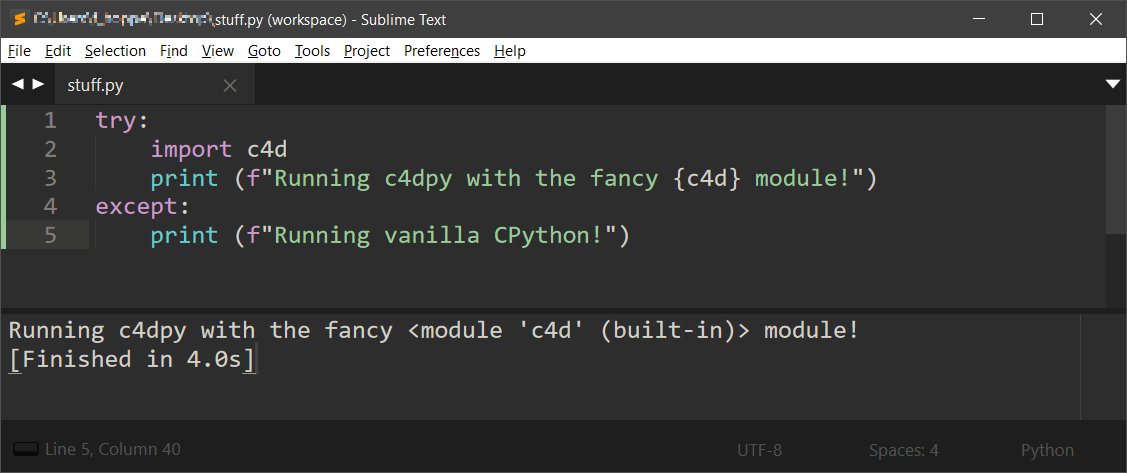
Running the file with c4dpy:
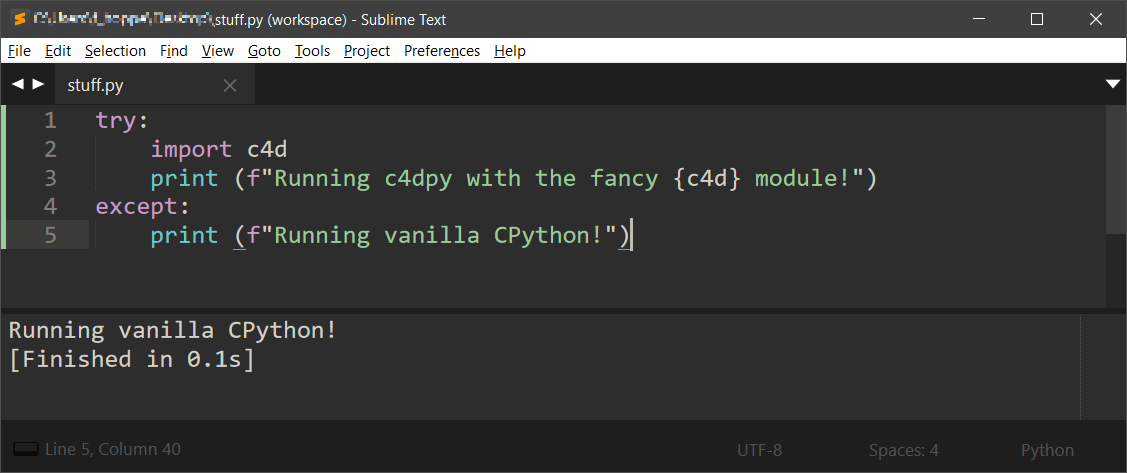
Running the file with CPython:
After having set the sub-environment with
CTRL + SHIFT + Ball consecutive Build invocations (CTRL + B) will run that currently selected sub-environment.
Visual Studio Code
c4dpy can also be run as a Python interpreter in Visual Studio Code.
Open Visual Studio Code and run
File > Preferences > Settings
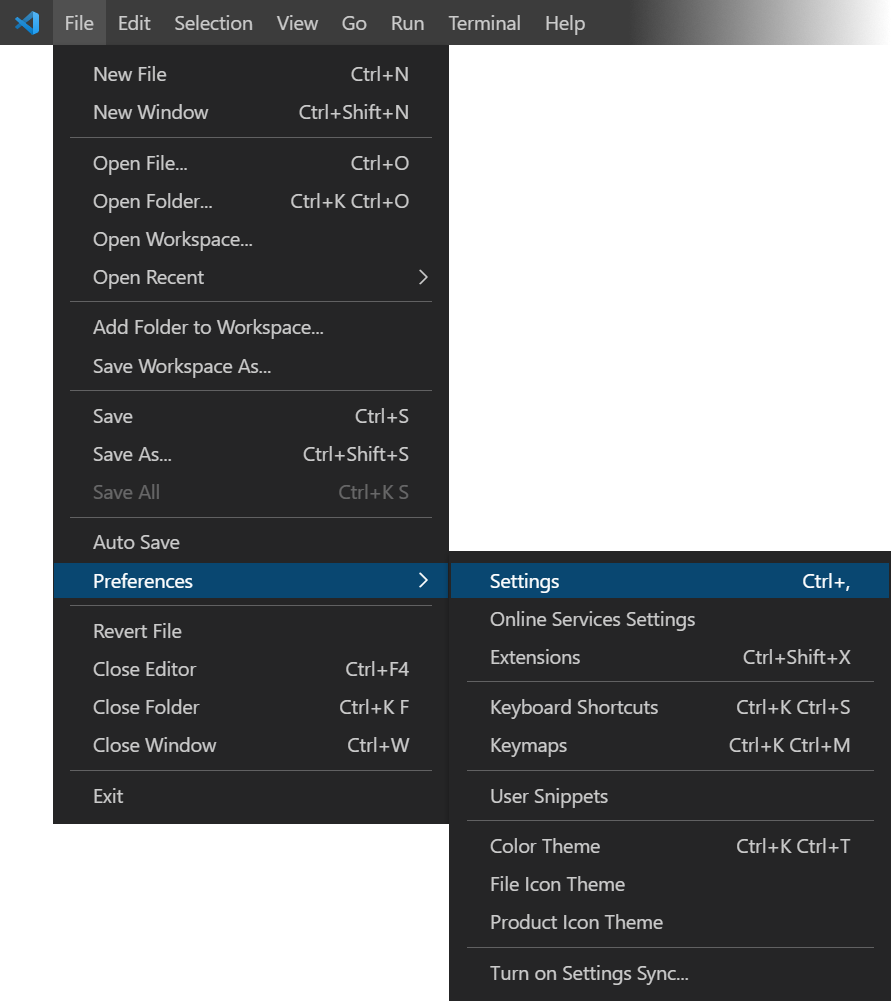
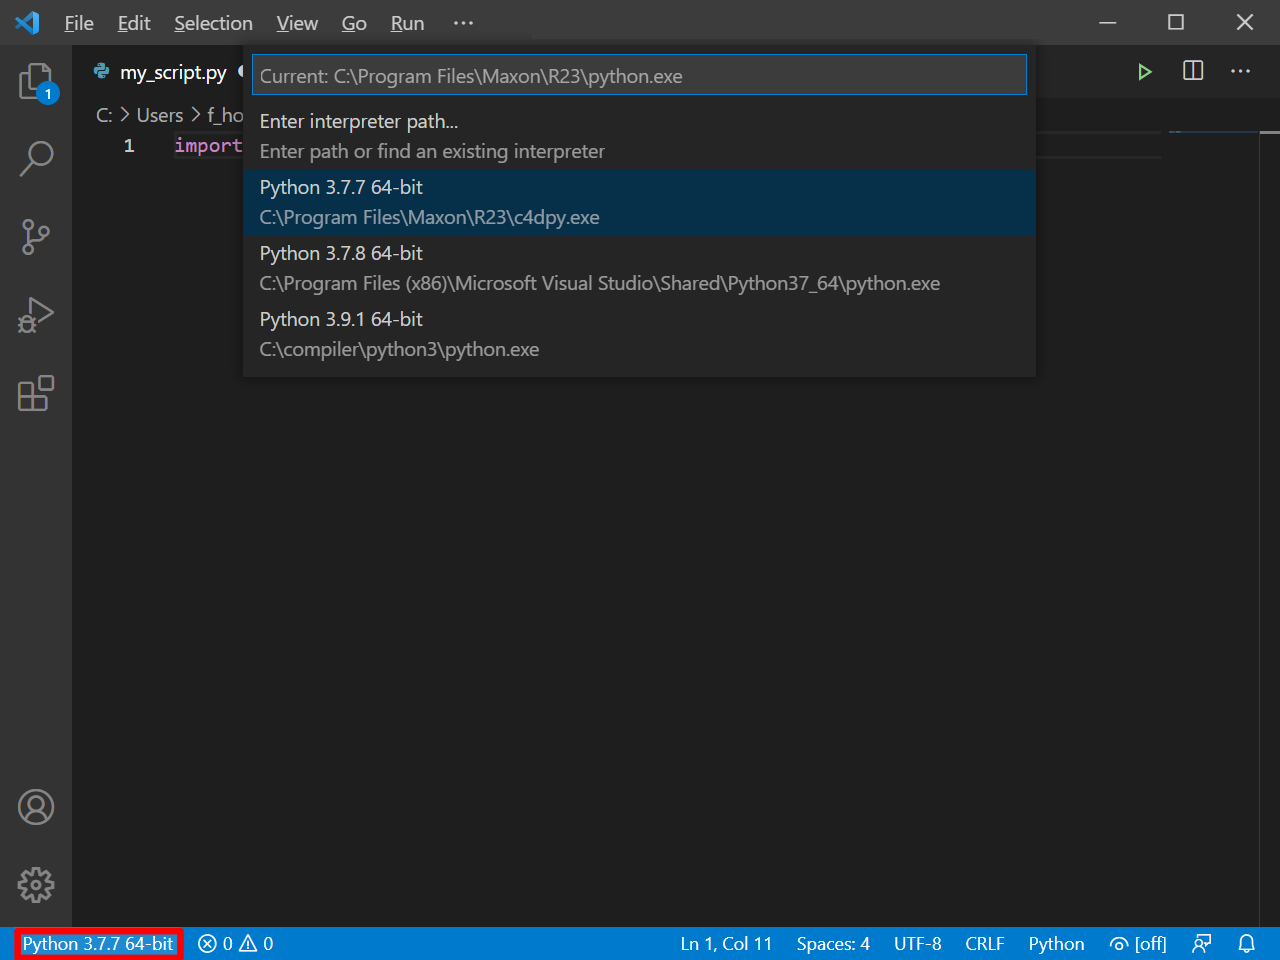
Type ‘Default Interpreter’ into the search bar of the user settings to find the ‘Python: Default Interpreter Path’ setting. Set it to the path of a c4dpy interpreter.
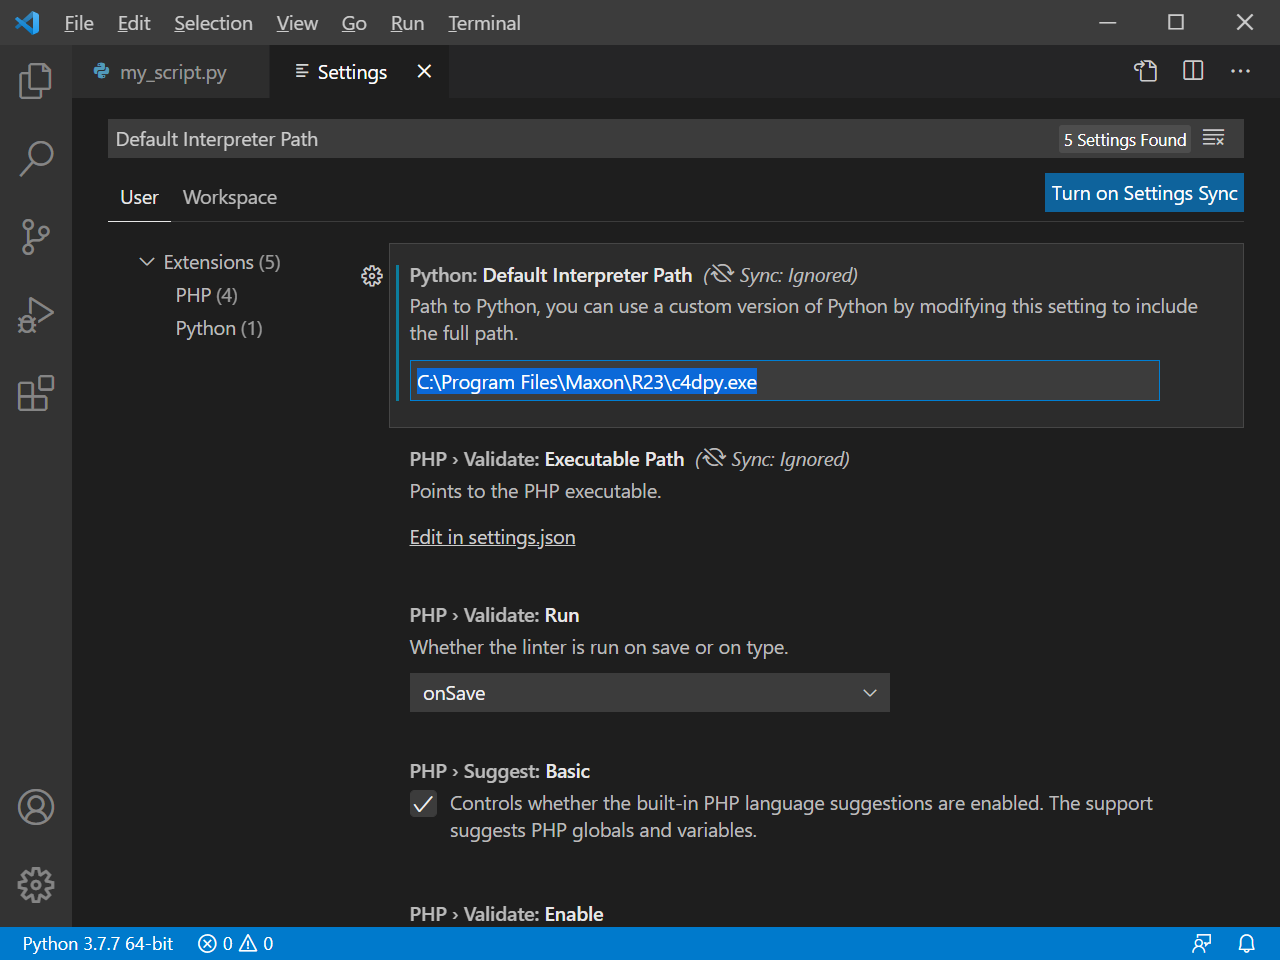
c4dpy should now appear in the available Python interpreters in the interpreter selector in the bottom left corner of Visual Studio Code when having a Python file opened.
With it activated, a file can be interpreted either by pressing
CTRL + F5or by pressing debug play button in the top right corner.

Debugging (
F5) will not work out of the box.
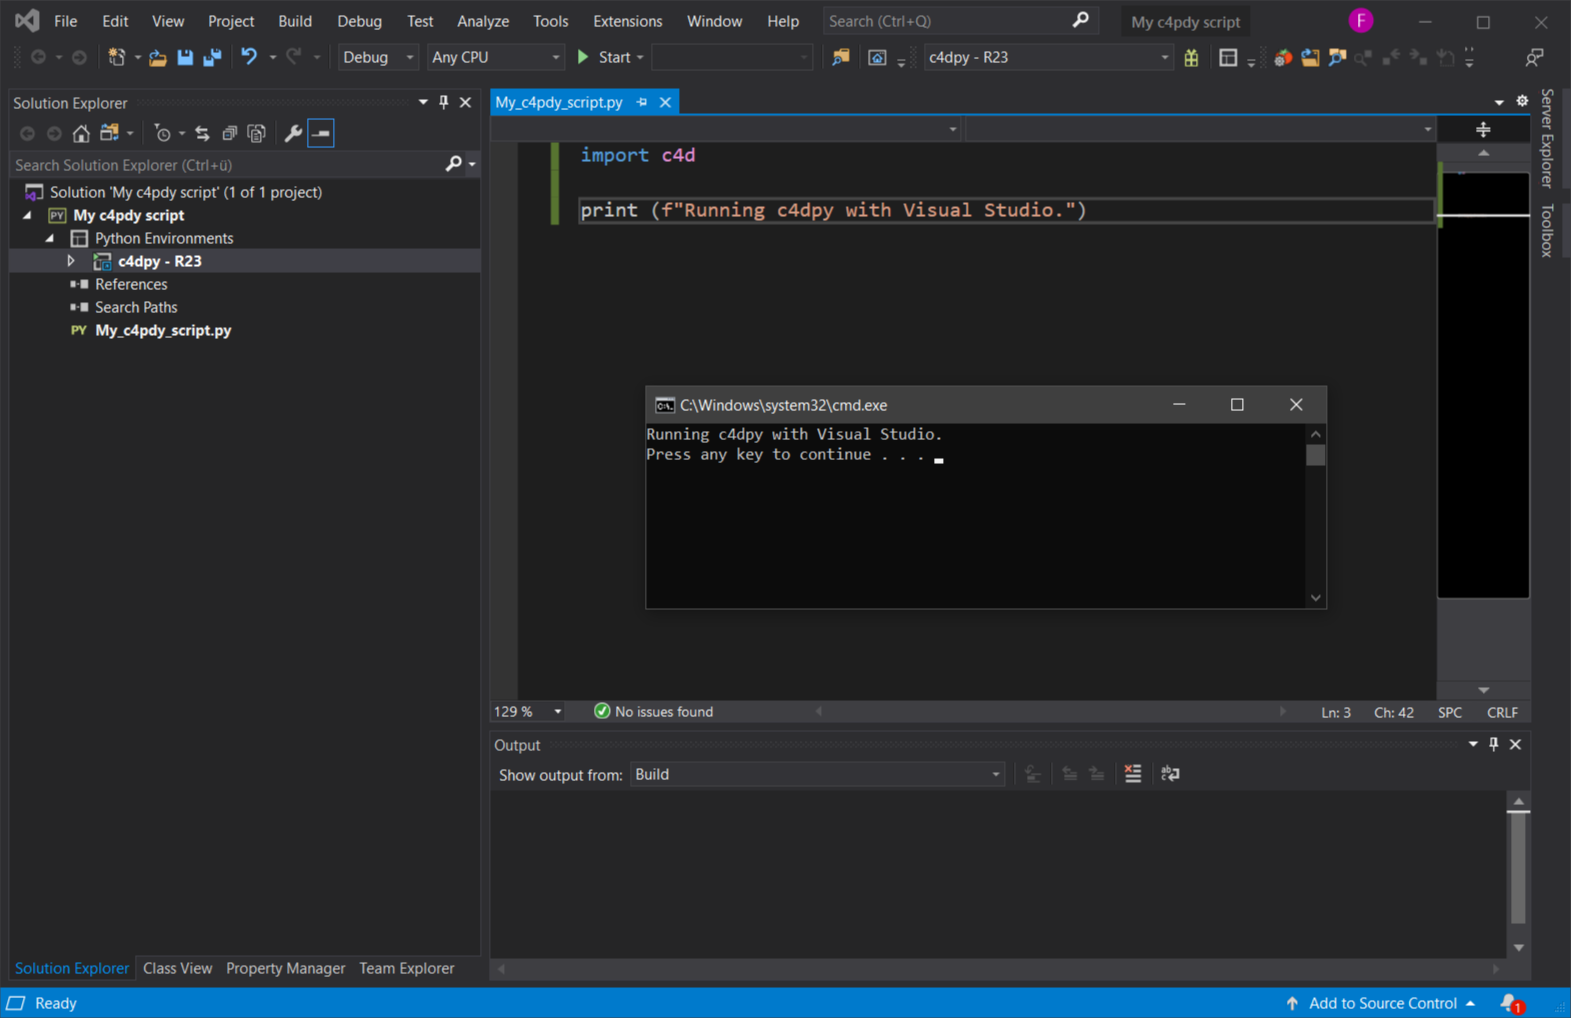
Visual Studio
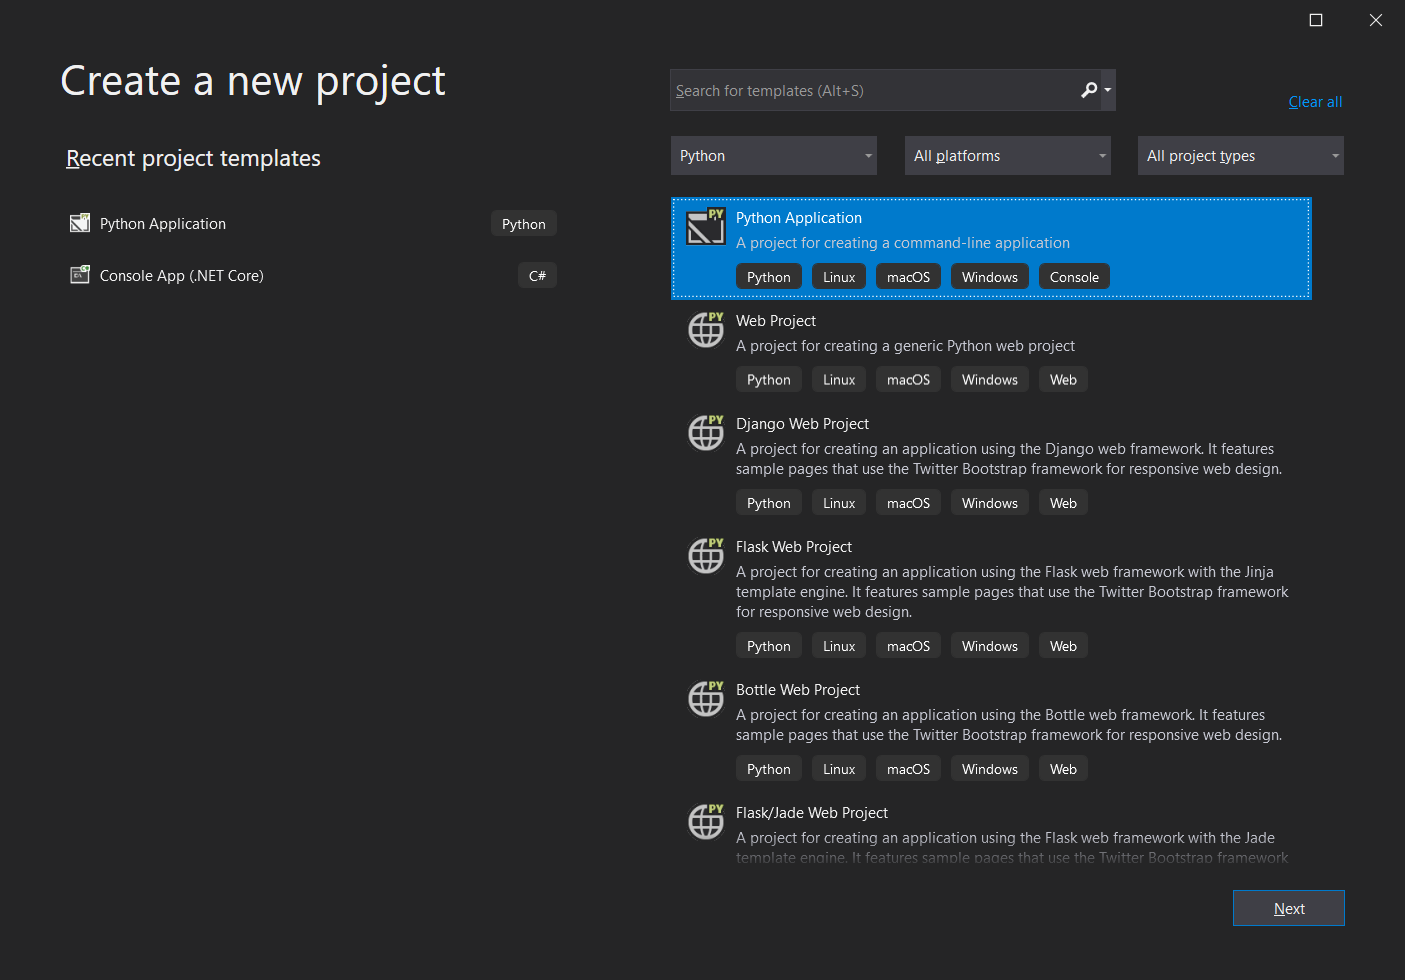
c4dpy has to be setup on a per project basis in Visual Studio.
Open Visual Studio and start a new Python Application project.
In the project add a new Python environment.
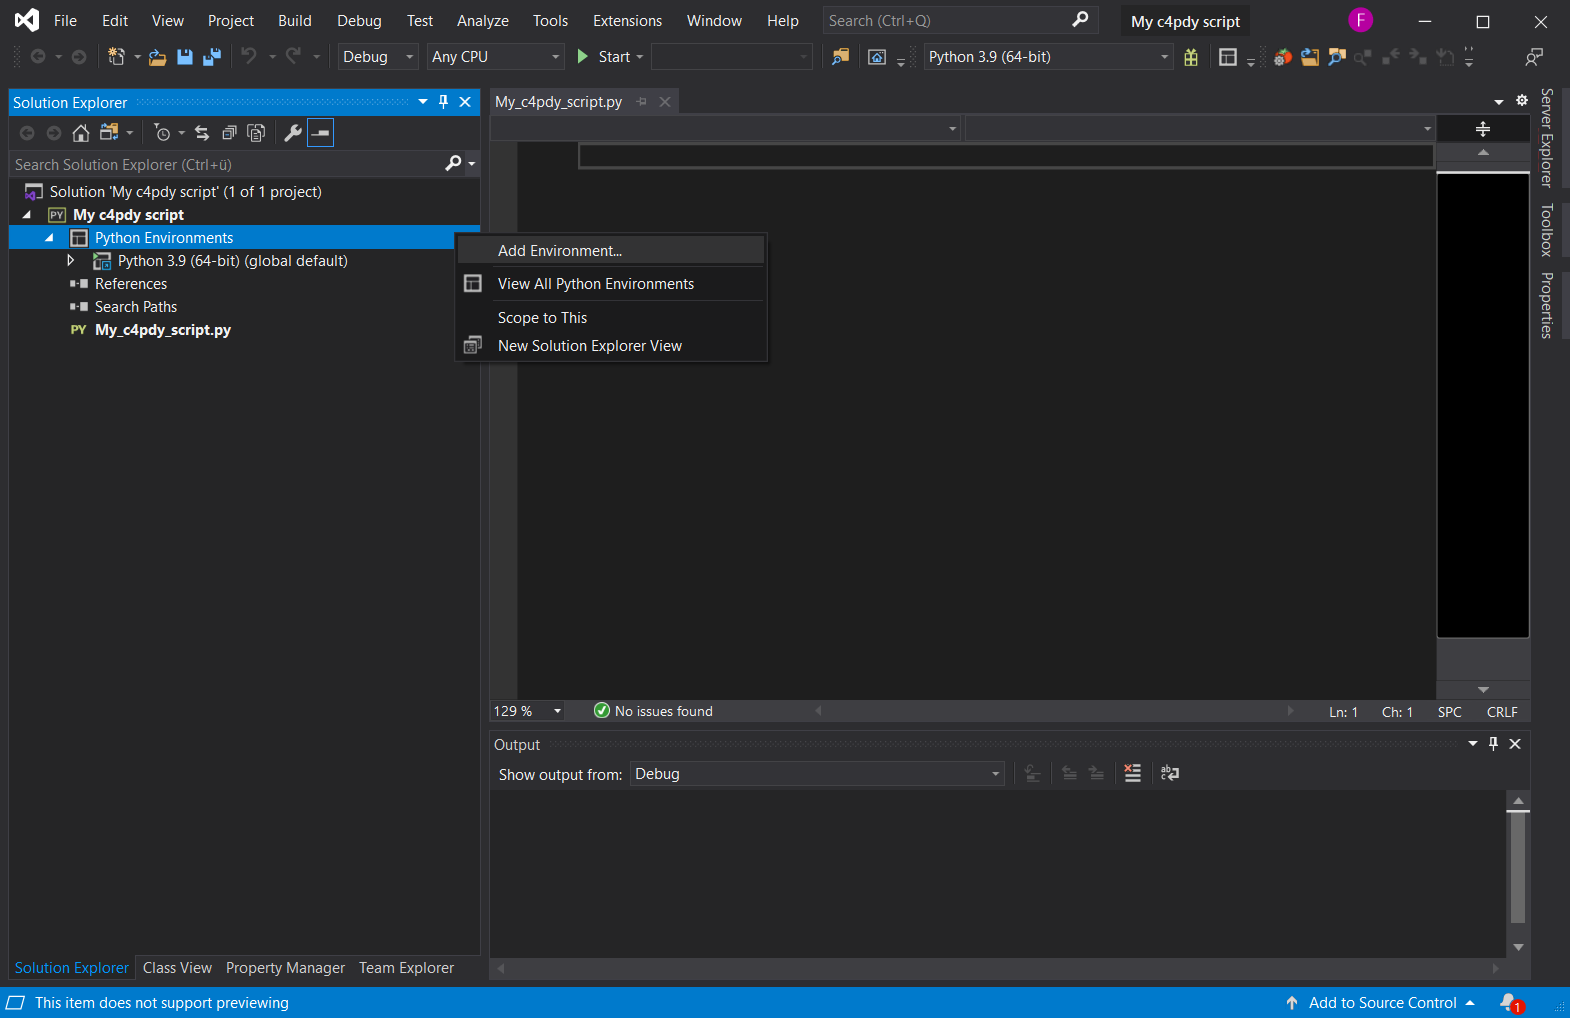
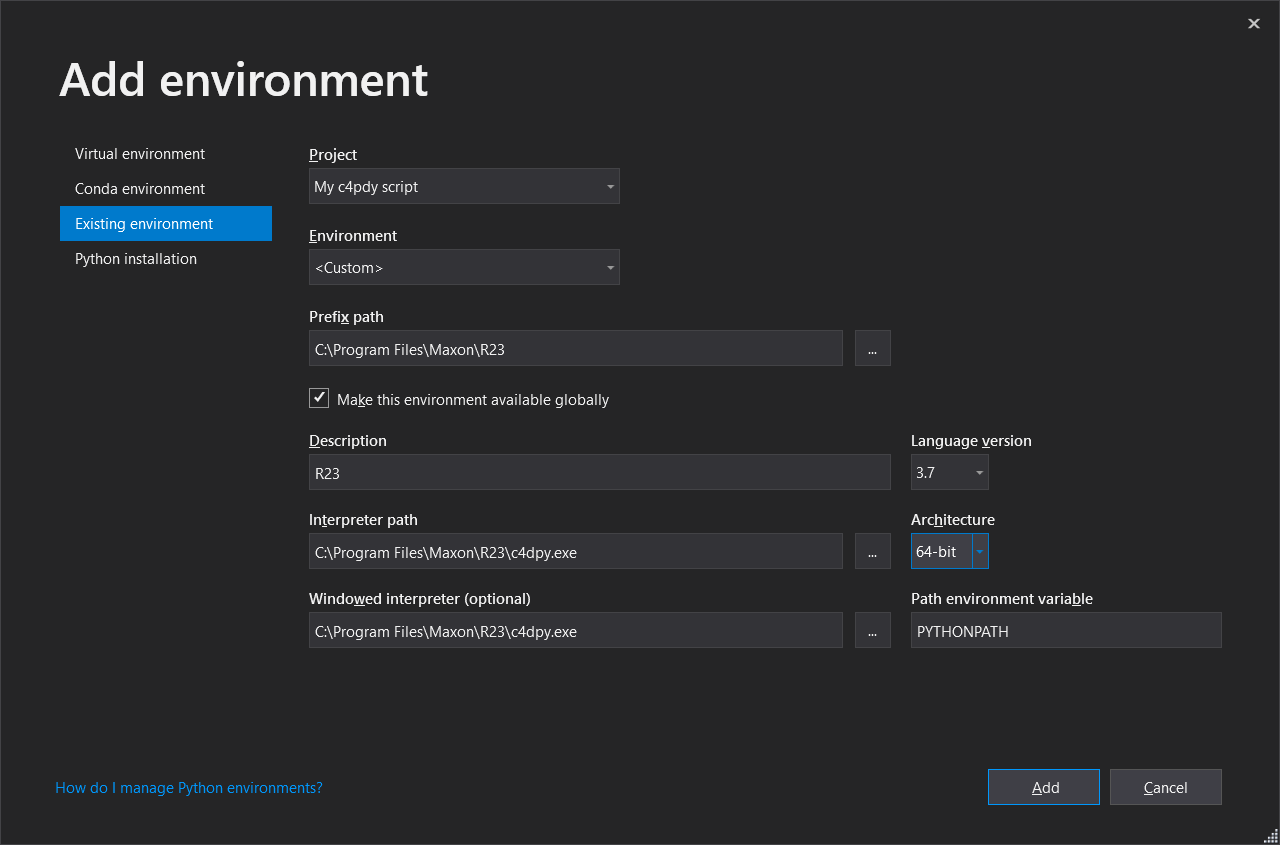
In the dialog select Existing Environment and then setup the values like shown below.
Pressing
CTRL + F5will now run the defined startup file of the project.
Debugging (
F5) will not work out of the box.